Readings for HW 3:
Bayes Rules, from The Economist, 1/5/2006 (handout)
Robots, After All
by Hans Moravec, Communications of the ACM 46(10) October 2003, pp. 90-97. (pdf)
Robot Evidence Grids (only pp. 1-16)
by Martin C. Martin and Hans Moravec, CMU RI TR 96-06, 1996. (pdf is reversed)
As a reminder, visual servoing simply refers to the process by which
Your visual servoing task may use an on-board camera or an off-board camera; it may involve observing the robot directly, or observing landmarks of your own design. It may involve sequential control, e.g., see an arrow and turn until it leaves the field of view, or continuous control, e.g., center on a region of a specific color in order to follow a person or another robot. The task is up to you -- and up to the problem you're working towards, but for this week's update, you should show your system using direct visual control.
Integrating vision into your project
We have found that making the vision system a server allows to be integrated into
any existing robot-control system relatively smoothly. The finite-state-machine that
executed the Sense-Plan-Act loop will act as a client, grabbing data from
the vision server each time through the loop.
The exact messages passed back and forth between server and client will depend on the data a particular project needs to extract from the video stream. There is already code in both the Mac OS X and Windows versions of the vision code that sets up a socket server. There, you will want to alter the format of the messages to pass along information particular to your project's landmarks. On the control side, you can use the client.py file, below, as a starting point for grabbing that information into your FSM.
The server.py file is provided simply to help prototype and debug your client code.Warning -- note that the way that the vision code's server and the above Python client interact is by having the server always send a reponse message to a client's request. If you use the existing code as a starting point, be sure you maintain this interaction, or you will find the server (and/or client) unresponsive...
A software framework for Windows/Mac OS X
You should use the OpenCV 1.0 library for this project if you are using
Windows. You will also need the (free) Express Edition of Microsoft's Visual
C++ compiler. Here is OpenCV and a .zip file to get you started:
  int windowXCoord = 1275;
  int windowYCoordOrig = 100;
  int windowYCoordDelta = 300;
  cvMoveWindow( "InputImage", windowXCoord, windowYCoordOrig );
References for these systems... There are a number of places to find documentation for OpenCV and the cvBlobsLib connected-components library. For example,
These .zip files above are simply a starting point for displaying and processing the cards -- the cards are included, as well. Here are the basics (you don't need a camera attached...):
Other keypresses
The code also supports a number of other user events in order to
define colors, change state, etc. The file notesOnWindowsVisionCode.txt
describes these, and for reference, they are copied here as well:
Key presses supported, among others:
-----------------------------------
escape: quit the program
space bar: stop and get one frame
R: reset current color definition
A: on/off color definition
shows the current color definition (draws in bright cyan)
B: go backwards through the pictures
S: save the current image
0: (zero) turn blobs on/off
!: save red definitions 1: load (draws in bright red)
@: save yellow definitions 2: load (draws in bright yellow)
#: save blue definitions 3: load (draws in saturated blue)
$: save green definitions 4: load (draws in bright green)
%: save pink definitions 5: load (draws in pink-ish)
** You need to load definitions in order to make that the current
color, under consideration
** After changing the definition, be sure to save it back to a file!
Z: reload all color definitions
** it's a good idea to run this after changing/saving several definitions
-: remove pixels from current definition
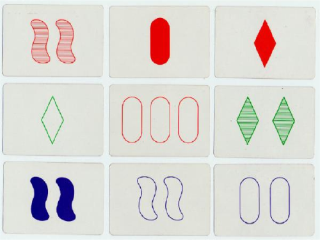
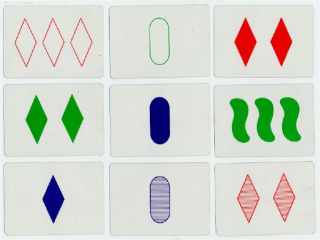
s: play set...
What your program should do
The code provides an interface that displays nine randomly-chosen images from
the set of 81 when the lower-case-s key is pressed. You should
alter the example function processSetCard and add other functionality
of your own design so that
the computer determines the symbol characteristics for each of the nine cards. It
should indicate at least one set that is present among them
(or indicate that there isn't one).
The program should highlight the cards that make up the set, e.g., by adding
a thick colored rectangle around the border of the three cards.
Constraints
One constraint is that your program has to be "general-purpose". Of course, it would be
possible simply to compute the label of each image once and remember it - don't do this.
Instead, the program should use a general label-finding algorithm (probably borrowing from
the algorithms we discussed in class) and it should run that algorithm on each card, whether
it is new or not. In essence, you should be able to additional images to your program
and it should have a chance of working. Whether it actually works on additional images depends
on lighting conditions, the camera's pose, etc. Since Set is subsidiary to
the robotics projects, we won't worry about those details for the game.
The cards
To avoid the variations in lighting, etc. that make the image-processing
task even more difficult than it already is, the cards are provided as a
set of 81 images. They are already contained within the archive above,
but if you would prefer to grab only the images, they are available from
this link: setImages.zip
If you have already invested lots of time into your vision code (and several
teams have!) you might find it easier to simply take these images and use them with your
system.