In VC7, create a new Visual C++ Project. Select "Win32 Console Project" as the template. Create the project on your desktop with the name "MyOpenGL." You'll be presented with an "Applications Settings" option; click on it then choose "Empty Project."
Download openGL.cpp to
the project folder. Open the file from the VC7 interface and right-click to add it to the project.
Build the project and run it. The application opens two windows; one is a console window and the
other is the OpenGL window. The latter shows a
red triangle.
OpenGL is a graphics library but it does not provide an interface to your windows system. This allows OpenGL to remain device independent. Interacting with window devices is left to a separate library call glut . When the scene is drawn, OpenGL draws to a frame buffer provided by glut, then glut transfer the frame buffer to a window on your screen. The first few lines in main() initialize glut and various glut parameters. The line
glutInitWindowSize(400, 600);sets the window width to 400 and height to 600 (It also specifies the size of the frame buffer). Change this line to
glutInitWindowSize(400, 400);The line
glutCreateWindow("My First OpenGL program");
creates the OpenGL window with the specified title.
Change the string to "My Second OpenGL program." If you are still
running the original application ("My First OpenGL program") exit by
closing both windows.
Then recompile and run the new version. (If you try to recompile while the
application is running you'll get a link error.) The OpenGL window
should be square and have the new title. The frame buffer is drawn by the display() function. The last line
glFlush();causes the frame buffer to be transferred to the screen. Add the line
cout << "In display." << endl;at the beginning of the display() function. Recompile and run the program. You should see the message written to the console window. This is because glut automatically calls display() when the screen needs to be drawn. If you resize the window, you'll see that display() is called again.
We tell glut that display() is the function that draws to the frame buffer by
registering it for callback in main() with the command
glutDisplayFunc(display);
Comment out this line of code, recompile, and run the program. What happens? Be sure to uncomment the line before going on to the next step.
Note, we don't have to call this function display(), elephant() would work as well, as long as we register the function it with glut. (Of course, for the sake of people who might need to understand your code, display() is a better name.)
The line
glClear(GL_COLOR_BUFFER_BIT);in display() draws the background of the OpenGL window. Comment out this line of code, recompile, and run the program. What happens? (If nothing happens try resizing the window to make it larger.) Uncomment the line before continuing.
The background color is pre-set in the init() routine by the command
glClearColor(0,0,0,0);Replace this line with
glClearColor(0,0,1,0);then recompile the program and run it. The background of the OpenGL window should be blue.
Colors in OpenGL are typically represented in RGB or RGBA mode. The A in RGBA is the alpha channel, which is used to specify transparency. Even if you don't use transparency, the glClearColor() command requires that you specify the alpha channel. Zero is a good default value for the alpha channel.
The background color is just one of many state variables that OpenGL uses. Most have default values so you don't have to worry about them unless you want to use something other than the default. Note that we could set the background color in display() instead of init(), but then it would be set every time the screen has to be redrawn. OpenGL is meant to be very fast so, in general, you should set OpenGL state variables, like the background color, only as often as you need to. In this application the background will always be blue, so we set it once in init().
The code
	// draw a red triangle
	glColor3f(1,0,0);
	glBegin(GL_TRIANGLES);
		glVertex3f(-3,-1,-8);
		glVertex3f(3,-1,-10);
		glVertex3f(0,3,-9);
	glEnd();
in display() draws a red triangle with vertices at (-3,-1,-8),(3,-1,-10), and (0,3,-9). OpenGL uses a right handed coordinate system; from the viewer's perspective positive x is to the right, positive y is up, and positive z is out of the screen toward the viewer.
Let's modify display() to draw another triangle. Immediately after the red triangle code shown above, insert the following.
	// draw a green triangle
	glColor3f(0,1,0);
	glBegin(GL_TRIANGLES);
		glVertex3f(-1,-1,-5);
		glVertex3f(1,1,-5);
		glVertex3f(0,1,-5);
	glEnd();
Recompile and run the program. You should now see a green triangle in front of the red one.
Next move the red triangle code so it immediately follows the green triangle code. Recompile and run the program and you'll see that the green triangle is now behind the red one. From our viewpoint in 3D space, the green triangle should be in front of the red one. OpenGL can figure out what is in front of what by performing hidden surface removal.
To have OpenGL perform hidden surface removal we first need to provide a depth buffer. A depth buffer is similar to the frame buffer but instead of recording the color of a point on the scene object, it is used to record the distance from the viewpoint to that point on the scene object. (We'll discuss this in greater detail in lecture.) The depth buffer is also created by glut. Change the line
glutInitDisplayMode(GLUT_SINGLE | GLUT_RGB);in main() to
glutInitDisplayMode(GLUT_SINGLE | GLUT_RGB | GLUT_DEPTH);OpenGL has a state variable that controls whether or not hidden-surface removal is performed. To set this variable, add the code
 	// enable depth buffering
 	glEnable(GL_DEPTH_TEST);
in the init() function. Finally, we need to re-set the depth buffer each time we re-draw the scene. Change the code
	// clear buffers
	glClear(GL_COLOR_BUFFER_BIT);
in display() to
	// clear buffers
	glClear(GL_COLOR_BUFFER_BIT | GL_DEPTH_BUFFER_BIT);
Recompile the code and run the program. The green triangle should appear in front of the red one.
Glut provides support for drawing a variety of shapes (including a teapot). To draw a sphere add the code
	glColor3f(1,0,1);
	glTranslatef(0,0,-5);
	glutSolidSphere(1,10,10);
in display() after the triangle code. Recompile the code and run. You should see a purple sphere-like object.
Change the line
glutSolidSphere(1,10,10)call to
glutSolidSphere(0.75f,20,20)Recompile and run the program. The sphere-like object should be smaller but more sphere-like. The first parameter to glutSolidSphere() is the radius of the sphere; the second two parameters control the resolution of the sphere.
Remove the sphere code before proceeding.
OpenGL will rotate, scale, and translate scene objectives for us. Modify the red triangle drawing code in display() as follows:
	// draw a red triangle
	glColor3f(1,0,0);
	glRotatef(90, 0,0,1);
	glBegin(GL_TRIANGLES);
		glVertex3f(-3,-1,-8);
		glVertex3f(3,-1,-10);
		glVertex3f(0,3,-9);
	glEnd();
Recompile and run the program. The red triangle should now be rotated 90 degrees about the z axis. The functions glScalef(float sx, float sy, float sz) and glTranslatef(float dx, float dy, float dz) perform the scale and translate tranforms. If we wanted to scale using doubles, we would use the function glScaled(double sx, double sy, double sz). Yes, OpenGL was developed long ago, before modern concepts like polymorphism were even considered.
Let's animate the green triangle to move through the world. Create a global variable (don't tell anyone I said that ;0 ) as follows:
float move=0;and an idle() function that updates move.
	void idle()
	{
		static float increment=-.0001;
		move+=increment;
		if (move>2 || move <-20)
			increment *= -1;
		glutPostRedisplay();
	}
Register this function for callback with the following line
glutIdleFunc(idle);in main() where the other callback functions are registered. Also include the function prototype at the top of the file with the other function declarations.
The idle function will be called whenever the program is idle. The glutPostRedisplay() command tells OpenGL to call the display() function at the next opportune moment. We could have called display() directly but that is almost never a good idea. Use glutPostRedisplay() when you want the window redrawn. Modify the green triangle code as follows.
	// draw a green triangle
	glColor3f(0,1,0);
	glTranslatef(0,0,move);
	glBegin(GL_TRIANGLES);
		glVertex3f(-1,-1,-5);
		glVertex3f(1,1,-5);
		glVertex3f(0,1,-5);
	glEnd();
As move is updated the triangle will move backward and forward through our 3D world. Comment out the red-triangle drawing code so that we can watch the green triangle as it moves backwards. Compile and run the program. You should see the triangle moving back and (if you wait awhile) forward. You probably will notice that the display is flickering. To fix this, we need to use double buffering . Change the line
glutInitDisplayMode(GLUT_SINGLE | GLUT_RGB | GLUT_DEPTH);in main() to
glutInitDisplayMode(GLUT_DOUBLE | GLUT_RGB | GLUT_DEPTH);and replace the line
glFlush();in display() with
glutSwapBuffers();Recompile the program and run it. The flickering should be gone. Now we have two frame buffers, only one of which is being displayed at any time. We draw to the second buffer and when the drawing is complete the buffers are swapped.
OpenGL translates, rotates, or scales a triangle by multiplying its vertices by an appropriate transformation matrix, called the modelview matrix. This matrix is initialized to the identify matrix in init() by the code
	glMatrixMode(GL_MODELVIEW);

	glLoadIdentity();
When the display() function is called the first time in our application, the modelview matrix is set to the identity, move= 0, and no translation occurs. After the scene is drawn the program goes into idle mode, the idle() function is called, move is updated, and the glutPostRedisplay() function is called. When idle() completes, display() is called a second time. The modelview matrix is still set to the identity matrix but move=-.01. The modelview matrix is updated to reflect a translation in y by -.01. The process repeats. The third time display() is called, the modelview matrix holds the translation by -.01 and move is -.02. The modelview matrix is updated to reflect an additional translation of -.02 for a total of -.03. The process continues.
To further clarify the issue, uncomment the red triangle code, recompile the program, and run it. Now a 90 degree rotation is added in each step.
To prevent this accumulation of transforms we need to re-initialize the modelview matrix to the identity each time display() is called. Add the lines
	glMatrixMode(GL_MODELVIEW);

	glLoadIdentity();
at the start of display() . Now the translation in the i-th call of display() is -.01*(i-1). You should notice that the movement is much slower. To speed it up, change the size of increment in the idle() function. The animation speed depends on the system you are using to run the program.To achieve a constant frame rate (that is machine independent) we could build a timer function.
There is still a problem with our program. The translation command is applied to the red triangle as well as the green one. To correct this, change the green triangle code as follows.
	// draw green triangle
	glColor3f(0,1,0);
	glPushMatrix();
	glTranslatef(0,move,move);
	glBegin(GL_TRIANGLES);
		glVertex3f(-1,-1,-5);
		glVertex3f(1,1,-5);
		glVertex3f(0,1,-5);
	glEnd();
	glPopMatrix();
The command glPushMatrix() instructs OpenGL to push a copy of the current modelview matrix onto a matrix stack. At this point in our code the modelview matrix is set to the identity. The glPopMatrix() command pops the matrix off the top of the stack and sets it as the current modelview matrix. Now the translate command affects the green triangle but not the red one. Pushing and popping the modelview matrix makes it very easy for us to render scene graphs. One this to remember, it is very important that every glPushMatrix() has a corresponding glPopMatrix() and vice versa!
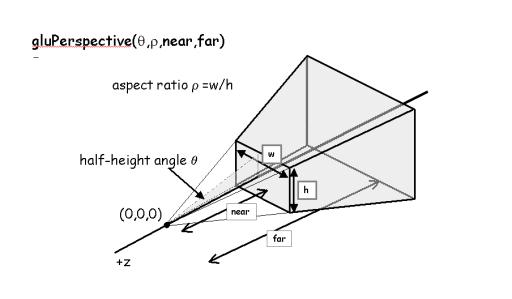
The portion of the 3D world that is visible to the view is called the view volume. Its shape is a truncated pyramid, or frustum . The frustum is specified by the line
gluPerspective(45,1,1,100)in init(). The first parameter is the half-height angle. The next parameter is the aspect ratio of the front face. The next two parameters specify the distance from the viewpoint to the near and far planes. The view volume shape and its specification are described in the following figure.
Change the frustum specification to
gluPerspective(45,1,1,6);You should also disable the animation. Then recompile and run the program. The red triangle should not appear. Why?
Now change the frustum specification to
gluPerspective(45,1,6,100)and recompile the program. Now the green triangle should disappear. Why? Try changing the other parameters and notice the effect they have on the OpenGL window. Restore the original settings before proceeding to the next step.
The objects in the view volume are projected onto the front face of the view volume, which is called the view window, creating the image that is drawn to the frame buffer. The OpenGL window can be resized by the user; when the happens the frame buffer is automatically resized. As a graphics programmer you have to decide how to interepret this resizing; do you want to change the frustum, change how the view window is drawn to the frame buffer, or something else. The reshape() function is registered as the call back function when the user resizes the window by the line
glutReshapeFunc(reshape);in main(). Currently, the reshape() function simply changes the mapping between the image projected on the view window and frame buffer. The command
glViewport(0,0,width,height);tells OpenGL to map the lower left corner of the projected image to the coordinate (0,0) of the OpenGL window; (0,0) is the lower left corner of the window. It also specifies that the upper right corner of the projected image is mapped to the coordinate (width,height) in window space; this is the upper right corner of the OpenGL window.
Change the code to
glViewport(0,0,width/2,height/2);then recompile and run the program. Our scene will be drawn in the lower left quarter of the OpenGL window
Since our view window is square (recall the gluPerspective() specifies an aspect ratio of 1), the image in the OpenGL window will be distorted if the window is resized to be non-square. Try it. To fix this problem modify the reshape() function as follows:
	void reshape(int width, int height)
	{
		if (width<height)
			glViewport(0,0,width,width);
		else
			glViewport(0,0,height,height);
	}
Recompile and run the program. Now the view window is always mapped to a square in the OpenGL window so
its aspect ratio is preserved.By default, the viewer is positioned at the origin. It is often convenient to change the viewpoint using the gluLookAt() command. Add the following immediately after the glLoadIdentity() command in display()
gluLookAt(0,0,-20,0,0,0,0,1,0);This command moves the viewpoint to the point (0,0,-20). The viewer is looking toward the point (0,0,0). The up direction is <0,1,0>. Recompile and run the program. From the new viewpoint, the red triangle occludes the green one.
(Note: The frustum is always positioned with its apex at the viewpoint. It is always centered about toward vector; the toward vector is directed from the viewpoint to the point the viewer is looking at. The top of the frustum is always oriented by the up vector.)
OpenGL applications are typically event-driven. This means that the program waits in an infinite loop for user input. At the moment, your program does not accept user input but you are about to change that. First create a keyboard routine:
	void keyboard(unsigned char key, int x, int y)
	{
		if (key == ' ')
			cout << "You hit the space bar." << endl;
	}
Register the keyboard callback with
glutKeyboardFunc(keyboard);and specify the function prototype at the top of the file. Recompile and run the program. Make sure the OpenGL window is active (click on it) then press the space bar. Your program should write "You hit the space bar." to the console window. Note that the keyboard function is only called when the OpenGL window is active. If you click on the console window and then press the space bar your program won't respond.
In addition to writing to the console window, you can also read from it. Modify the keyboard() function as follows:
	void keyboard(unsigned char key, int x, int y)
	{
		int val;
		cout << "You entered " << key << "." << endl;
		cout << "Now enter an integer." << endl;
		cin >> val;
		cout << "You entered " << val << "." << endl;
		}
Compile and run the program. Click on the OpenGL window to activate it then press any
key. Your program should output the first two messages to the
console window. Click on the console window. Type a number and press return. The program
should print the final message and the number you input.
Try repeating the process without activating the console window. What happens and why?
That will be useful to remember!We can also take input from the mouse. Create the mouse() function shown below.
	void mouse(int button, int state, int x, int y)
	{
		if (button == GLUT_LEFT_BUTTON && state == GLUT_DOWN)
			cout << "You pressed the left mouse button down with the cursor at"
			     << x << " " << y << endl;
		}
Register the mouse function with
glutMouseFunc(mouse);and specify the function prototype.
Compile and run the program. Activate the OpenGL window then left click on the mouse. Your program should output the mouse message. Other values the button parameter may hold are GLUT_MIDDLE_BUTTON and GLUT_RIGHT_BUTTON. The state parameter may also be set to GLUT_UP.
To detect mouse movement you need to use glutMotionFunc or glutPassiveMotionFunc. Details are provided in the glut manual. This is a great resource for understanding what glut can do for you. I recommend you refer to it often.