What to do
You will gradually extend the functionality of the program by doing more and more of SeamCarver.
- [0 points] for looking experimenting with the the GUI before making changes.
- Run the application and click on the button in the GUI labled "redden" to make sure that it turns the image red. Click "Color" to reset the image.
- Click on the "Load" button to load the image in from this URL.
- Find a link to an image online, paste it into the text box, and click "load."
- You can go to a website and right-click (or ctrl+click) on the image, select "Copy Image URL" and paste this into the text box
- You can go to Facebook and open an image. Then right-click (or ctrl+click) on the image, select "Copy Image Location" and past this into the text box.
- Click on pixels within the image and look at what is printed in the console. Find where this is printed in the code.
- Look through the code. You do not need to understand all of it, but get familiar with what files and methods are being called.
- [0 points] for looking at the computeReddenedImage() method.
The function computeReddenedImage() is called when you click on the button labled "Redden" in the GUI.
- (Again) Run the application and click on the button in the GUI labled "redden" to make sure that it turns the image red. Click "Color" to reset the image.
- Look at the method computeReddenedImage() in SeamCarver.java.
- Experiment: Try making some changes to the function computeReddenedImage() to do silly things like blue-en or green-en the image or change only pixels with an odd y-value.
- Experiment with the code until you feel pretty comfortable with it. You can add extra features in the extra credit.
- [10 points] for implementing the getIntensity method.
(Java Hints: BufferedImages)
(Java Hints: Integers vs. Doubles)The SeamCarver object keeps track of the current color image (this.colorImage); the job of getIntensity(x,y) is to return the grascale-equivalent value of the corresponding pixel (x,y) in that color image, which will be an int between 0 and 255.
In the color image, each individual pixel has:
- a redness level (0-255, where 0=no redness and 255=maximum redness)
- a blueness level (0-255),
- a greenness level (0-255),
- an opaqueness (0-255, where 0=completely transparent and 255=totally opaque).
Shades of gray arise when you have equal amounts of red, green, and blue. (Of course, black is 0 for all three, while pure white is 255 for all three.) We could therefore convert from RGB to gray by computing the average of the three.
That is certainly acceptable. A slightly fancier approach is to compute luminosity, rather than the average. Luminosity is a weighted average of red, green, and blue; the weights take into account that people are much better at seeing differences in some colors (e.g., greens) than in others (e.g., blues):
luminosity = 0.21 * redness + 0.72 * greenness + 0.07 * blueness
Here is an example showing the difference between average and luminosity.
- [10 points] for implementing the computeGrayImage method.
(Java Hints: BufferedImages)This method just creates an empty BufferedImage object with the same dimensions as the color image, computes the grayscale intensity at each point, and sets the red, green, and blue values of that point to that intensity.
Once this is implemented the Gray button should start working.
Q: “I implemented this, but when I select the Grayscale image, the picture disappears!”
A: The output of this.getIntensity(...) is a number between 0 and 255. If you pass this as an integer directly to setRGB, it will be interpreted as opaqueness, redness, and greenness all 0 (since the most-significant bits of that small integer are all zero), and blueness equal to the intensity. So, you'll get a 100% transparent blue image. This is very hard to see. Make sure setRGB is being given maximum opaqueness (alpha=255), and equal red, green, and blue values.
- [20 points] for implementing the getEnergy method, to compute the “energy” of a particular pixel in the image.
Let us abbreviate the grayscale intensity at point (x,y) as \(i(x,y)\). Moving horizontally, we can numerically approximate the horizontal derivative (rate of horizontal change in intensity) at (x,y) with any of three methods:
- The forward difference \[ i(x+1, y) - i(x, y) \]
- The backwards difference \[ i(x, y) - i(x-1, y) \]
- The central difference \[ \frac{i(x+1, y) - i(x-1, y)}{2} \]
Numerically, the central difference is considered most accurate. For pixels on the edge, i(x-1,y) or i(x+1,y) might not exist, in which case you would want to use one of the others.
Vertical derivatives are similar. For example the vertical central difference would be computed as \[ \frac{i(x, y+1) - i(x,y-1)}{2}. \]
The paper defines the energy at each pixel using the sum of the absolute value (Math.abs) of two derivatives: the horizontal and vertical rates of change in grayscale intensity. Using the forward difference for both the horizontal and vertical directions:
\[ energy = abs( i(x+1, y) - i(x, y)) + abs( i(x, y+1) - i(x, y) ) \] or \[ energy = abs( horizontal\_derivative ) + abs( vertical\_derivative ) \] - [30 points] for implementing the computeSeam method.
(Java Hints: 2D Arrays)This is the dynamic-programming part of the assignment. A vertical seam is a sequence of pixels, one per row of pixels, such that pixels in adjacent rows are no more than one column apart. Since there's exactly one pixel per row, we only have to remember the columns of each pixel; this can be represented as a single array of integers.
Step one is to create an array table of integers, of the same size as the image. Each entry table[x][y] is the total energy of all pixels in the least-energy seam starting on the top row and moving down to the ending at pixel (x,y). As discussed in the paper, we can define this recursively by \[ \begin{array}{lcl} \mathrm{table[x][0]} &=& \mathrm{getEnergy[x][0]}\\ \mathrm{table[x][y]} &=& \mathrm{getEnergy[x][y]} + \mathrm{min} \begin{cases} \mathrm{table[x-1][y-1]}\\ \mathrm{table[x][y-1]}\\ \mathrm{table[x+1][y-1]}\\ \end{cases} \end{array} \] That is, the least-energy seam ending at (x,y) extends the best seam ending either directly above-and-to-the-left, directly above, or directly above-and-to-the-right. (Note that for pixels on the far left and far right borders, only two of these three possibilities exist.)
The dynamic programming approach is to fill out this table in order of increasing y: first all the entries where y=0, then the entries where y=1, etc.
We also need code to keep track, at each pixel, which of the 3 possible parent seams was chosen. We can do this basically in the same way we did in our Spampede breadth-first-search algorithms. Specifically, creating a second 2D array parent. The idea is that parent[x][y] will be the column of the previous pixel in the best seam ending at (x,y). So, if while computing table[x][y] we decided the smallest of the three possible parent seams was table[x+1][y-1], then parent[x][y] should be set to x+1. If the smallest of the three possible parent seams was table[x][y-1], then parent[x][y] should be set to x. And so on. Finally, when we have filled out the table and parent arrays, we can find the best seam. First, we find the smallest table value in the bottom (maximum y) row. This will be where the seam ends. Using the parent array, we can figure out whether the seam extends up-and-left, up, or up-and-right, to find the next pixel in the seam. We continue working our way up, until we reach the top row. We can collect the columns of each pixel in the seam into an array. (The row numbers will be obvious, since there's exactly one pixel per row.)
Example: If we had a 3-by-3 image whose energies were \[ \begin{array}{ccc} 1 & 2 & 3\\ 8 & 6 & 4\\ 5 & 6 & 5\\ \end{array} \] then table would be \[ \begin{array}{ccc} 1 & 2 & 3\\ 9 & 7 & 6\\ 12 & 12 & 11\\ \end{array} \] and parent would be \[ \begin{array}{ccc} X&X&X\\ 0&0&1\\ 1&2&2\\ \end{array} \] (The top row of parent doesn't matter, since there are no more pixels above.)
Thus, the best seam ends in the lower right corner, in column 2, because that's the smallest value of table in the bottom row. Working backward through the parent array, we find that the next pixel up is also in column 2, and the pixel above that is in column 1. Thus we get the seam (from top to bottom) 1,2,2, corresponding to the original pixels with intensities 2, 4, and 7.
Please make sure you understand where this seam comes from before you start coding.
- [10 points] for implementing the computeSeamImage method.
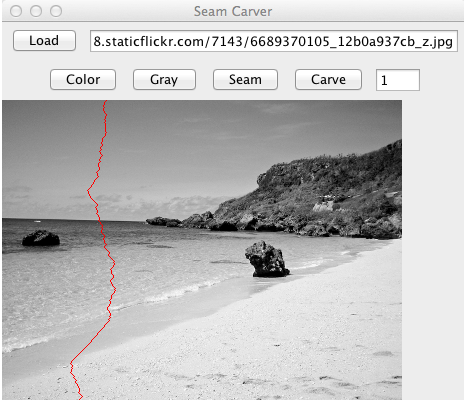
This method should compute a grayscale image, compute the seam, and use the seam to color all the pixels on the seam red. Then return this image. Once this method is implemented, the Seam button should start working.
Here's the seam I got for the default image. Depending on exactly how you compute grayscale intensity, derivatives, and pixel energy, you could get a slightly different seam. But it shouldn't be wildly different (e.g., in the same general region, not going to a corner or along the edge of the image.)
- [20 points] for implementing the carve method.
This method should compute the seam and delete those pixels from the color image stored in the SeamCarver object. In practice, this will mean creating a new color image (slightly smaller), and copy all pixels in the original image into the new image except for the seam pixels. Then set this.colorImage to that new image.
Submission
Zip up your files into an archive named hw10.zip and submit that in the usual way on the submission site. If you create some extra-credit options, you can do so within your main submission or as an extra archive named extra.zip. Either way, please include a finle named extra.txt if you submit any extra-credit options, as noted below.Totally Optional Extra Credit: Fancier Seam Carving (+10 points or more)
If you have submitted SeamCarver.java, you can extend the seam carver with new, cool features. For this part, you may modify any or all files and/or add new files as necessary.- [10+ points] are available for basic improvements
to the user-interface and capabilities. You're encouraged to design an interface
of your own, but as a guide to the kinds of capabilities
you might include, each of the following features (or other
equivalent ones) would be worth 2-3 points. Substitutions
are welcome!
- A button to revert back to the original image
- A pull-down menu (or button) to rotate among different images that are provided (like okinawa.jpg and/or web URLs)
- A checkbox or other interface component to choose between vertical and horizontal seam-carving.
- A button to save the final image to a file in .png format (you will want to investigate ImageIO.write and the File class), and a text field to choose the name of the saved picture on disk.
- A button to show what the original picture would look like if it were horizontally scaled to the current size, rather than being carved to the current size.
- Significantly speed up seam carving (and quantitatively describe the before/after difference.)
- [10+ points] are also available for cool "above and
beyond" features or creative extensions. Again, this is
completely up to you, but here are a couple of ideas for
possibilities:
- for example, full credit on this part would be available if the user could select rectangles of pixels that would guide the seam carving, either always being carved or always being avoided (to obtain the kinds of results shown in the paper)
- similarly, seam-insertion as described in the paper would earn full-credit on this part
- A button that carves in a horizontal direction would earn partial credit on this part. The ability to automatically resize to a specific size, using an optimal order of horizontal and vertical seam removals, would earn full credit.