int[] seam = this.computeSeam();
Picture newPicture = new Picture(this);
Seam carving was first published in this paper by S. Avidan and A. Shamir in 2007. It's a relatively accessible paper -- take a look! That said, all of the background needed should be available from lecture and this write-up.
Seam carving finds the "least-noticeable" seam from top-to-bottom or left-to-right in an image. Then, repeated seam removal allows for image-aware resizing to any smaller size. As with all of CS, this requires quantifying what is meant by "least-noticeable"!
For us, "least-noticeable" refers to the shortest path through the image, where distance is defined to be the total strength of the image edges traversed along the way. The paper offers a seam-insertion algorithm for resizing to larger image sizes, too, though that won't be an official part of this assignment.
This assignment starts with the files in hw9src.zip
In that folder there are many images (used for testing) and a number of .java source files. The only .java file you'll need to edit is Picture.java. The other ones you'll use are PictureTest.java (for running the JUnit tests) and Pixel.java (for accessing the images' pixels). The other files are listed here, but knowing their details are not important for completing this assignment. Here is an overview of all of them:
It's a bit different getting an existing folder to serve as source code within Eclipse. Here are the steps:
Once the hw9src folder is a source folder and JUnit 4 is an included library, you should be able to run the program itself:
First, from the Project Explorer tab, open up the Picture.java file. From Eclipse's Outline tab - or simply scrolling about halfway down the file - you should see the methods grayscale2 and grayscale. These are examples from which to start. Below them are several methods marked with TODO, which are the ones to implement.
You will gradually extend the functionality of the program by writing several methods in the Picture class within the Picture.java file. Here are the signatures of these methods. Afterwards are some thoughts and hints on how to approach this!
In all of our images, whether color or grayscale, each individual pixel has:
The grayscale2 and grayscale functions convert from RGB to gray by computing the average of the three. they also show how to use many of the methods in the Picture class (for example, the constructor to copy and image) and in the Pixel class, e.g., the way to access individual components of a Pixel or to access a whole Color object that, in turn, has all of the color components needed.
To implement the first six methods, adapt one of the two approaches to computing grayscale, either grayscale2 or grayscale (with helper methods). Be sure to try out your image transformations in the graphical user interface (GUI). Also, be sure to test your implementations with PictureTest.java
For the rotateRight method, you will need to use a different
one of the Picture class's constructors in order to create
a brand-new image of a different size. Here is an example call:
Picture newPicture = new Picture(newWidth, newHeight);
From there, you will want to loop through all of the pixels, copying their color from the old image (this) to the appropriate place in the new image (whatever you've named it). Be sure to return the new image in the end! Personally, I looped through the destination picture's pixels and - for each one - computed the location from which to grab the source pixel that corresponded to it. The reverse works equally well.
Note that objects of type Pixel have methods that
will get and set all of the components of a color at once! They use
Java's Color class, e.g.,
Color c = some_pixel.getColor();
some_other_pixel.setColor( c );
some_other_pixel.setColor( some_pixel.getColor() );
These two methods compute a single (grayscale) value from the r, g, and b of a color's channels different than uniform averaging. Luminosity is a weighted average of red, green, and blue in which the weights take into account that human vision has much better visual acuity within some color frequencies (e.g., greens) than in others (e.g., blues):
luminosity = (int)(0.21 * redness + 0.72 * greenness + 0.07 * blueness);
Warning! The order in which you perform the luminosity calculation, above, matters! Be sure to use the order above (adding red, then green, then blue) with the coefficients shown. Small floating-point errors can accumulate and, once in a while, they will change a pixel value by 1 gray level -- not enough to see, but enough to cause a test to fail...
Here is a visual example showing the difference between uniform averaging and luminosity.
The key idea in seam-carving is finding the edge-energy-minimizing path through the image. But what is this "energy"?
Intuitively, the strength of the edges around a particular pixel is that pixel's "energy." High-energy pixels are ones at a strong edge in the image -- those are pixels we're most likely to notice if they disappear. Low-energy pixels are those in the middle of uniform patches of color or gray -- those are least likely to be missed!
To quantify this idea of "energy," we use simple approximations
to the image derivative, which is simply how fast the luminosity
is changing between adjacent pixels. If we abbreviate the luminosity at point (x,y) as \(i(x,y)\). Moving horizontally,
we can numerically approximate the horizontal derivative (rate of horizontal change in intensity)
at (x,y) with any of three methods:
Although the central difference is the most accurate approximation numerically, Avidan and Shamir simply usd the forward energy, which is what we will do.
Vertical derivatives are similar. For example the vertical central difference would be computed as \[ \frac{i(x, y+1) - i(x,y-1)}{2}. \] Again, however, we will use the forward vertical energy.
The Seam Carving paper defines the energy at each pixel to be the sum of the absolute value (Math.abs) of two derivatives: the horizontal and vertical rates of change in luminosity. Specifically, you should use the forward difference for both the horizontal and vertical directions:
\[ energy = abs( i(x+1, y) - i(x, y)) + abs( i(x, y+1) - i(x, y) ) \] except when the pixels are on the edge of the image so that they do not have a "forward" neighbor, either x+1 and/or y+1. Whenever one of those cases happens, your implementation should use the backwards difference. For one pixel (the lower right corner), you'll need to use two backwards differences.Important: again, the test cases provided in PictureTest.java assume that when possible you will use the forward difference. And when the forward difference is not available you will use the backwards difference.
This is the dynamic-programming part of the assignment. A vertical seam is a sequence of pixels, one per row of pixels, such that pixels in adjacent rows are no more than one column apart. Since there's exactly one pixel per row, we only have to remember the columns of each pixel; this can be represented as a single array of integers.
Step one is to create an array table of integers, of the same size as the image. Each entry table[x][y] is the total energy of all pixels in the least-energy seam starting on the top row and moving down to the ending at pixel (x,y). It is sometimes called the cumulative-energy table: it does not contain single energies, but the smallest cumulative energy starting from anywhere at the top and ending at pixel (x,y). As discussed in the paper, we can define the entries in table recursively by \[ \begin{array}{lcl} \mathrm{table[x][0]} &=& \mathrm{getEnergy[x][0]}\\ \mathrm{table[x][y]} &=& \mathrm{getEnergy[x][y]} + \mathrm{min} \begin{cases} \mathrm{table[x-1][y-1]}\\ \mathrm{table[x][y-1]}\\ \mathrm{table[x+1][y-1]}\\ \end{cases} \end{array} \] That is, the least-energy seam ending at (x,y) extends the best seam ending either directly above-and-to-the-left, directly above, or directly above-and-to-the-right. (Note that for pixels on the far left and far right borders, only two of these three possibilities exist.)
The dynamic programming approach is to fill out this table in order of increasing y: first all the entries where y=0, then the entries where y=1, etc.
We also need code to keep track, at each pixel, which of the 3 possible parent seams was chosen. This means creating a second 2D array, perhaps named parent. The idea is that parent[x][y] will hold the column number (x-value) of the previous-row's pixel in the best seam ending at (x,y).
For example, if we had a 3-by-3 image whose energies were \[ \begin{array}{ccc} 1 & 2 & 3\\ 8 & 6 & 4\\ 5 & 6 & 5\\ \end{array} \] then table would be \[ \begin{array}{ccc} 1 & 2 & 3\\ 9 & 7 & 6\\ 12 & 12 & 11\\ \end{array} \] and parent would be \[ \begin{array}{ccc} X&X&X\\ 0&0&1\\ 1&2&2\\ \end{array} \]The top row of the parent array doesn't matter, since there are no more pixels above.
Slightly more generally, if while computing table[x][y] we decided the smallest of the three possible parent locations was table[x+1][y-1], then parent[x][y] should be set to x+1. If the smallest of the three possible parent locations was table[x][y-1], then parent[x][y] should be set to x. And so on.
Finally, when we have filled out the table and parent arrays, we can find the best seam. You won't be surprised that several loops are involved in this!
First, we loop across the bottom row of the table array. As we do so, we find the smallest table value in that bottom row (where y == height-1). The location you find has the minimum cumulative energy and will be where the seam ends. Then, using the parent array, you can determine whether the seam extends up-and-left, up, or up-and-right. Then, you continue working your way up, until reaching the top row.
As this process happens, you can collect each of the column (x) values for the pixels in the seam at each row. A one-dimensional array whose length is the height of the picture is ideal for this: the index into the array is the row number and the contents of the array is the column location of the seam at that row. (Think of it as a "column" array, though it doesn't really have any preferred direction.) My implementation called this array seam.
Continuing from the 3x3 example above, the best seam ends in the lower right corner, in column 2, because that's the smallest value of table in the bottom row. Thus, seam[2] = 2. Working backward through the parent array, we find that the best north-neighboring pixel in row 1 (the one with lowest cumulative energy) is also in column 2, so seam[1] = 2. From there, the best north- neighboring pixel in row 0 is in column 1, so that seam[0] = 1. Thus we get the seam (from top to bottom) {1,2,2}, corresponding to original pixels that had intensities 2, 4, and 5.
(Thanks to Savannah Baron for pointing this out!) We need a rule for breaking ties when defining the seam: more than one of the neighbors in the next-row-up may share the same minimum value!
If there is a tie when you're identifying which Pixel to select on the minimum-cost path, please select the Pixel with the same x value as the first choice (if it is the min or shares the min). Choose the Pixel to the left (x-1) as the second choice (if it's the min but the previous one is not). Finally, choose the pixel to the right (x+1) - if it's the only one with the minimum value.
If there are multiple paths that have same, minimum cost: Select the path that has the minimum X value on the bottom row (i.e. the largest Y value)
Please make sure you understand what table, parent, and seam are before you start coding!
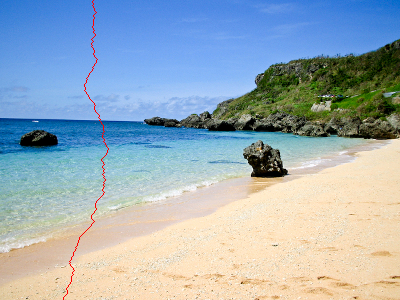
This method should return a copy of this with the
lowest-cost seam, as computed by computeSeam, shown in red.
To do this, you'll probably want to start by (1) computing the
best seam and (2) making a new copy of this. For instance,
these lines will accomplish these two things:
    int[] seam = this.computeSeam();
    Picture newPicture = new Picture(this);
The carve method is similar in spirit to showSeam,
except that instead of coloring the seam red, it removed those pixels
altogether. Because of this, you won't be able to use the Picture
constructor that copies this, because your newPicture
has to have a different size! In this csae, use the brand-new Picture
constructor, e.g., starting with
Picture newPicture = new Picture(newWidth, newHeight);
From there, you'll need to copy pixel colors from this to newPicture. Notice that we always copy the colors of Pixels, not the Pixels themselves... . However, in doing this, your code will need to be careful to skip the seam's pixels and to shift over all of the pixels to the right of the seam by one pixel place to the left.
For the carveMany method, you will want to loop
numSeams times, carving once each time! Note that you
can write a line such as this:
Picture p = this;
The file PictureTest.java has 34 of tests with which to check your implementations. You do not have to write your own tests, though you may write your own testing code in order to understand and/or debug some of the image-processing functions. Several helpful debugging methods have already been written -- feel free to use them:
The file PictureECTest.java has 14 extra-credit tests, as well.
Q. I keep getting the following error: Uncaught error fetching image: java.lang.NullPointerException. A. This error message arises because some, or all, of the images are not in the same folder as the result of your code. Please place any additional images files in the same place!
Q. I keep getting the following error: Exception in thread "main" java.lang.OutOfMemoryError: Java heap space. A. This error message arises when you are trying to load too big a file. Given the current framework, the project works best with moderately-sized images.
Q. I tried to compare two images together using the equals method in the Picture class, and even though they are obviously visually the same, the equals method returns false. A. Check to see whether one of the image files is a JPEG file. The equals method fails on JPEG files because JPEG files use lossy compression to store images: in other words, they compress an image to store it, but doing so causes information to be lost. Since the equals method attempts a perfect information match, it does not work well with JPEG files. This problem will not arise with GIF, BMP, and PNG files, since these file types involve lossless compression.
Q: I run my program many times and after a while eclipse starts to get really slow. A: When you close the picture explorer using the red X at the top right of the window (instead of using File->Exit), Eclipse doesn.t really end your process. Go to the debug perspective in Eclipse and click on the red square to stop each process individually.
Q: Any tips on these two dimensional arrays? A: Here is a helpful resource for Arrays: A: Here is a quick-summary reference on Java Arrays and here is Java's official (longer) tutorial on arrays.
Q: If there is a tie for a minimum path . which path should we pick? A: By default, please pick the cell above in a tie, if there is only a tie between the left and the right pixels, please pick the left pixel.
Q: My energy is off by just a few pixels! What is wrong? A: Inside the energy() method you'll be working with two different Picture objects. The object the method was called on (this) and the one you plan to return. When you call the method getEnergy(x, y) make sure you call it on this and not the Picture object you plan to return because the contents of this won't be changing... .
Q. My showEdges method does not pass the tests, even though my resultant
picture and the test picture look exactly the same. What can I do?
A. If you are using the Pixel.colorDistance method, cast its result to an
integer before comparing it with the threshold.
Submit your Picture.java sourcefile in the usual way under homework 8. You'll onle need to submit PictureExplorer.java if you try some of the additional extra-credit.
For up to +10 points of extra credit, there are several additional image-processing functions in Picture.java. These have tests already written with which to try things out. They also have descriptions in the Picture.java source file:
For even more extra credit, depending on what's implemented, you're welcome to add features and/or other image-processing capabilities by changing the user interface. If you'd like to do this, you'll want to change PictureExplorer.java and submit your new version of that file.
For example, you could include a menu option for