Harvey Mudd College
Computer
Science 154 - Robotics
Lab #3
Woody Hunt
David Ordal
Introduction
For this lab project, we continued to work on our friendly little robot. For the last lab, we finished assembling the robot from the kit. After that, there were still many things left to do to prepare the robot so that we can start doing our navigation research and implementation. The following is a list of tasks that we performed on the robot in order to get it ready to map out and navigate its environment.
Task 1 – Added Bump Sensors
Our robot kit came with holes to mount bump sensors, but without the sensors themselves. We started by mounting two bump sensor switches on the front of the robot. Then we hot-glue-gunned metal strips on the sensors so they would have a feeling range outside of the robot platform. Then we connected the sensors to the bump sensor connections on the NextStep board. We touch-tested the sensors and they worked great. We are looking forward to seeing how they work in a real application after we write some more involved code.
Task 2 – Added Sonar
In order to accurately map its environment, the robot needed sonar-sensing capabilities. This turned out to be a much more involved task than we had originally thought. We used the RugBat kit, designed for the Rug Warrior. We had to figure out how to use the RugBat, without damaging the kit, to work with our platform. We followed directions on a web page that were very helpful. The URL is as follows:
http://www.acroname.com/robotics/info/examples/polaroid-1/polaroid-1.html
First we had to build a circuit board from the following schematic:
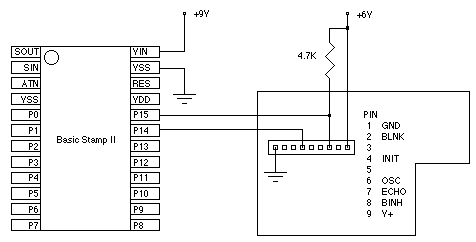
This took a lot of time, as we had to build a new circuit board from scratch. After we finished soldering together the board, we mounted the board on the robot base. Next to the board, we mounted the stepper motor from the RugBat kit and then mounted the Polaroid sensor from the RugBat kit on top of the stepper motor. Then we connected up the sonar sensor to the board we made.
After everything was mounted, we hooked the new board and the stepper motor up to free input slots on the NextStep board. Then we had to figure out how to get the stepper motor to work with the BasicStamp, since the pulse signals work differently than the other motors. Then we calibrated and tested the sonar sensor. The only redeeming factor of this task was that after we finished hooking everything up, it just worked. There was really no trouble shooting involved at all.
Task 3 – Calibrated the Motors
When we tested the motors, the pulse values we gave to the motors were far from linear. The values go from 0 to 100. Going from pulse 1 to 2 or from 4 to 5 were very big jumps in the speed of the motor. Once we got into the 30’s, going up one pulse value had almost no effect. Between 40 and 100, there was no change at all. The motors were going full speed. We needed some way of calibrating the motors that that we could give values to a drive function and we could know that the speed was increasing (or decreasing) at a linear rate (within the drive function).
We solved this problem by laying down a tape measure and timing how long it took the robot to travel a specific distance with a given pulse value. We did several trials with different pulse values and recorded our results in Excel. Then we graphed the pulse values against the calculated feet/second values. We then had Excel give an approximate curve and equation for our results. It turns out that the pulse values are logarithmic. This was all we needed to know in order to write a linear drive function. The results from our tests are below.
Task 4 – Worked on Serial Communication
In order to run our mapping and navigation systems on the PC, we needed real-time two-way communication between the PC and the robot. The only way to accomplish this is through the serial port. Included in the PBasic language are serial in and serial out commands that make serial communication very simple. You just give the command and a numerical value that represents the baud rate, parity and stop bits, along with the string you want to transmit. We tested this with the built-in debugger. The input and output worked perfectly over the serial port.
Unfortunately when we went to test the serial communication using a terminal program it did not work as well. As soon as the terminal program (HyperTerminal) connected with the Com port, the Basic Stamp froze. We also tried connecting though a C++ program and had the same problem. We are currently still trying to fix this bug. The problem will definitely be resolved soon.
Conclusion
Our project is coming along very well. Of course we have had our hang-ups, but overall we are very happy with our progress. Now that the robot is all set up and all the hardware is functioning properly (except for the serial communication which will be working shortly), the next step is to start researching mapping and navigation algorithms. Then we can implement our own mapping and navigation software. We will most likely write the entire mapping, path planning, localization and navigation software in Visual C++ and have the PC talk directly to the Basic Stamp via the serial port. Everything is coming along great; we’re looking forward to making this little guy do some neat stuff!