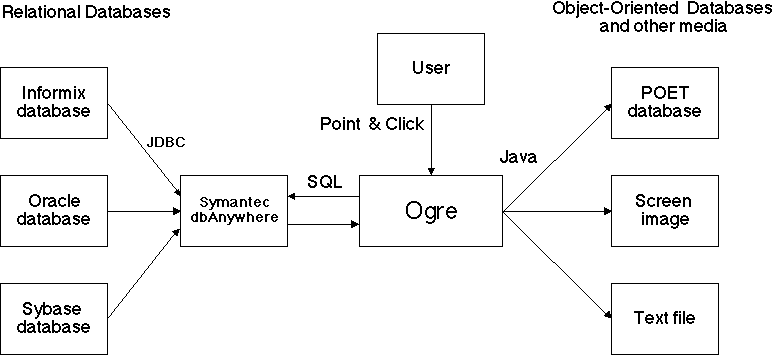
Ogre (Objects Generated from Relations) is a tool that enables users to convert information stored in a relational database to an object-oriented database (ODB) without requiring knowledge of SQL, the standard relational database access language. A graphical user interface enables the user to specify the form of the translation graphically.
The current version of Ogre is intended to target a POET object-oriented database. The relational database can be from any of a set of vendors supported by ODBC (Open Database Connectivity), such as Informix, Sybase, Oracle, etc., or the Java companion, JDBC.
Ogre provides the following functions:
The GUI enables a user to prescribe the conversion without requiring any knowledge of SQL, the relational query language. Based upon a graphical representation constructed on the monitor, Ogre generates the necessary SQL automatically and populates the ODB with the results of the SQL query. Alternatively, Ogre can simply display the results of the query, or route them to a text file.
The following diagram shows a diagram of Ogre and its principal interfaces.
Although Ogre does not require sophistication for its effective use, the present document does not attempt to be a tutorial on all of the concepts needed to understand what Ogre does. It is helpful if one has at least moderate knowledge of relational databases to understand Ogre's behavior from this document. A more basic tutorial will have to be the subject of another document.
Ogre is based on a relational data model, an object-oriented data model, and a mapping between them. We describe these components next.
The relational model is the traditional one:
The object-oriented model is very basic:
The set of attributes for a type of object is referred to as the schema for the object. The structure of the resulting object-oriented database is determined by the set of schemas, as configured using Ogre.
It is not required that the same attribute names be used in the objects Ogre creates as were used in the relations. Ogre allows the user to rename the attributes. In some cases, renaming is necessary, as ambiguity would otherwise result. Ogre provides visual indications of those cases.
We now present the relational-to-object mapping in two steps. The first step is the mapping of a single relation to objects. The second step is a mapping of multiple relations, sharing common attributes, to objects.
Each object also has a schema attribute, which is by default the name of the original table, although this name can be modified by the user if desired.
A degenerate form of mapping for multiple tables would involve simply repeating the above single-table relation mapping once for each relation. However, this may not capture the intent of the original relational database. Typically relational databases distribute the description of single objects over multiple tables (through a design process known as "normalization"), and the attribute values of one or more tables would then be joined. We would like to recapture those joins in creating objects. As the exact nature of the join cannot be inferred from the tables alone, it is up to the user to specify the join, using Ogre's GUI.
Suppose there are two tables R and S with a common column attribute A and we intend that rows of R and S having the same value of A really designate the same object. We can indicate this intention in Ogre's GUI by making a connection between these attributes. In relational database terminology, this is conceptually a join of the two tables.
Ogre makes it possible to join any number of relations in this way. When the join describe the user's desired interpretation of the relations as objects, Ogre will present a query to the relational database to extract that information. Ogre will then generate the corresponding objects. The user also can inspect both the original relations and the resulting objects using the GUI.
Currently Ogre runs as a Java application under Microsoft Windows NT. In the following, we walk the user through the various windows and functions in Ogre.
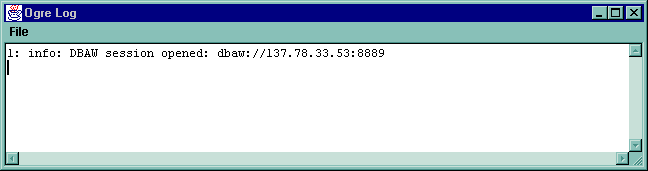
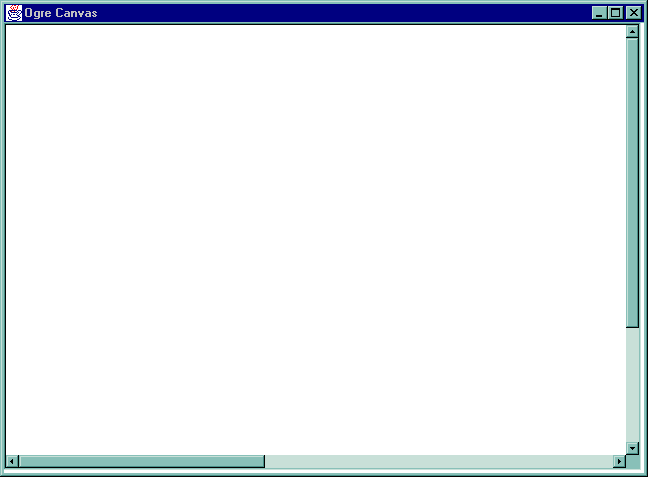
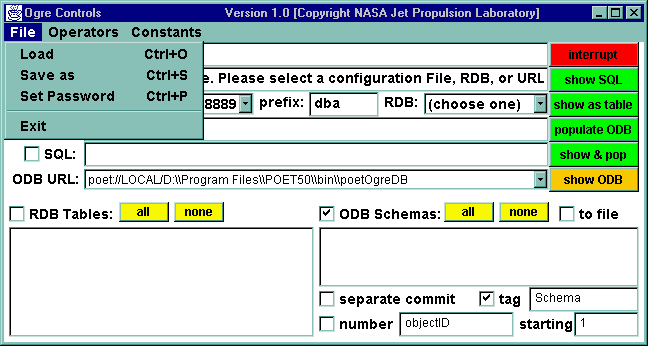
Ogre starts with three windows, typically one above the other. The user can control the opening placement of the windows, as well as other parameters, through the ogre.ini file. The opening windows are:
The following figures show the windows in a typical start-up. The label on the windows in their upper left-hand corner next to the steaming Java cup.
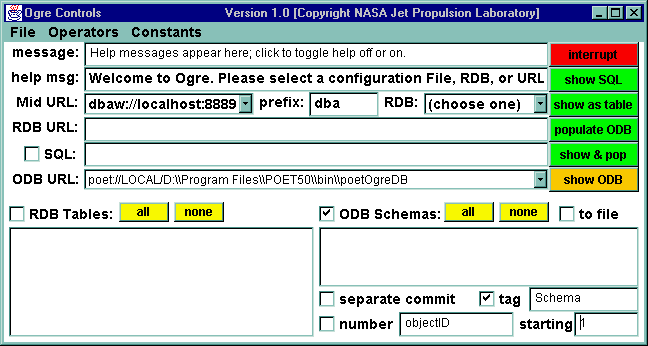
Proceeding down and across from left to right, we will mention the function of each item in the menu Controls window:
Customize the initialization of some of the widgets may be done through the ogre.ini file, as described in Appendix A.
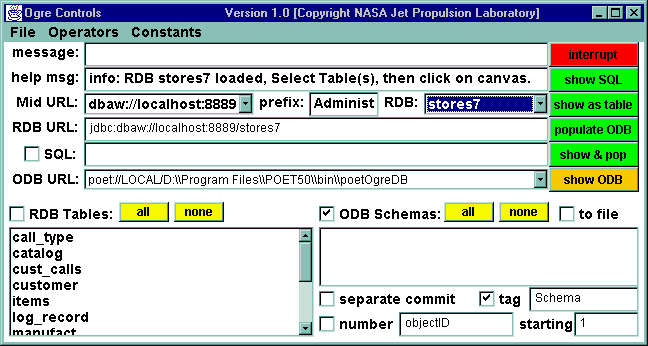
In the following, we will use as an example the relational database stores7 that is provided with the Informix Enterprise Server release. This a database for a sporting-goods store, containing 11 tables. Enter the user name and password for this database by selecting Password from the File menu.
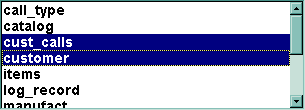
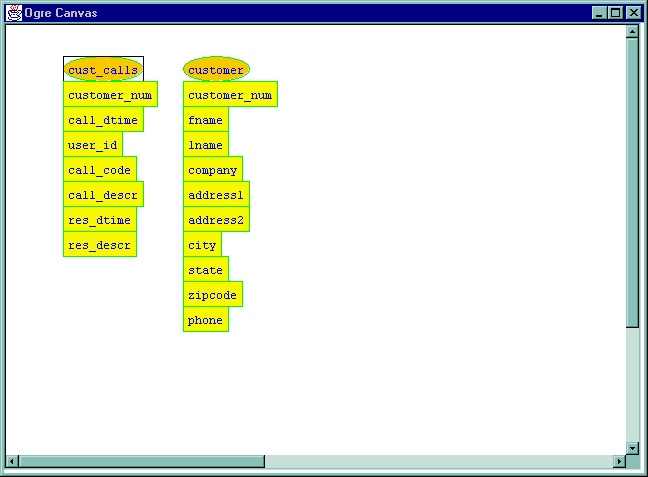
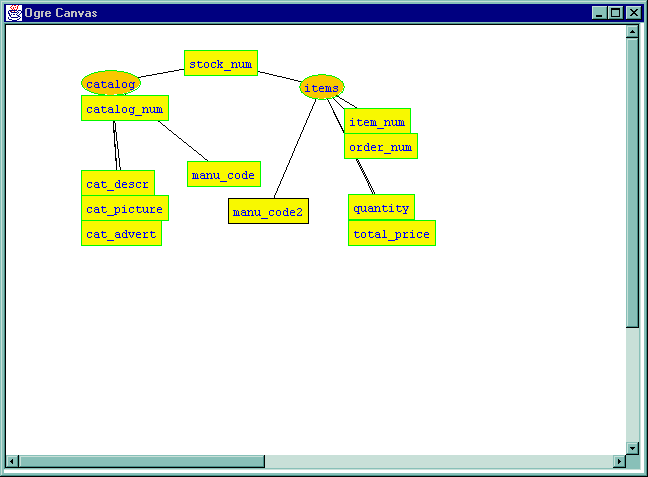
The oval nodes represent relations, while the rectangular nodes represent attributes of the relations to which they are connected. This display indicates that cust_calls has seven columns or attributes, while customer has ten columns or attributes. The names for the attributes are those given in the relational database itself. The dark box around the cust_calls relation indicates that this relation is selected. The selection is a group of nodes that can be moved as a unit.
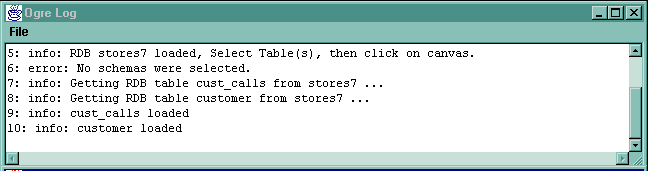
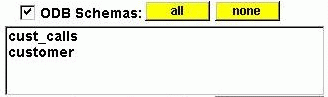
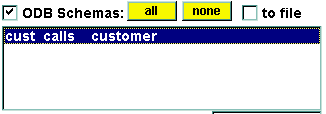
Now suppose we wish to get an idea of what is in these tables. Notice that the Schemas menu shows two schemas, having the same names as the two tables. This is because each table forms a component of the graph by itself.
A trivial application of Ogre is to generate objects directly from each relation, one object per relation row. In this type of usage, the attributes of objects are the same as the attributes (column headers) of the relations. There will be one "type" of object per relation.
In order to generate this form of object, select one or more schemas, then press the populate ODB button.
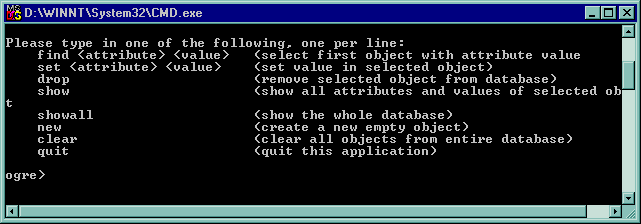
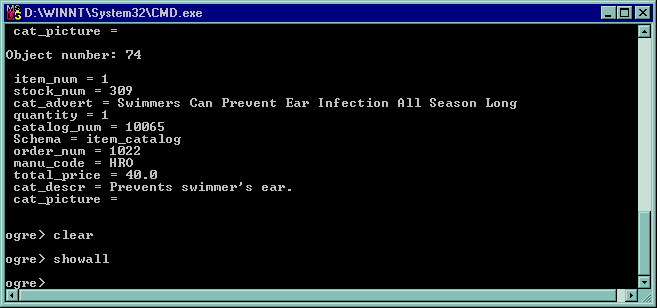
To check the results, press Show ODB, which will display the contents of the ODB in a text window.Except for the addition of new objects, the object-oriented database cannot be modified from Ogre. However, a companion application called poetOgreDBaccess can be run from a DOS command line to clear all objects from the database, and run simple queries on it. This program is started by giving the URL of the object-oriented database on the command line. The program then presents its own command line, which has the following options:
To select multiple nodes, hold the shift key while pressing with the mouse. The outline color of a selected node darkens to indicate that the node is selected. A node can be selected or unselected, with other selections remaining invariant, by holding the shift key.
Another way to select multiple nodes is to press the mouse on the background area of the screen, then drag it. The rectangle thus formed will select nodes contained within. The shift-click technique can then be used to unselect nodes as desired.
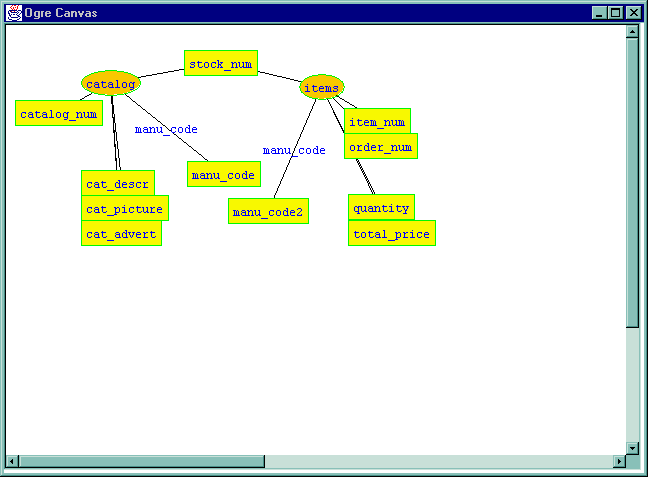
When an attribute is dragged using the mouse to where it nearly coincides with another attribute of comparable type (numeric, string, etc.), the two attributes become joined as a single attribute, as shown below.

It is beyond the scope of this guide to explain the theory of joining. However, the impact on the object-oriented database that would be created is that the rows of joined relations will represent a single object.
Note that joining relations changes the schema to a name composed of the names of the joined relations. Each connected subgraph determines one schema for the ODB. So when two relations are first joined, there is one fewer schema than before. The new schema will, by default, have a name comprised of the names of the original schemas with two intervening underscores. For example, joining cust_calls and customer will produce cust_calls__customer. This name can be changed by the user.
Attributes can be unjoined by control-clicking the mouse button over the box (i.e. clicking while holding down the control key). One then has a choice, from the popup menu, of the following options:
There are two ways to view the attribute types in a schema:
The following is the list of options that appear when control-clicking on a relation node:
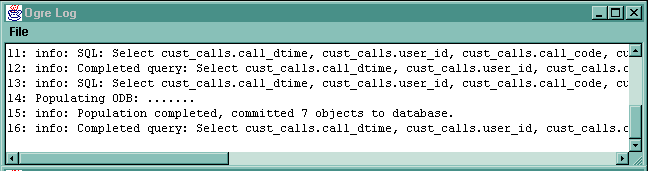
Suppose we press populate ODB having selected the cust_calls__customer. The log will show the action taking place:
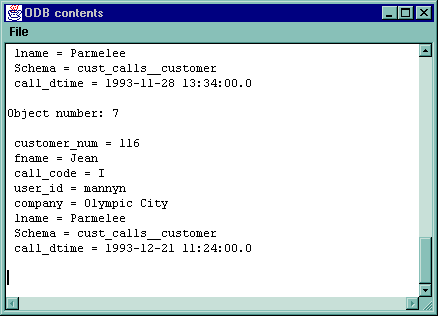
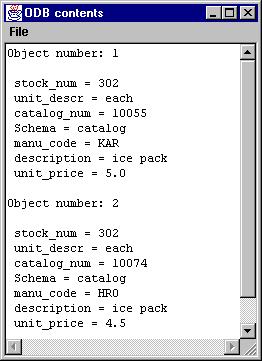
We can view the current object-oriented database by pressing show ODB:
When two attributes are joined, if there are other attributes with common names in the same schema, these will be highlighted, since they are regarded as conflicting. In other words, attempting to create objects using this naming scheme would cause ambiguities. These ambiguities must be resolved before Ogre will allow objects to be created.
The following example shows the phenomenon of name conflicts. Below, joining the two relations on stock_num has produced a conflict between the two instances of manu_code.
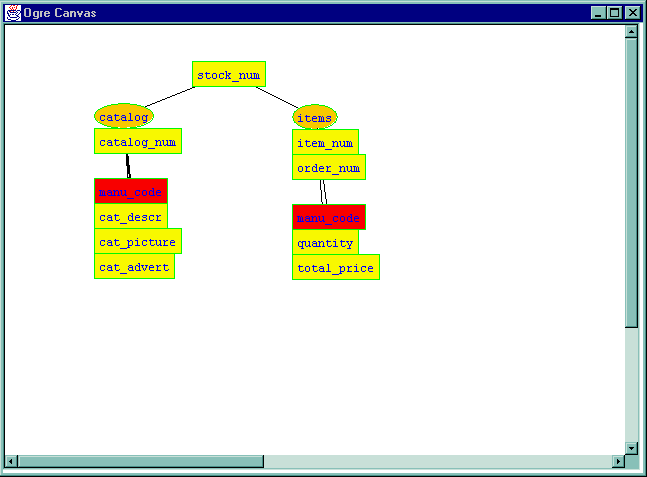
There are several ways to resolve the conflict. Each will have a different implication about the form of the objects ultimately created. Before pursuing an option, the user must understand the meaning of the relations and the intent of joining these particular attributes, to make sure that the result is meaningful when objects are created from the schema.
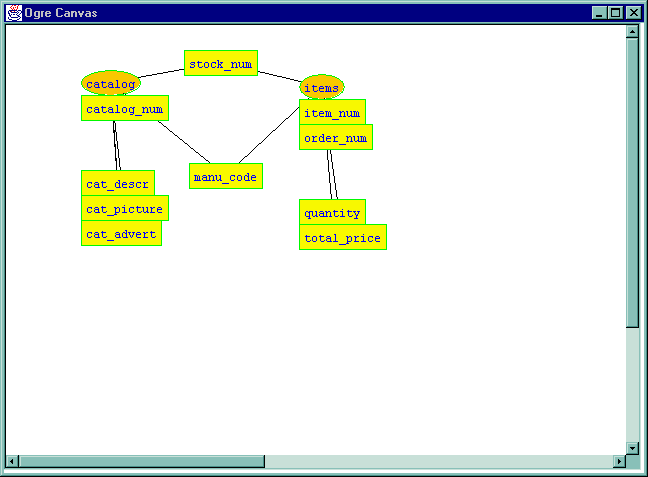
The conflict is then resolved.
In the Rename Attribute window edit the name. In this case, we will just add a character 2:

The conflict is now resolved.
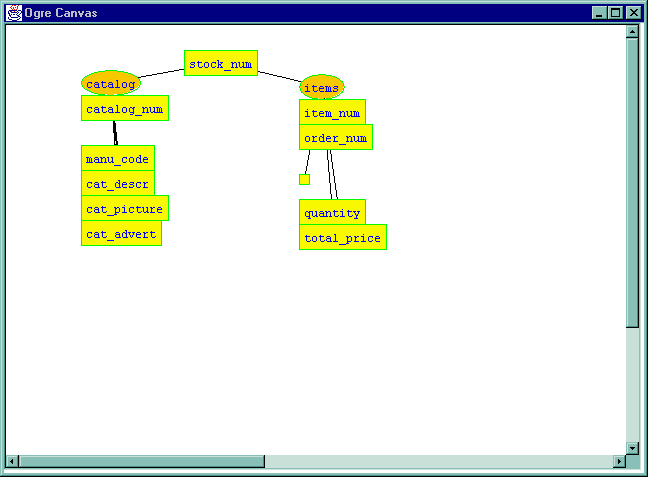
If the user wishes to view the original names of the attributes, this may be done by double-clicking the corresponding arc, as shown below.
Double-clicking again toggles the original name off.
The user may add constraints to the selections from tables used to create objects. These are expressed graphically, but translate into SQL select conditions.
Examples are:
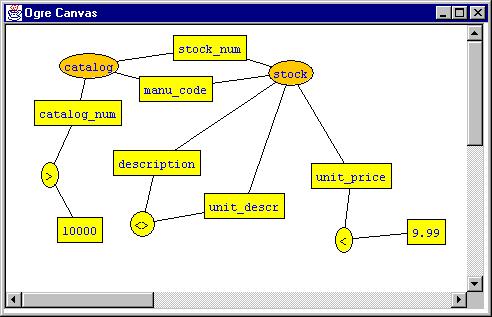
Constraint operators are handled similarly to relations. They are selected from the Operators pull-down menu at the top of the Controls window. Next to that menu is a Constants menu. Constants may be introduced by the user for the purpose of creating constraints. Below we show a constraint example. We wish to create objects from a join of the relations catalog and stock for which the unit_price is less than 9.99, the catalog_num is greater than 10000, and the cat_description is not equal to (<>) description.
The configuration for this query is as follows:
The result of this query is shown below as a table:
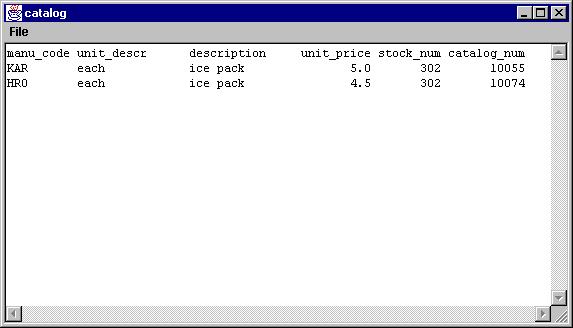
The reader can verify that the constraints are satisfied by the result given. Of course, a full inspection of the original tables would be required to verify that these are the only results satisfying the constraints.
We also show the result as objects:
Leave Ogre either by selecting Exit from the file pull-down menu of the Controls window, or by clicking the close box in the upper right-hand corner of that window.
The object-oriented database is implemented in Java. The database class is called poetOgreDB, which is a wrapper for the POET class Database.
Each object is an element of the class poetOgreObject, which has as its main component an object of type MapOfStringToObject from the POET libraries. The latter is used to achieve a mapping from attribute names, which are strings, to objects of type poetPersistentValue. The latter is specialized to the following sub-classes:
|
|
|
|
poetPersistentDouble |
double-precision floating point numerals |
|
poetPersistentLong |
extended-precision integer numerals |
|
poetPersistentString |
strings |
The Java source code files may be consulted for a definition of the API for poetOgreDB and the other related classes.
Provided along with Ogre is a stand-alone program for accessing the POET database created by Ogre. Using this program, known as poetOgreDBaccess, objects can be searched by attribute value and displayed, modified, or deleted. The database can be displayed in its entirety or cleared. The program has a simple command-line interface with no windows. To use it, the user types:
java poetOgreDBaccess ... URL of POET database ...
A previous version of Ogre, which stood for "Oracle-Grok Interface", was constructed by the authors in 1997 using Tcl/Tk and C++. That version used Oracle as the relational database and ObjectStore as the target object-oriented database. It was a complete redesign and new implementation an earlier version of Ogre with a different interface that originated as a Harvey Mudd College Computer Science Clinic project in 1996-97. That project was performed by Elizabeth Coleman, Chris Sloan, and Kevin Sours, with Robert Keller as faculty supervisor and Walter Bunch and William Lincoln as liaisons.
Grok stands for Graphical Representation of Knowledge and was introduced to us by Walter Bunch at JPL, who apparently ported it to UNIX® using Tcl/Tk. The GUI of the present version and our previous version of Ogre builds on the GUI ideas of another HMC CS Clinic project in 1995-96 known as Condor, which was performed by Will Ballard, Ingo Muschenetz, Jeff Polakow, and Amy Ward, with Robert Keller and Professor Josh Hodas as faculty supervisors, and Walter Bunch as liaison.
The authors wish to thank Dr. Lakshmi Rebbapragada of CECOM for facilitating the sponsorship of the project. We thank Lamark Johnson of JPL for his support during the project. The advice and suggestions of Dr. Nevin Bryant and James Hauge were invaluable throughout the project. We also thank John Rector for his evaluation and numerous suggestions for improvement.
// User-modifiable Initialization file for Ogre
//
// READ CAREFULLY BEFORE CHANGING
//
// Suggestion: Comment-out any lines you change, for possible example or reversion.
//
// Ogre looks for file named ogre.ini in the same directory as the executable.
// The format of this file is one attribute and one value per line.

// Comments begin with // and are on a line by themselves.
// DO NOT put comments at end of line.

// Generally the items are CASE SENSITIVE.
// Blanks count within values (e.g. for file names)!!!
// Only leading and trailing whitespace is trimmed.
// Tabs are allowed as whitespace.

// Most items are optional; if not specified, they default to none specified
// or some pre-defined value.

// addresses of DBAW servers
DBAW    dbaw://localhost:8889

// addresses of POET servers
ODB     poet://LOCAL/D:\\Program Files\\POET50\\bin\\poetOgreDB

// default user and password for RDB
userName    ... not shown ...
password    ... not shown ...

// default prefix for RDB
RDBprefix dba

// position and size of Control window
controlX        0
controlY        0
controlWidth    640
controlHeight   300

// position and size of Log window
logX            0
logY            345
logWidth        640
logHeight       125

// position and size of Canvas window
canvasWindowX       0
canvasWindowY       510
canvasWindowWidth   640
canvasWindowHeight  450

// The canvas is inside the Canvas window and
// is not necessarily entirely visible at one time.

canvasWidth         1500
canvasHeight        600

// amount by which to jog newly-created windows
jogX 20
jogY 20

// amount by which to space nodes when displaying multiple relations
xNodeSpacing 120
yNodeSpacing 0

// whether to allow intra-relation joins
allowIntraRelationJoin false
|
|
||||
|
|
|
|
||
|
|
|
|
||
|
|
|
|
||
|
|
|
|
||
|
|
|
|
||
|
|
|
|
||
|
|
||||
|
|
|
|
||
|
|
|
|
||
|
|
|
|
||
|
|
||||
|
|
|
|||
|
|
|
|
||
|
|
|
|
||
|
|
||||
|
|
|
|||
|
|
|
|
||
|
|
|
|
||
|
|
|
|
||
|
|
|
|
||
|
|
|
|
||
|
|
|
|
||
|
|
||||
|
|
|
|||
|
|
|
|
||
|
|
|
|
||
|
|
||||
|
|
|
|
||
|
|
|
|
||
|
|
|
|
||
|
|
|
|
||
|
|
|
|
||
|
|
|
|
||
|
|||||
|
|
||||
|
|
||||
/**
  *  POET Java ODMG Binding
  *
  *  Configuration file for poetOgreDB
  *
  *  ptjavac.opt
  */

[schemata\poetOgreDict]
oneFile = true

[databases\poetOgreDB]
schema = poetOgreDict
location = SAME
oneFile = true

[classes\poetOgreObject]
persistent = true
hasextent = true
schema = poetOgreDict

[classes\poetPersistentString]
persistent = true
hasextent = false
schema = poetOgreDict

[classes\poetPersistentDouble]
persistent = true
hasextent = false
schema = poetOgreDict

[classes\poetPersistentLong]
persistent = true
hasextent = false
schema = poetOgreDict

[classes\poetPersistentDate]
persistent = true
hasextent = false
schema = poetOgreDict
Graham Hamilton, Rick Cattell, and Maydene Fisher, JDBC Database Access with Java, Addison-Wesley, 1997. A thorough introduction to the JDBC API.
Joshua S. Hodas, Robert Keller, Jeffrey Polakow, Ingo Muschenetz, Amy Ward,
and Will Ballard,
Condor: A simple, expressive graphical database query language",
Harvey Mudd College, Computer Science Technical Report HMC-CS-97-04,
March, 1997.
Robert Orfali and Dan Harkey, Client/Server Programming with Java
and CORBA, Wiley, 1997.
Describes various layered client/server approaches, including for
databases.
POET Software Corporation, Poet Java SDK Programmer's Guide,
POET, 1997.
Symantec, Visual Cafe for Java User's Guide, Database Development
Edition, Symantec, 1997.
Explains the dbANYWHERE approach.
Glossary of Terms
| Clicking on canvas background | unselects all nodes | |
| Clicking a node | selects the node | |
| Shift-clicking a node | toggles the node into or out of the current selection | |
| Dragging starting on the canvas background | selects all nodes circumscribed | |
| Dragging a selected node | moves all selected nodes | |
| Control-clicking a relation node | pops up choices regarding the relation
(remove, select all attributes, show all attributes, hide all attributes, show schema) | |
| Control-clicking an attribute node | pops up choices regarding the attribute
(rename, hide, mask, unmask) | |
| Double-clicking an edge | toggles the original attribute name for that edge | |
| Double-clicking a schema name in the schemas menu | opens a window for that schema | |
| Double-clicking an attribute or schema name in a schema window | renames the attribute or schema |
| Select a node | Click on the node. |
| Select a grouping of nodes | Drag the mouse across a diagonal of the region to be selected. |
| Unselect all nodes | Click on the background. |
| Add/remove a node to/from selection | Hold shift while clicking on node. |
| Select all relation nodes | Hold shift while clicking each node. |
| Select all nodes | Drag the mouse across a diagonal of the canvas. . |
| Move nodes | Select the nodes to be moved, then drag any selected node. |
| Hide, mask, or unmask an attribute | Control-click the attribute, then select appropriate action. |
| Show original attribute name | Double-click the edge to which the attribute corresponds. |
| Show a schema definition | Control-click a node in the schema, then choose show schema, or double-click the schema name in the schemas list. |
| Rename an attribute | Control-click the attribute, then choose rename, or show the schema and double-click the attribute. |
| Rename a schema | Show the schema and double-click the schema name. |
| Rename a relation | You can't, since relation names are fixed in the relational database. . |
| Show or generate objects directly from relations | Check the RDB box, then select the relations of interest, then press either the Show as Table button or the Generate Objects button. |
| Show or generate objects from schemas | Check the Schemas box, then select the schemas of interest, then press either the Show as Table button or the Generate Objects button. |
| Show the SQL without showing tables or generating objects | Select either the relations or the schemas as above, then press Show SQL. The SQL will be listed in the Log window. |