WorldBuilder - Code Overview
Introduction
This is an introduction to and overview of the code for the WorldBuilder application.
The intended audience is (ideally Java) programmers who are interested in understanding
the design and operation of this tool.
The descriptions are presented in three parts:
History
The development of this tool was motivated by
Christopher Kampe's
observation that, in RPG development, the creation of the underlying maps had
a relatively poor cost/value performance. He wanted to make it easy for
game developers to start with realistic maps, atop of which they could
add their more creative and interesting features and encounters.
This program is majorly inspired by the
Martin O'Leary's
Uncharted Atlas project.
His
Terrain Builder is a
JavaScript Web-app to synthesize pages of a fantasy Atlas.
The
WorldBuilder
is Java application to enable game designers
to create 3D regional landscapes that can be exported as maps for a
variety of computer-based Role Playing Games (starting with RPG Maker).
While these goals have very different scopes, calling for rather
different approaches, this program still draws heavily on several of
O'Leary's insights:
- defining a large Cartesian landscape by
interpolations of the altitudes of (randomly
placed) points in a Voronoi mesh.
- defining (satisfyingly irregular) topographic
features by imposing vertical displacements associated
with regular (e.g. conical) geometric figures
on the random Voronoi mesh.
- simplifying the simulation of water-flow by
restricing all flow to the paths between
(the few) points in the Voronoi mesh
- using that flow to compute erosion as a
downards deformation of the points through
which water flowed.
- defining geo-political borders as the points
where the cost of travel from two adjacent
capitals are equal.
The evolution of this tool has been driven by a combination of
Mark Kampe's
architectural thoughts (about how to structure geo-physics simulations
and plug-in RPG-map exporters) and
Christopher Kampe's experiences (with how to make a more usable tool
for creating satisfying worlds).
After studying O'Leary's work, I came up with my own (surely personal) prime directive:
The only attributes of any consequence are associated with the points of
the (sparse) Voronoi mesh. All finer grained models (e.g. Cartesian exports or
2D displays) should be deterministic functions of those
per MeshPoint attributes.
I will not attempt to defend this decision, but it strongly guided all subsequent
decisions.
High-Level Overview
To greatly over-simplify, this program can be divided into:
- a set of points (in a Voronoi, triangluar, mesh) each of which has
a variety of attributes (e.g. altitude, soil type, water flow).
- a collection of graphical renderers to display 2D maps to illustrate
those attributes (e.g. topography and water, erosion and deposition, etc.).
- a collection of exporters, to translate such maps into a form that can be
imported into another program (e.g. RPGMaker, Foundation).
- a collection of engines for making updates to the topography, water
flow, plant cover, and other attributes of map points.
- a collection of dialogs/editors and a script interpreter
that use those engines to update those attributes (e.g.
creating mountains or changing water flow) of map points.
- a collection of menus, dialog widgets for accepting and executing commands.
- a collection of parsers to read program parameters, maps,
and export generation rules from (mostly JSON) configuration files.
The classes that create and operate on Meshes of Voronoi points are
Mesh.java,
Mesh.Pointjava and
MeshPointHasher.java.
The set of MeshPoints that define the world are stored in a Mesh array.
Their attributes (e.g. altitude, soil type, water flow) are stored in parallel arrays
(e.g. Map.heightMap, Map.soilMap, Map.fluxMap) ...
all of which are accessed through their common MeshPoint index.
There are several different map renderers, one for each major attribute:
- AltitudeMap.java, rendering altitudes as shades of gray
- TopoMap.java, rendering topographic lines
- WaterMap.java, rendering water and shorelines
- RiverMap.java, tracing rivers/streams through MeshPoints
- RainMap.java, showing regional rainfall
- ErodeMap.java, showing erosion and sedimentation
- SoilMap.java, showing soil types and mineral deposits
- FloraMap.java, showing plant distributions
- FaunaMap.java, showing animal/fish distributions
- CityMap.java, showing identified cities and the
trade-routes between them
The mapping from a (sparse and irregular) Voronoi mesh to a
(dense and continuous) 2D map is greatly facilitated by the
Cartesian.java
interpolation of values from surrounding MeshPoints
as chosen by (sub-classes of)
Vicinity.java.
The overall orchestration of creating a display from all of these
independent layers is managed by (the largest and most important class in the program)
Map.java.
Many decisions about resource placement or which (exporter) tiles to use to represent a region are
based on MeshPoint (or tile) based bidding rules. The base class for these rules (used for
Mineral, Flora, and Fauna placement) is
ResourceRule.java,
which can be extended by exporter-specific sub-classes like
RPGMRule.java and
OverlayRule.java.
All Exporters implement a
standard interface,
and a common
export orchestrater
creates a series of 2D per-tile maps which it pushes to the
output-format-specific implementations.
- The simplest of these,
RawExport.java
and
JsonExporter.java,
simply write (and read) a collection of per-point attribute descriptions.
- More interesting is
RPGMexport.java,
which uses tile placement rules (managed by
RPGMRule.java)
to drive a very RPG-Maker-savvy
RPGMTiler.java
to reproduce the map in tiles, and cause the (RPG Maker map) output to be written by
RPGMwriter.java.
- Another Exporter is
FoundExporter.java,
which creates the appropriate altitude and resource bit-maps, and uses
LuaWriter.java to
create the index that describes them.
- Another Exporter is
ObjectExporter.java,
which uses
ObjectExport.java to
examine the topography and choose hill/mountain tiles, and then
outputs a simple json description of per-tile altitudes
and water depth, followed by a list of larger (e.g. hill/mountain) tiles
(chosen by
OverlayRule.java)
to be overlayed on that simple map.
The main-screen menus and controls are put-up and responded to by the main class
(WorldBuilder.java).
Simple operations like saving updated maps and loading new ones, it handles
directly. But display and update operations are handled by creating new
interactive dialogs in one of the sub-dialog managers:
- MeshDialog.java,
- WorldDialog.java,
- MountainDialog.java,
- LandDialog.java,
- RainDialog.java,
- RegionDialog.java,
- RiverDialog.java,
- MineralDialog.java
(most of the work done by
ResourceDialog.java),
- FloraDialog.java
(most of the work done by
ResourceDialog.java),
- FaunaDialog.java
(most of the work done by
ResourceDialog.java),
- PointDebug.java,
- SlopeDialog.java,
- CityDialog.java,
- POIDialog.java,
- ZoomDialog.java,
- RuleDebug.java.
These put-up and respond to their own widgets, but on-map selection
(e.g. of lines, rectangles or groups of MeshPoints) is handled by
Map.java.
The actual map/attribute updates are made by the update engines
(TerrainEngine.java,
AttributeEngine.java,
TerritoryEngine.java),
which update the per MeshPoint arrays and use Map.set functions
(e.g. Map.setHeightMap() or Map.setSoilMap())
to give effect to the new values.
Most of the same operations can be initiated through the script interpreter
(Script.java).
The most complex (and only barely under control) modules are probably the
Drainage and
WaterFlow classes,
which use rainfall and topology to compute water flow, erosion,
deposition, and lake boundaries.
Most program parameters are read-in and accessed through the Singleton
implemented by
Parameters.java.
When a map is read in (or written out), this is done by
the read() and write() functions in
Map.java.
Key Classes and Operations
The worldBuilder application is moderately large
(over 10,000 lines of code spread over a few dozen modules).
The high level class structure can be (crudely) summarized by
a few UML class diagrams.
Mesh and Map-related Classes
The first class diagram shows the main WorldBuilder class,
the awt and swing GUI classes it builds on,
and the Map and Mesh classes that support
the MeshPoints on which the map is based.
Note that the only Map methods shown in this
figure are those involved in basic map creation.
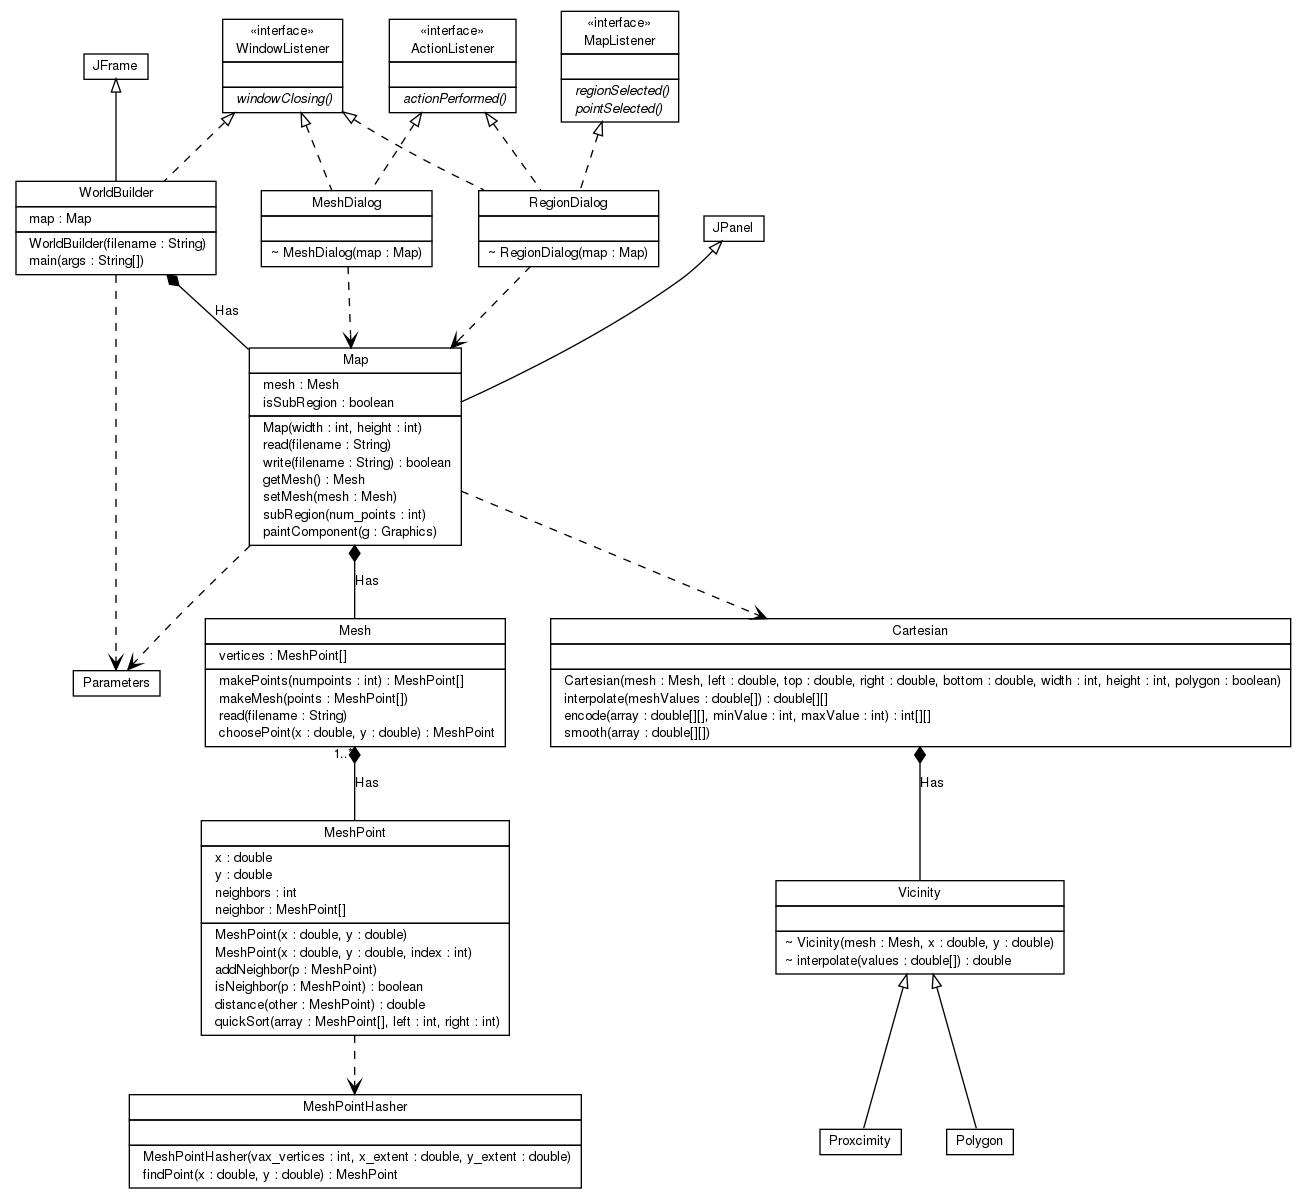
Mesh Creation
O'Leary observed that if we create map points in a rectilinear grid,
deformations tend to retain that (unnatural) rectilinearity. This
problem is elimnated if the map points are placed at random.
Truly random points exhibit unattractive degrees of sparse-ness
and clumpy-ness. O'Leary evens this out by a few iterations
of connecting points into a Voronoi mesh and then choosing,
as new points, the centroids of those Voronoi polygons.
We use a Voronoi library to assign three neighbors to
each point and create the desired Mesh.
Simple Dialog Classes
The second class diagram shows the simpler (non-point-attribute-editing)
dialogs and the primary Map class functions they use.
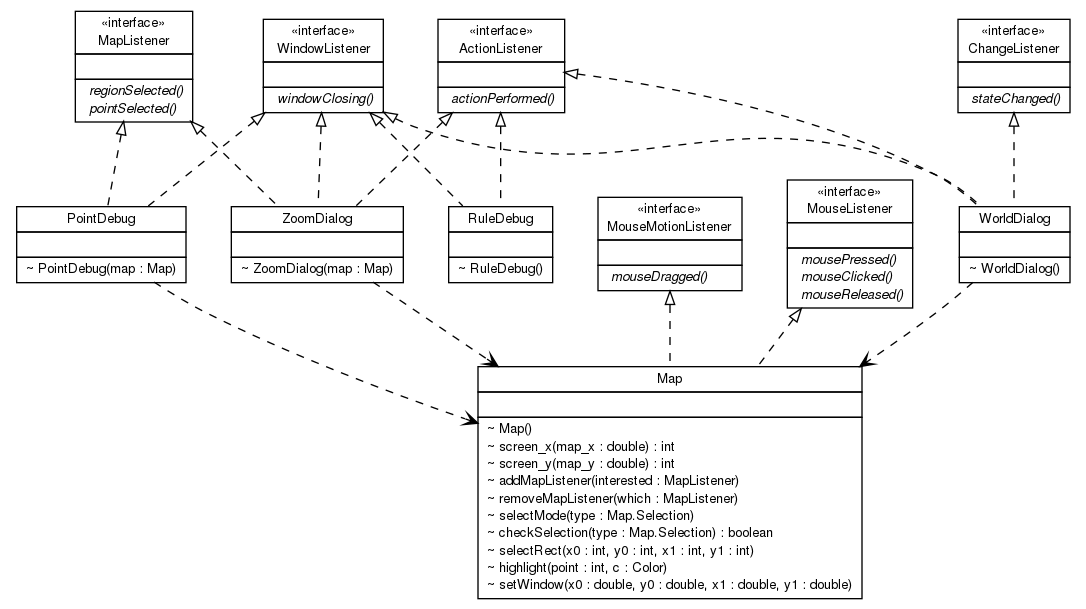
These are all very simple dialogs. Some of them
(e.g. PointDebug) simply display the attributes of
a selected point.
Others simply update parameters (e.g. WorldDialog
adjusts the latitude, longitude and size of the world map).
The most complex is probably the ZoomDialog, which
allows a sub-region of the world map to be selected, and
uses the Map.setWindow function to cause the
displayed map to zoom into the selected sub-region.
Point and Region Selection
The Map class is a Mouse and MouseMotion
Listener, interprets mouse actions as selection attempts,
and indicates the selected points/areas on the currently displayed
map. Any dialog that needs to know about point or region selections
can register as a
MapListener
and receive call-backs in response to selection actions. They can
also use the Map.selectMode() and Map.checkSelection()
operations to enable the desired selection mode (e.g. point, line, region)
and query any selections that may have already been made.
Terrain Editing Dialog Classes
The third class diagram shows the attribute-editing dialogs and the
Map selection and get/set functions they use to update
the MeshPoint attribute maps.
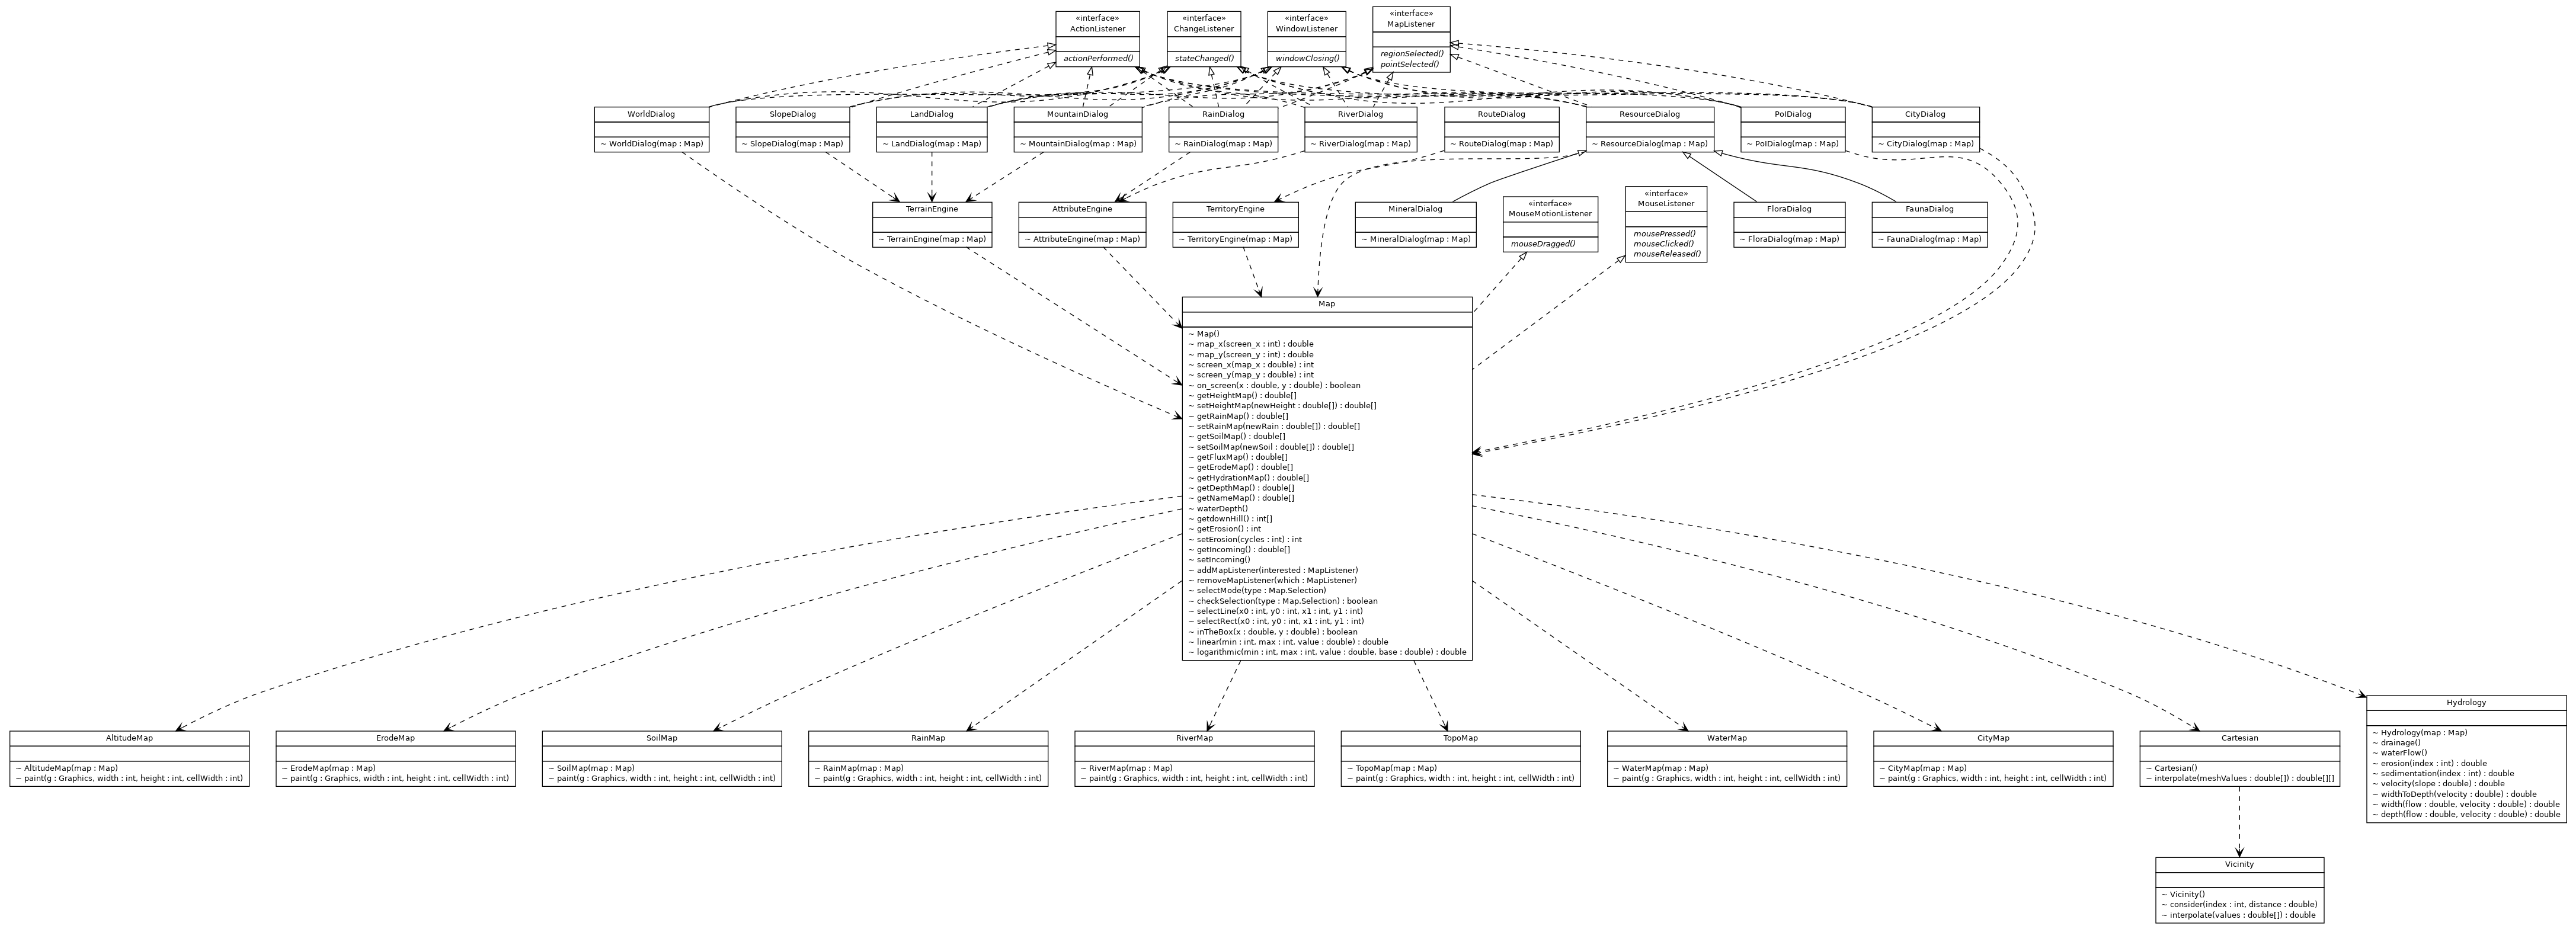
The operations in this richer set of dialogs (a) update point attributes and
(b) drive refreshes of the displayed map to show the updated information.
Attribute Maps
As random points in a 2D space MeshPoints are not very exciting.
What makes them interesting is the collection of attributes associated
with each point. As mentioned previously, each MeshPoint has
a stable index in the Mesh array, and the MeshPoint
attributes are stored in series of parallel arrays:
- heightMap stores the altitude (in -0.5 to +0.5 map coordinates)
of each MeshPoint
- waterLevel stores the altitude (in -0.5 to +0.5 map coordinates)
of the nearest water level to each MeshPoint
- soilMap stores the soil and mineral types
(sedimentary, metamorphic, igneous, alluvial, iron, copper, precious, ...)
of each MeshPoint
- rainMap stores the annual rainfall (in cm)
for each MeshPoint
- fluxMap stores the flow of water (in cubic meters/year)
into each MeshPoint
- erodeMap stores the net (negative) erosion or (positive) sedimentation
of each MeshPoint
- floraMap stores a flora ecotope class
for each MeshPoint
- faunaMap stores a dominant animal (including birds and fish) class
for each MeshPoint
- nameMap stores the types/names of cities, towns, aand villages
for each MeshPoint
The attribute update engines load the appropriate attribute maps from the Map
class, update them according to the specified operations, and then pass the
updated values back to the Map class.
Displayed Map(s)
Whenenver attributes are changed the awt.repaint() method invoked,
causing a call to Map.paintComponent().
There are many different
attributes for each MeshPoint. Which will be displayed is controlled
by calls to Map.setDisplay().
When the call is made to repaint the map, Map.PaintComponent will:
- decide on the dimensions of the (to be updated) map.
- create a Cartesian interpolation matrix to compute
the values at every pixel from the nearest/surrounding
MeshPoints.
- go through the display-enabled attributes, using the
appropriate map-rendering class
(e.g. AltitudeMap or RiverMap) to compute
the attribute values for every pixel on the map and generate
the appropriate display updates.
- if any selection areas are to be highlighted, add appropriate
rectangles, lines or point-halos to indicate them.
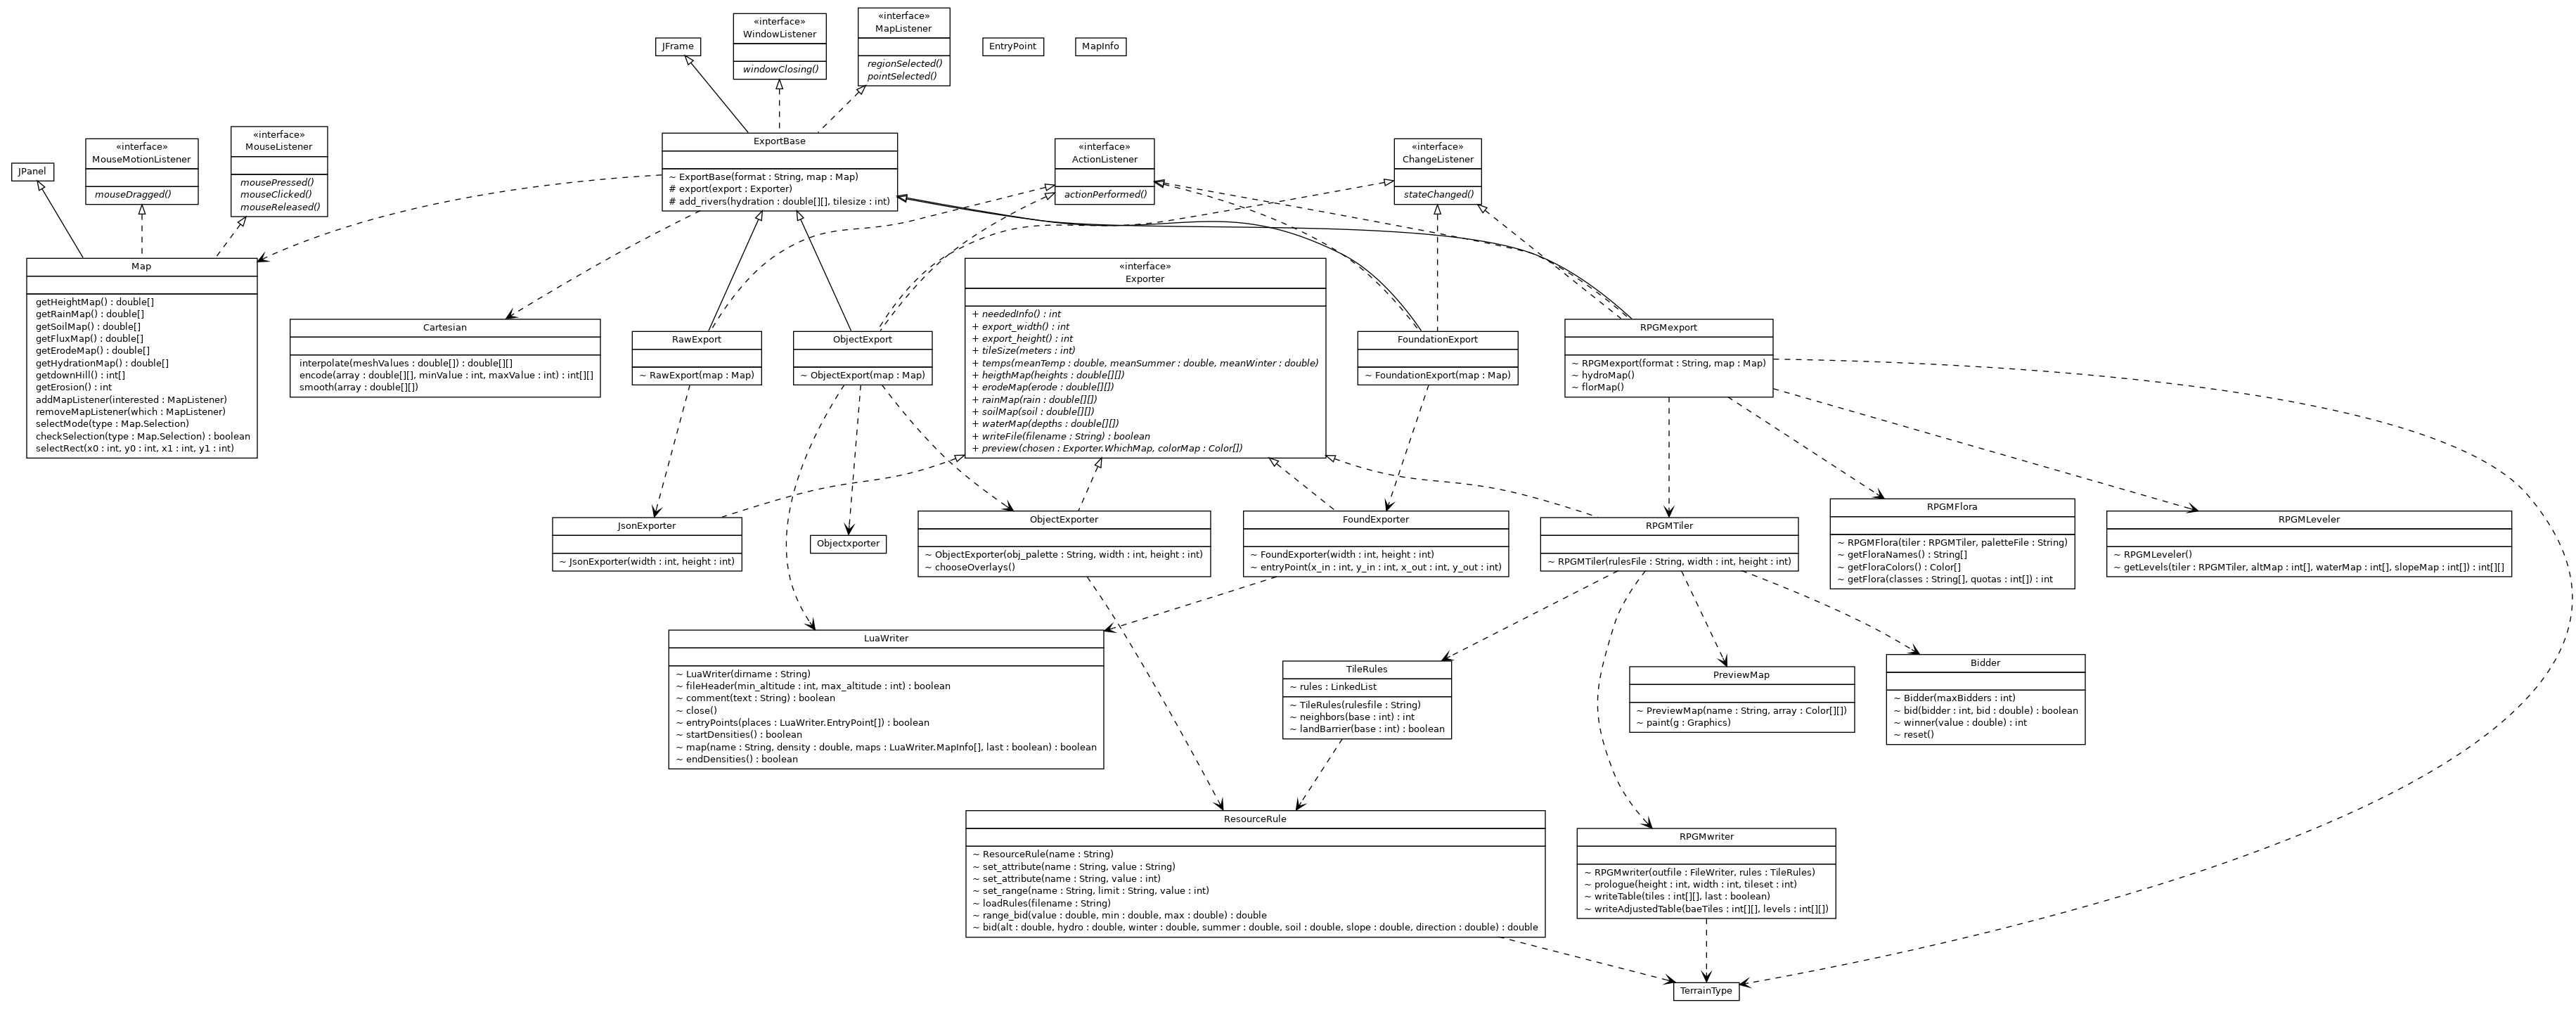
Export Classes
The final class diagram shows the Export related classes.
(that handle raw JSON, RPG Maker, Object and Foundation maps).
Notes on hydrological simulations
The classes involved in hydrological simulation are:
- Drainage ... figure out how water would flow between the mesh points:
- mark all sub-sea-level points on the edge of the map as oceanic.
- determine the most down-hill (steepest) neighbor or each land point.
- identify the lowest point in each depression (sink).
- identify the lowest escape point for each depression (sink) if it fills with water ...
and if the escape is into a larger depression, combine them.
- create a source-to-sink ordered list of non-oceanic points
(to be used in the next pass).
- WaterFlow ... compute water velocity, erosion, deposition, and lake boundaries:
- compute the incoming rainfall and flow, vs evaporation to determine
whether or not there is net water (flowing or lake) on each point.
- use the down-hill slope to compute the velocity of flow through each point.
- if the velocity is high enough to cause erosion, compute the amount of
soil removed from this point and added to the flow.
- if the velocity is low enough to cause sedimentation, compute how
much soil is removed from the flow and deposited on this point.
- if this point is in a depression, compute the water depth
(as the altitude difference between this point and its escape point identified
in the drainage pass).
- erosion ... return the (number of meters of) erosion for
a specified mesh point (based on the waterFlow computations).
- sedimentation ... return the (number of meters of) sedimentation for
a specified mesh point (based on the waterFlow computations).
I started out trying to use real physics for erosion and sedimentation:
- the Manning formula to compute water velocity from slope.
- suspended concentration studies to estimate how much soil could be carried
by water at a given speed.
- the Hjulstrom curves to distinguish erosion and deposition ranges.
but the results were disappointing:
- Fantasy maps seem to have a wider vertical range than real topographies,
so the water would always be moving too fast for any sedimentation to happen.
I dealt with this by changing the velocity computation to simply interpolate a
reasonable range of water speeds (0.005m/s - 3m/s) from a wide range of
slopes (1/1000 - 1/1).
- The Hjulstrom curves tell us what sized particles are being eroded
or deposited at a given velocity, but not the rate at which these
processes proceed.
Based on my experience with other such processes, I asserted
that erosion and deposition were exponential processes,
with some fraction of the possible erosion/deposition happening
at each mesh point. The possible erosion was proportional to
the water velocity, and the deposition inversely proportional to
the water velocity. The fraction of possible erosion/deposition
that happens per MeshPoint is controlled by two tunable parameters:
Ce and Cd.
- Silt has not been dug out of the river-bed, but washed off the top
of the entire watershed. Consequently, the amount of silt
deposition should greatly exceed the amount of river-bed
erosion.
I dealt with this by making silt deposition a distinct process
from the deposition of eroded rock, and making the simplifying
assumption that sufficently slow moving water always has more
silt to deposit.
I have seen much higher resolution erosion/deposition simulations,
performed by GPUs on a much denser Cartesian grid. The results were
very beautiful, but require many orders of magnitude more computer
power (to do anything), and lack the (very satisfying) irregularity
that emerges from points on our (very sparse) Voronoi mesh.
The erosion/deposition models used by those simulations were much
simpler than mine:
- velocity is a simple function of slope, and the allowable
amount of sediment carried by water is directly proportional
to its velocity.
- erosion is the shortfall (amount of allowable sediment not
yet carried) divided by the hardness of the rock.
- deposition is the surplus (amount of carried sediment
beyond what is currently allowed for that water).
I was impressed by the simplicity of these models, and incorporated
some of those lessons into the above solutions. But (O'Leary's insight)
performing all topographic operations on a (manageably small number of
points) Voronoi grid is fundamental to how this program works, and
moving to an entirely (much finer grained) Cartesian model is a
different program.
Issues
MeshPoint to Cartesian Conversion
A Cartesian map
specifies, for each square in a Cartesian grid, a list of surrounding
MeshPoints and
their distances from this square.
This enables us to interpolate per-Cartesian-square values
from a list of per-MeshPoint values.
The interpolation process is trivial (simply the inverse-distance-weighted
average of the values for the surrounding MeshPoints).
The hard part is figuring out which MeshPoints are the surrounding ones.
The most obvious answer, the nearest N points, works well for
(relatively continuous) functions like altitude and rain-fall,
but poorly for lake boundaries (which are a discontinous
function of altitude). For these, a better result is obtained
by using those MeshPoints that define the Voronoi polygon within
which the Cartesian point lies. But, sadly, values inferred
from the enclosing polygon experience significant discontinuities
at the polygon boundaries. After considerable frustration I
decided to:
- Make
Vicinity a
super-class that implements interpolation but does not
actually decide which the neighboring MeshPoints are.
- Create a
Polygon
sub-class that attempts to enumerate the MeshPoints
that define the enclosing Voronoi polygon ... starting
with the nearest.
- Provide two means of using a Vicinity to
populate a Cartesian map:
- interpolate using the inverse-distance-weighted
values of all points in the surrounding Polygon.
- nearestValid using the value of the nearest
MeshPoint.
The interpolate method works well for relatively continuous
attributes like altitude or rainfall. The nearestValid method
is more appropriate for discrete attributes (like mineral and flora
classes).
The Polygon constructor and nextPoint methods
attempt to enumerate the surrounding points by:
- starting with the MeshPoint nearest to the desired Cartesian square
- choosing, at each successive point, the path that seems most likely
to be enclosing the desired polygon.
A human would use a simple heuristic (like always turn
to the right).
I compute, for each possible (non-reversing) path,
the derivative of radius (distance from the Cartesian center) with
respect to circumference (distance from the previous
vertex). Minimizing this ratio tends to keep us on
the most concave path.
This works reasonably for points that are within the Voronoi mesh.
But for points outside the edges of the mesh, there is no surrounding
polygon, so the above works badly. This results in attempting to
interpolate values from (poorly chosen) non-neighbors, giving rise
to strange altutudes and water bodies near the edges of the map.
If we knew that a point was outside of the mesh, we could probably
interpolate reasonable values by considering only the one or two nearest
MeshPoints. But how can we know whether or not a point is outside
the mesh (or inside a computed polygon)? The problem of
point in polygon determination turns out to be a fairly
expensive one ... and we need to solve it for a very large number
of points (every time we zoom, sub-region, export, or define a new mesh).
The Vicnity.outsideMesh function uses a few cheap
heuristics to recognize more obvious cases ... but there
are points near non-convex outer borders that are not
recognized, and therefore still interpolate badly.
The problem is relatively minor, in that it only happens to non-ocean
points at the outer-most edges of the map ... and is only then noticable
if there is wide range of altitude and land/water variation among the dozen
nearest MeshPoints. Most people will never encounter it, and those who do are
unlikely to notice it. But, in the interests of correctness ...
- If we simply limit the displayed (and exportable) map to
be entirely within the Voronoi mesh, this problem ceases
to happen.
- The only thing I wanted from the Voronoi package was the
MeshPoint connections (which drive water flow)
... but the Voronoi analysis had actually identified all
of the polygons. If we kept the polygon definitions
and exploited more of the Voronoi package services
we might be able to greatly improve the efficiency of
finding the surrounding MeshPoints for Cartesian translation,
and perhaps solve this problem as well.
Musings
A reasonable map will be based on thousands of MeshPoints.
Computations on those (relatively few) points are simple and efficient
(thank you Martin O'Leary). But ...
- creating the (much larger) Cartesian grids for display and export,
where many contenders bid on every tile is much more expensive.
- for reasons having to do with zooming and exports of bordering
regions, I wanted the derivation of sub-maps to be a deterministic
function of the MeshPoint attributes ... so that all maps would
agree where the hills, creeks (and even trees) were.
- Chris asked for affinity/antipathy rules to create realistic
flora clustering. I had simiilar thoughts about resources,
population, and trade routes. These would easily add another
order of magnitude to those computations, and (to my mind)
best have been implemented as multi-generational evolutionary
sequences. A very compelling approach, that would surely
yield interesting worlds ... but very expensive.
A lesson I seem to have learned (from a cruel Hydrological master) is
that more realistic world simulations add a level of detail that will
(in most cases) never be noticed when the resulting world is exported
for use in an RPG. Would this really justify another few thousand lines of
code, making the rule-sets even more complicated, and making rendering
and export even slower? The answer surely depends on our audience and
their goals ... which at the moment, are purely hypothetical :-)
My greatest regret about the current code is the combination of
complexity and difficulty of testing ... which often results in
unexpected consequences of seemingly simple changes:
- a map is comprised of thousands of MeshPoints,
each of which has a dozen floating-point attributes.
- any operation on the map (e.g. change of rain-fall or
creation of a new ridge) will have complex implications
for many attributes of many points.
- it is not practical to compute or confirm correct values
for a few thousand point-attributes.
- we have always tested new features by
performing operations on a few different maps and seeing
if the resulting changes "looked right".
But ...
- by decoupling the actual map/attribute updating from the
editing dialogs, we can cause most manual-editing operations
to be driven by scripts.
- given my Prime Directive that all exported or
graphically rendered information should be a deterministic
function of the per MeshPoint Attributes,
most of what we could need to check is likely to be present
(in a relatively compact form) in a saved map.
Thus, we can do a fairly reasonable job of base engine testing by:
- writing scripts to perform all of the various types of
terrain and attribute editing operations.
- save the resulting map, and then read it back in.
- carefully examine the graphical output and point attributes
resulting from each of these tests to ensure that the
correctness of the restored map.
- use that saved map as Golden Output, against which we
compare the results of future test runs.
- divide tests across multiple scripts so that the addition
of a new test does not invalidate golden output for
previous tests.
We can similarly test exports, by starting with a fixed and content-rich
map, exporting it in various formats, and manually confirming the correctness
of each export.
This process isn't ideal, but it will warn us whenever code changes result
in a different set of per MeshPoint attributes, or a different
translation of those attributes into a Cartesian grid.