Remote desktop · Updated October 5, 2026
Use your Omarchy desktop from a Mac with Moonlight
Set up smooth desktop access with Sunshine, Moonlight and Tailscale. Make Command work as Super, and prepare for restarts.
1. What you will end up with
Use Moonlight on your Mac to control the desktop already running on your Omarchy computer. Sunshine on Linux sends the picture and sound; Tailscale connects the two computers privately. No router port forwarding is needed.
This is our recommended everyday setup. In our session, Moonlight felt substantially more responsive than macOS Screen Sharing through WayVNC. Sunshine successfully used the Linux computer’s Intel hardware video encoder. We did not measure comparative latency.
You control the same desktop that someone at the Linux monitor sees, rather than a separate login. The physical Windows key continues to work, and we will enable Command as Super on the Mac.
Optional backup: after finishing this guide, follow the WayVNC / Screen Sharing fallback guide. You do not need WayVNC to use Moonlight.
On October 5, 2026: Omarchy with Hyprland 0.56.2, WayVNC 0.10.1, Sunshine 2026.516.143833, Moonlight 6.2.0, an Intel UHD 630 GPU, and a connected 1920 × 1080 monitor. Screen Sharing displayed the Linux lock screen; Moonlight displayed the desktop and initialized audio. Command–Space opened the Omarchy menu after keyboard capture was enabled. Cold-boot recovery, other GPUs, headless use and Screen Sharing modifier remapping were not tested.
2. Before you start
- An Omarchy computer with a monitor attached, connected to the internet, awake and logged into its desktop.
- A Mac connected to the internet.
- Your Linux username and password, with permission to run
sudocommands. - Both computers signed into the same personal Tailscale account. A managed account may need an administrator to allow the connections.
This guide is for Omarchy/Hyprland. Ubuntu GNOME and KDE need different desktop-sharing instructions. Start with a working local Linux desktop; do not try to create a headless desktop with these steps.
Each command block says where to run it. Copy the whole block, paste into Terminal, and press Return. Do not copy a prompt such as ~ ❯. Password prompts usually show no letters or dots while you type; that is normal.
Already have a working setup? Skip to Command as Super or daily use. The configuration steps below are for a new setup and replace the named configuration files. They include backups where appropriate.
3. Connect both computers with Tailscale
On the Linux computer, in a local terminal
If Tailscale is not installed, install it from the Omarchy/Arch repositories. Keep Omarchy up to date through its normal update workflow first if package installation reports stale mirrors or dependency errors; do not run a database-only pacman -Sy update.
sudo pacman -S --needed tailscale
sudo systemctl enable --now tailscaled
sudo tailscale up
Open the sign-in link printed by the last command and sign into your Tailscale account. If it is already connected, you do not need to sign in again.
systemctl is-enabled tailscaled
systemctl is-active tailscaled
whoami
tailscale ip -4
The first two answers should be enabled and active. Write down your username and the address printed by the last command, which normally begins with 100.. These are your connection details; there is no shared address for everyone following this guide.
On the Mac
- Install Tailscale using its official Mac instructions.
- Open Tailscale, approve its normal network-extension setup, and sign into the same account.
- Make sure its menu says it is connected. Enable its start-at-login option if you want it available after logging into your Mac.
Enable terminal access on Linux
If SSH to this machine already works, keep your existing setup and skip this command. For a new personal setup, run this at the Linux computer:
sudo tailscale set --sshThis enables Tailscale SSH for connections over your private Tailscale network. It can interrupt an existing SSH connection to the Tailscale address, which is why you do this locally. Your account must allow SSH to this Linux user. See Tailscale SSH access rules if access is denied; do not make a managed network broadly accessible just to bypass a denial.
4. Open a Linux terminal from your Mac
On the Mac: open Terminal from Applications → Utilities. Run this block. It asks for the two details you wrote down:
printf "Linux username: "
read -r LINUX_USER
printf "Linux Tailscale IPv4 address: "
read -r LINUX_IP
ssh "$LINUX_USER@$LINUX_IP"
Complete any Tailscale browser verification if prompted. If SSH asks about a new host key, verify it against the host information before accepting it. You should end up at a Linux prompt. Run hostname if you are unsure which computer you are controlling.
Keep this terminal open for the Linux steps below. Later, open a second Mac Terminal window for the connection tunnel. Typing exit in an SSH session returns that window to the Mac.
5. Install Sunshine
In your Linux terminal (the SSH window is fine):
sudo pacman -S --needed sunshineEnter your Linux password, then type y if asked to proceed. Wait for the normal prompt to return. Confirm it installed:
pacman -Q sunshine
systemctl --user is-active graphical-session.target
systemctl --user show-environment | grep WAYLAND_DISPLAY
The session check should say active, and the final command should show a Wayland display, such as WAYLAND_DISPLAY=wayland-1. If either is missing, log into the Omarchy desktop locally first. An SSH login by itself does not create a graphical desktop. Do not add sudo to the systemctl --user commands in this guide.
6. Set up Sunshine on Linux
In your Linux terminal, run bash first so the following block uses Bash syntax.
In the Linux terminal: this creates a configuration that listens on your Tailscale address. It leaves automatic router port opening turned off.
mkdir -p ~/.config/sunshine
chmod 700 ~/.config/sunshine
if [ -f ~/.config/sunshine/sunshine.conf ]; then
  cp -p ~/.config/sunshine/sunshine.conf ~/.config/sunshine/sunshine.conf.backup-$(date +%Y%m%d-%H%M%S)
fi
LINUX_IP=$(tailscale ip -4)
if [[ "$LINUX_IP" =~ ^100\.[0-9]+\.[0-9]+\.[0-9]+$ ]]; then
  printf 'sunshine_name = Omarchy Desktop\nbind_address = %s\nupnp = disabled\n' "$LINUX_IP" > ~/.config/sunshine/sunshine.conf
  chmod 600 ~/.config/sunshine/sunshine.conf
  echo 'Sunshine configuration saved.'
else
  echo 'Not saved: connect Tailscale first, then repeat this block.'
fi
Wait for “Sunshine configuration saved,” then start the service:
systemctl --user enable --now app-dev.lizardbyte.app.Sunshine
systemctl --user restart app-dev.lizardbyte.app.Sunshine
systemctl --user is-active app-dev.lizardbyte.app.Sunshine
Expected: active. The package waits a few seconds for the desktop. After enabling it, sunshine also works as a short service name. This guide uses the full name because the short alias may not exist before enabling it.
Sunshine chooses an encoder automatically. On our Intel UHD 630, hardware H.264 and HEVC encoding worked with the installed Intel media driver. We explicitly selected encoder = vaapi on that machine. Leave automatic selection in place on different hardware; do not copy Intel-specific settings onto an NVIDIA computer.
7. Open Sunshine’s settings securely
Open a second Terminal window on the Mac. Leave your Linux terminal available. Paste this block into the new Mac window and enter your Linux details again:
printf "Linux username: "
read -r LINUX_USER
printf "Linux Tailscale IPv4 address: "
read -r LINUX_IP
ssh -N -o ExitOnForwardFailure=yes -o ServerAliveInterval=30 -o ServerAliveCountMax=3 \
  -L "127.0.0.1:47990:$LINUX_IP:47990" \
  "$LINUX_USER@$LINUX_IP"
Expected: after authentication, the terminal sits quietly without returning a prompt. That means the tunnel is running. Leave this window open. Pressing Control–C or closing it stops this connection.
This tunnel lets your Mac browser reach Sunshine’s settings. Here, 127.0.0.1 means “this computer”: the Mac connects locally, and SSH carries that traffic to Linux.
8. Install Moonlight and pair it
Install the Mac app
Download the macOS version from Moonlight’s official website, open the downloaded disk image, and drag Moonlight into Applications. If you already use Homebrew, the alternative is:
brew install --cask moonlightYou only need one installation method. Open Moonlight from Applications.
Create your Sunshine admin login
- With the SSH tunnel from step 7 still running, open https://localhost:47990/ on your Mac.
- Sunshine uses its own certificate, so the browser may show a certificate warning. Confirm the address is exactly your local tunnel address and that this is the Sunshine server you just started. Use your browser’s advanced/details option to continue only for this known local service. Do not apply this advice to unfamiliar websites.
- On Sunshine’s first-run page, create a username and a strong, unique password. Save them in your password manager. This login is separate from your Linux login.
- Sign into Sunshine. Keep this browser tab open for pairing.
Add your Linux computer in Moonlight
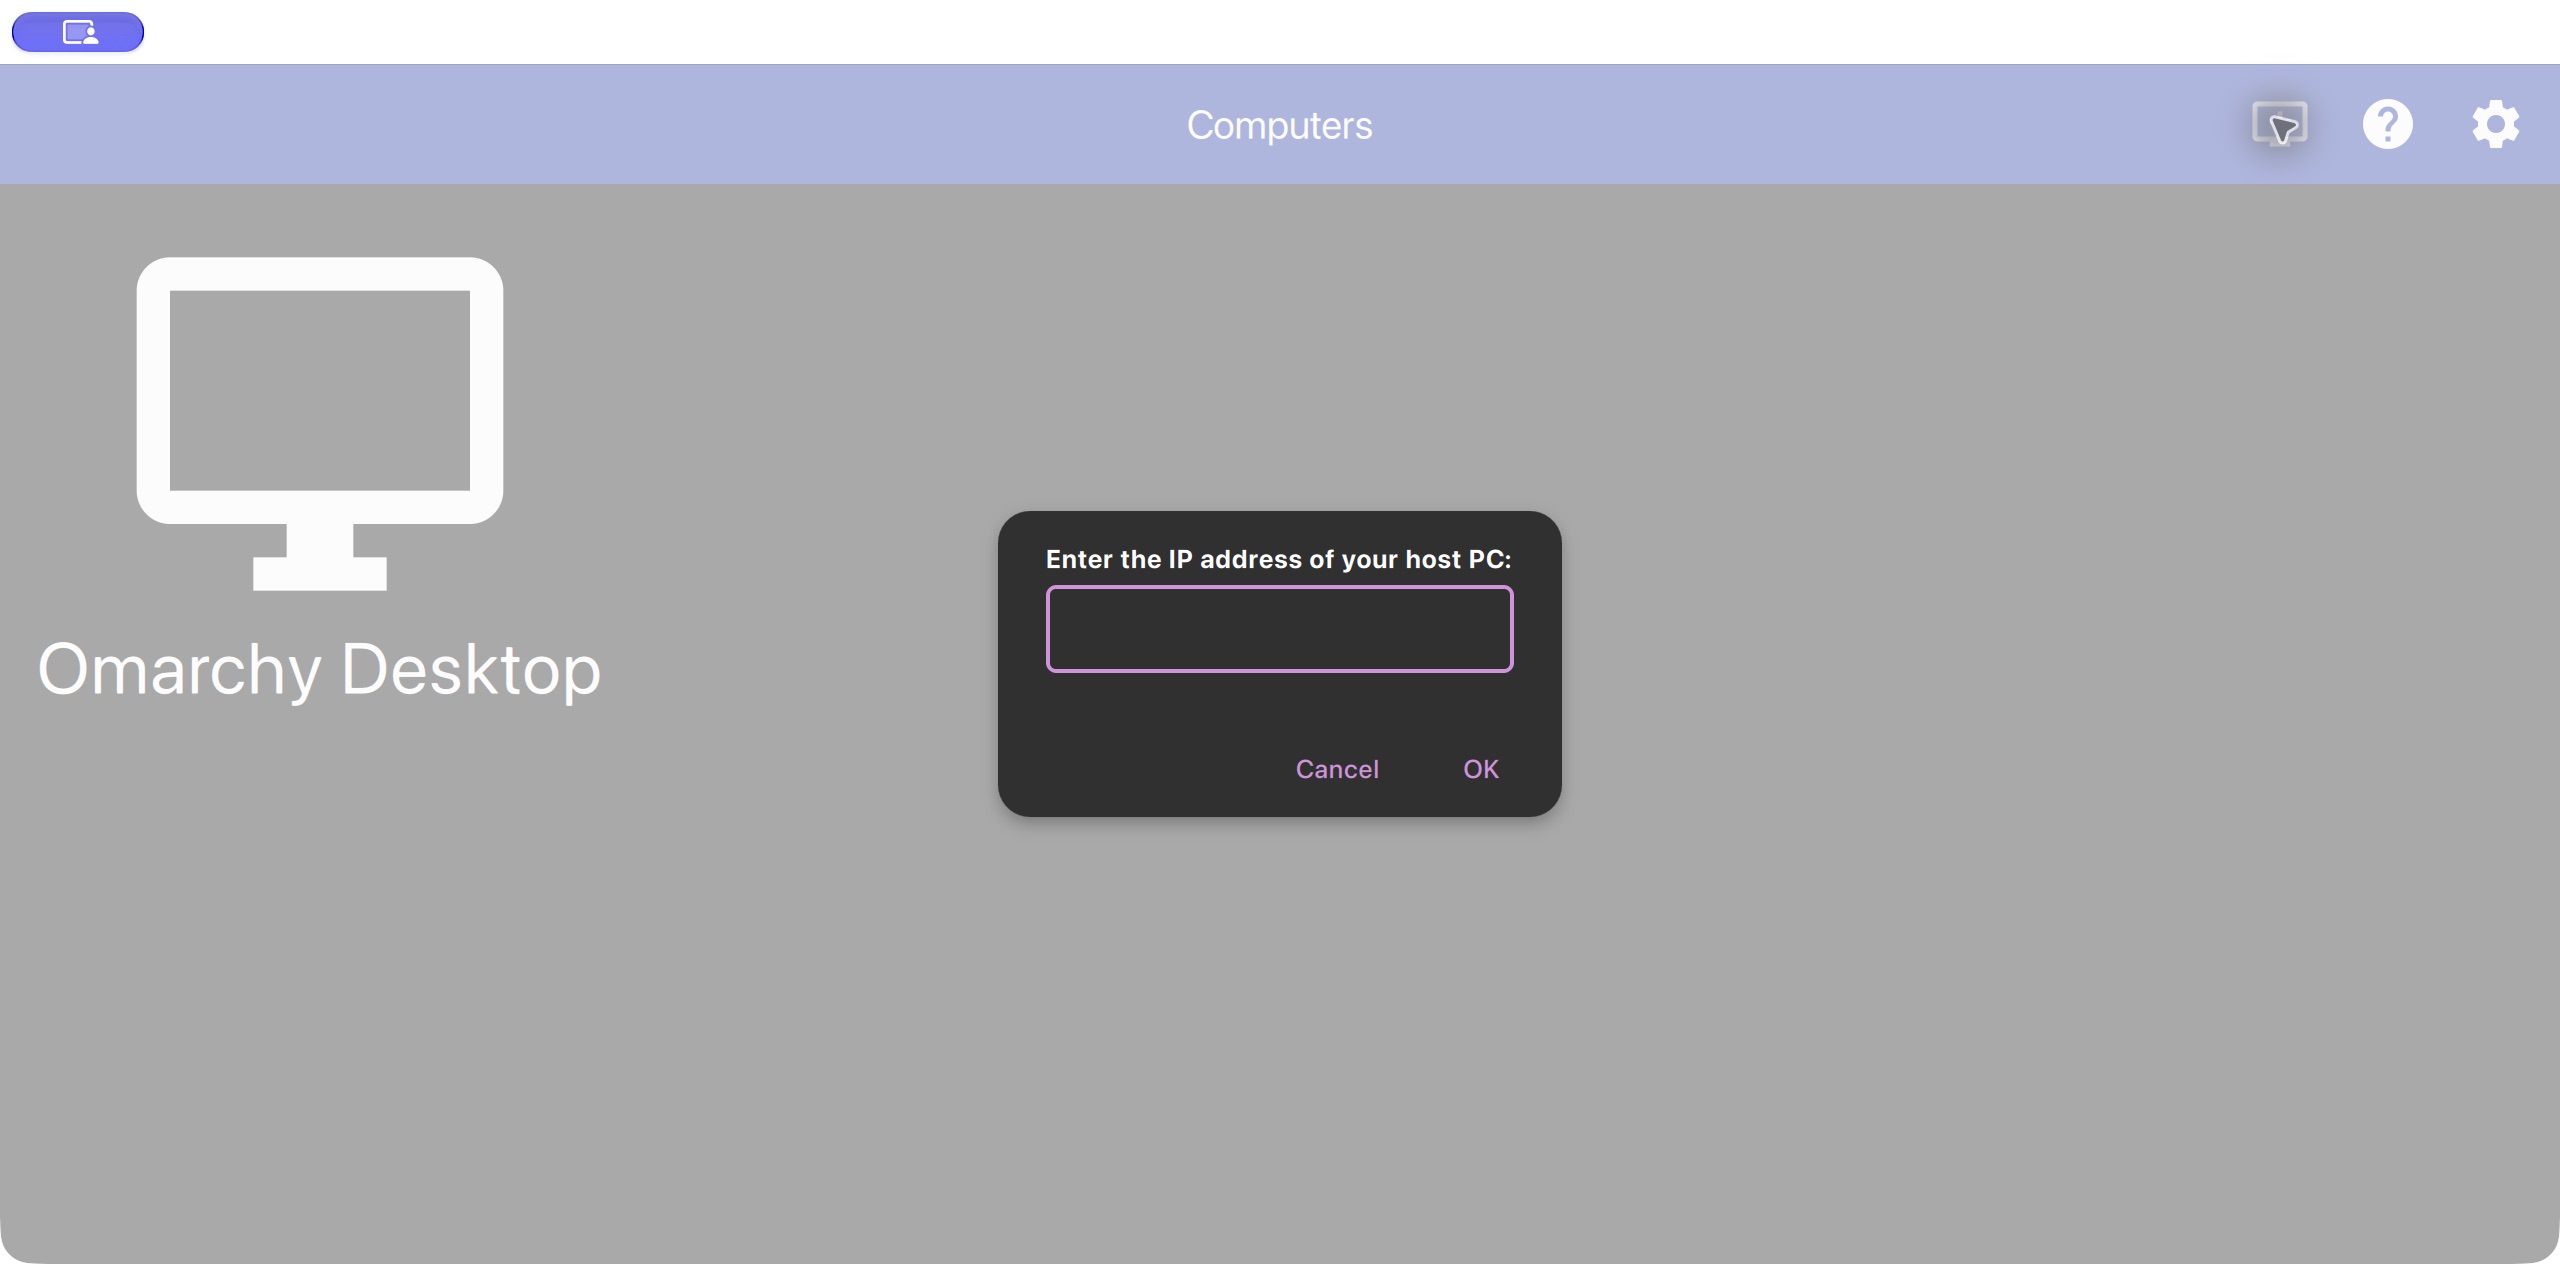
- In Moonlight’s Computers view, click the monitor-with-a-plus button in the top right.
- Enter the Linux Tailscale IPv4 address you recorded earlier. Do not enter
127.0.0.1, a web address, or the VNC port. - Click OK. “Omarchy Desktop” should appear.
- Click the computer. Moonlight displays a four-digit pairing PIN.
- In Sunshine’s browser tab, open PIN, enter that PIN and a name for your Mac if requested, then click the pairing/submission button.
- The Moonlight PIN dialog closes when pairing succeeds. Click the computer again to see its applications.
Click Desktop, the first desktop tile. Our package also supplied “Low Res Desktop” and Steam Big Picture. The low-resolution entry contains commands for a different display setup; use the ordinary Desktop tile.
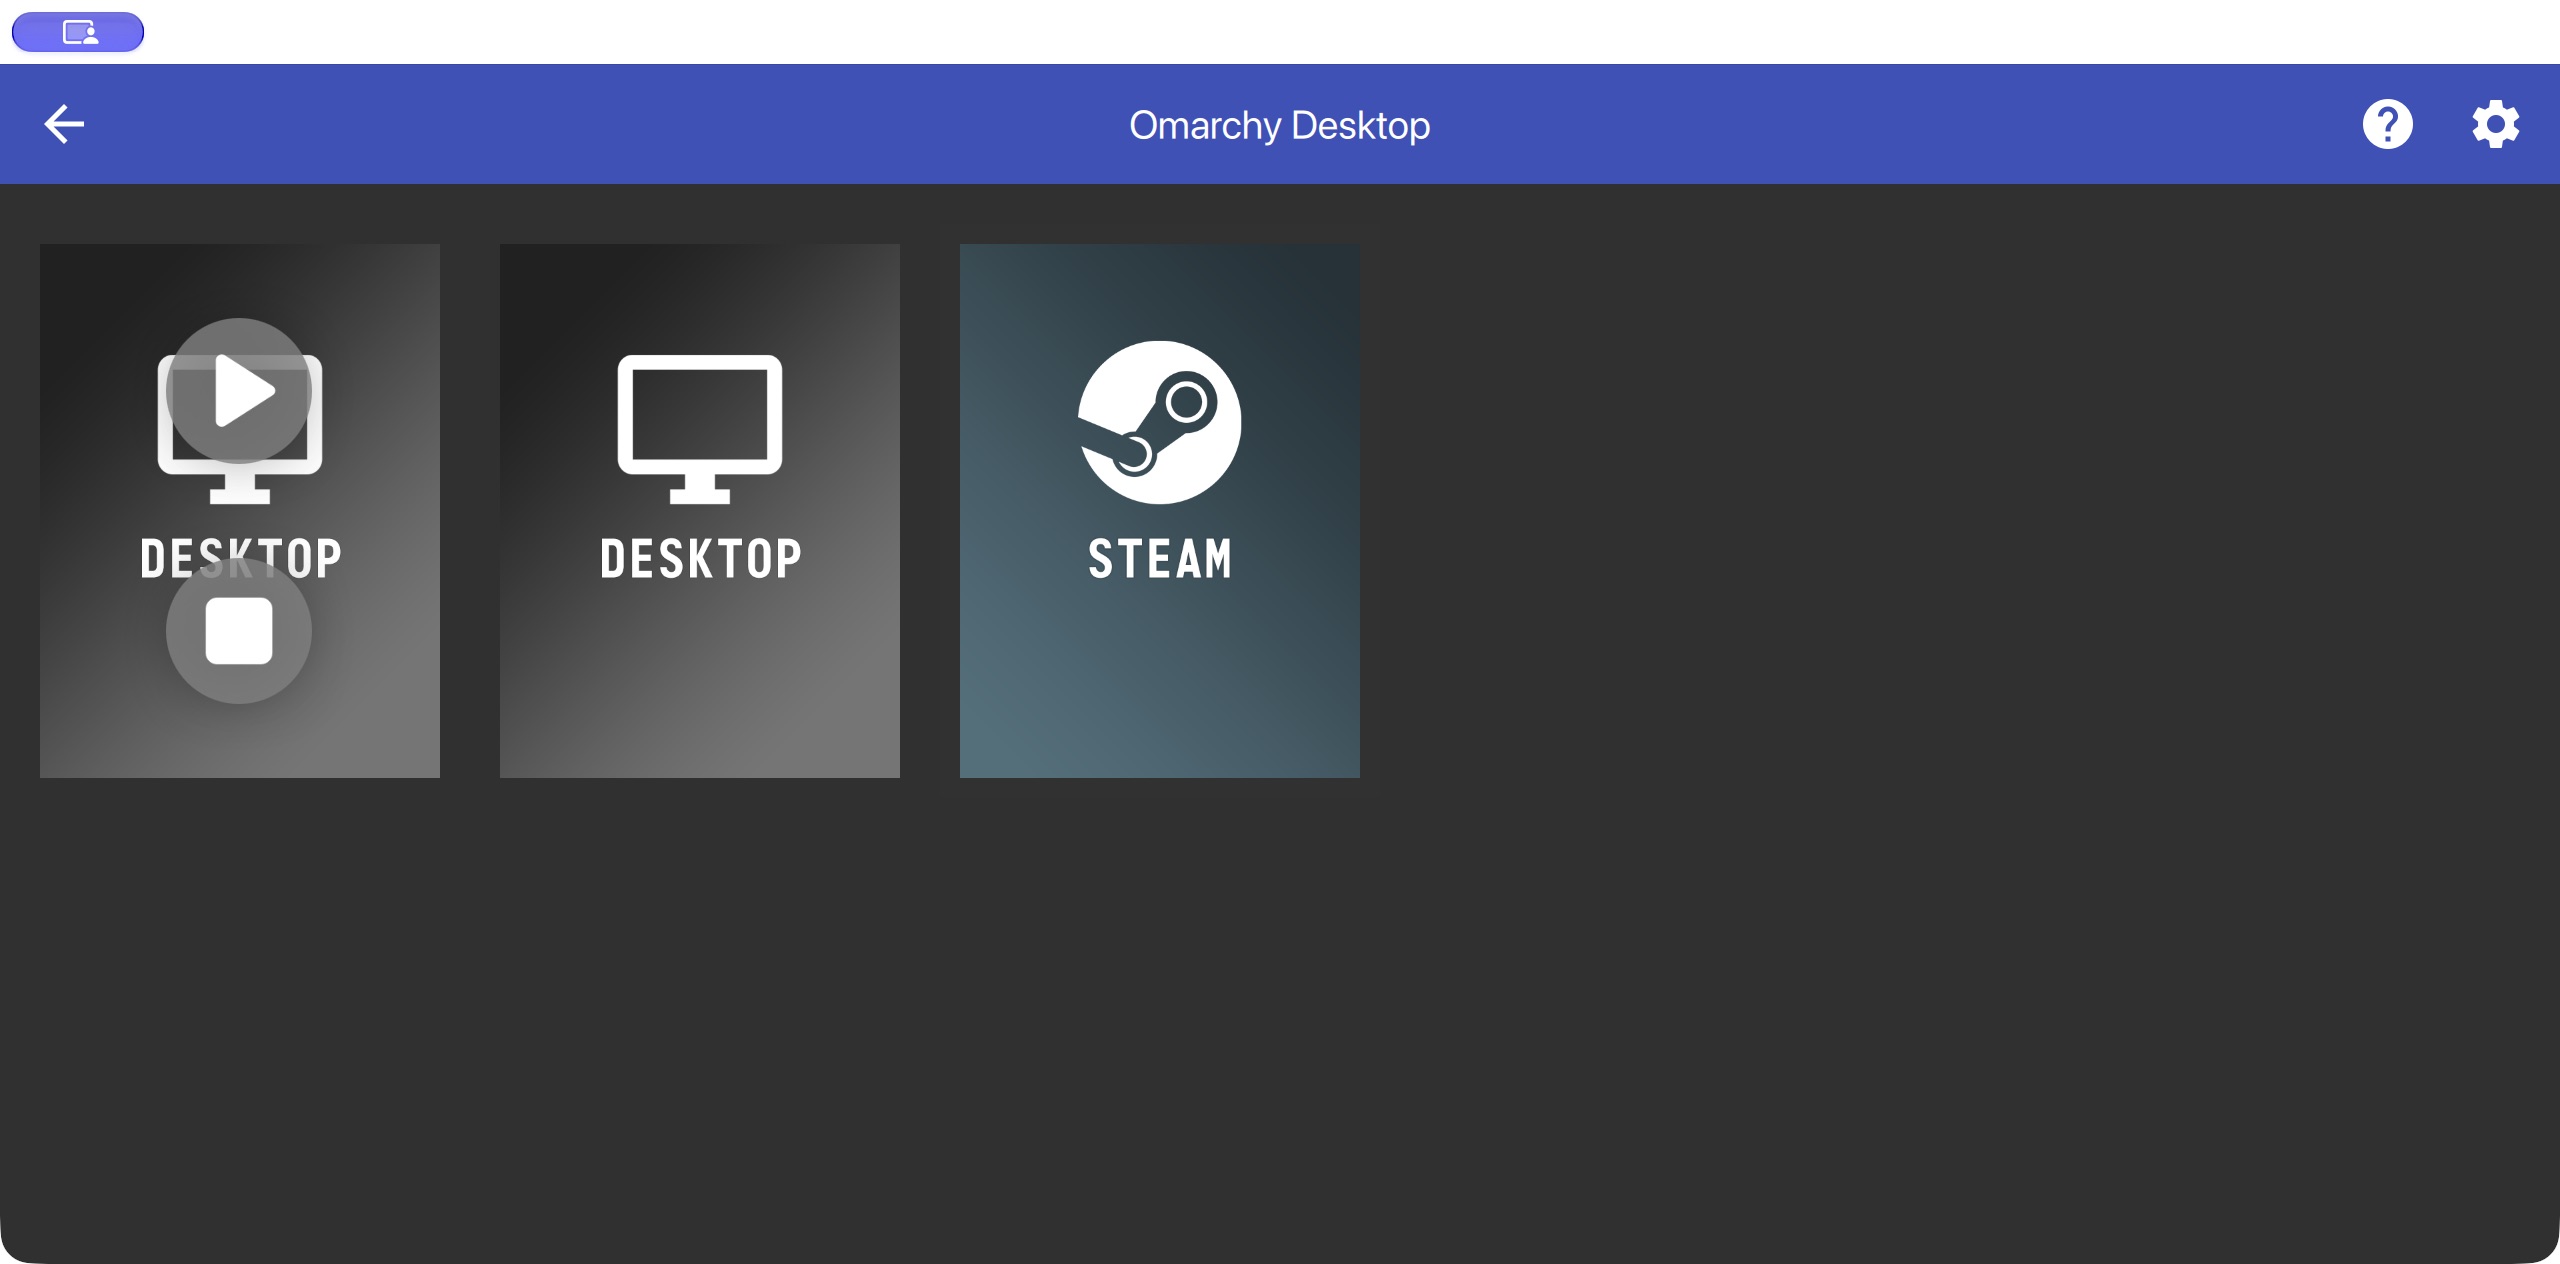
Expected: your Linux desktop appears. You can unlock a locked desktop with your Linux password. Disconnect with Control + Option + Shift + Q. On a Mac, Option is the Alt key named in Moonlight’s tip. This ends the stream, not your Linux login.
Moonlight connects directly over Tailscale after pairing. It does not need the SSH tunnel for everyday streaming. After pairing, you can stop the tunnel with Control–C. Open it again whenever you need Sunshine’s administration page.
9. Make Command work as Super / Windows
This is the step that fixed the missing Super key in our session. No Linux-wide remapping was needed.
- Disconnect the Moonlight stream with Control + Option + Shift + Q.
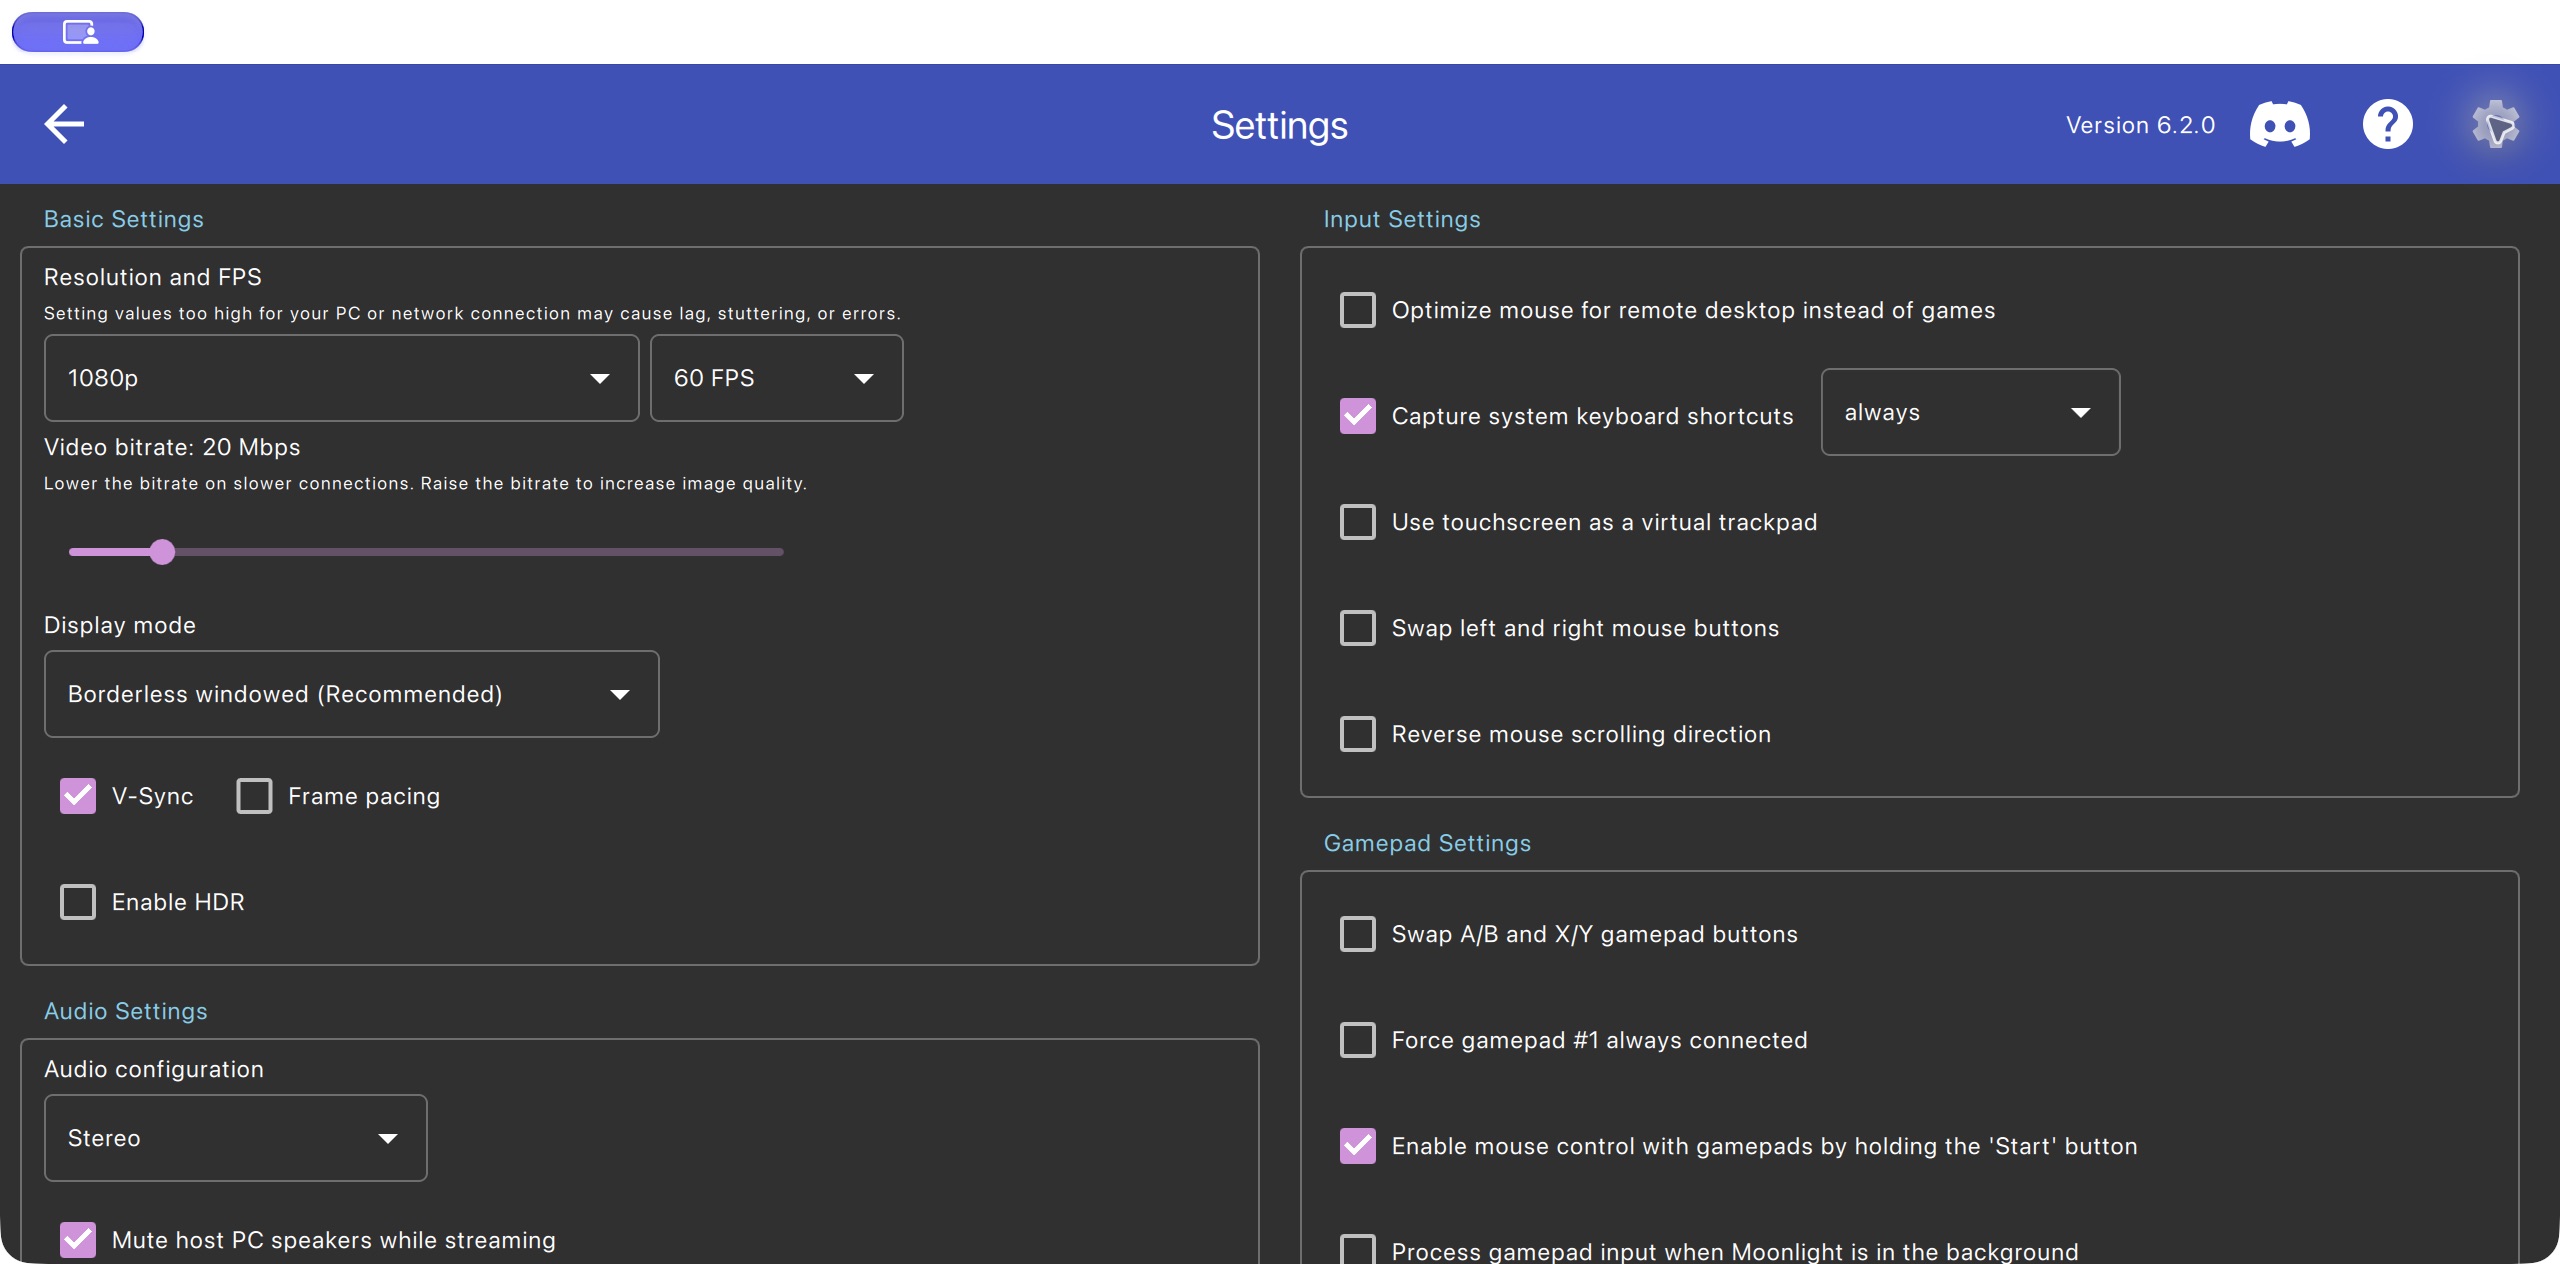
- Click the gear in Moonlight’s upper-right corner.
- Under Input Settings, check Capture system keyboard shortcuts.
- In the menu next to it, choose always. This also covers windowed streaming, rather than only fullscreen.
- Click the back arrow and resume Desktop.
- Click inside the stream and press Command + Space. With the Omarchy bindings used here, its menu opens.
| Key on your Mac | Meaning inside the Moonlight session |
|---|---|
| Command ⌘ | Super / Windows |
| Option ⌥ | Alt |
| Control ⌃ | Control |
Yes, the physical Windows key on the Linux computer still works. This setting controls keyboard capture in the Mac Moonlight app. It does not change the Linux keyboard’s layout or Omarchy’s shortcuts.
While the stream has keyboard focus, Mac system shortcuts can go to Linux. Remember the disconnect shortcut above to get back out. This fix applies to Moonlight; the optional Screen Sharing fallback has separate keyboard behavior.
10. Everyday use
For Moonlight
- Make sure Linux is awake and logged into its desktop, and Tailscale is connected on both computers.
- Open Moonlight → Omarchy Desktop → Desktop.
- Use Command for Super shortcuts. Disconnect with Control–Option–Shift–Q.
No Terminal window or SSH tunnel needs to stay open for Moonlight. If you want a second way to reach the desktop, set up the optional WayVNC fallback.
11. What happens after a restart or power outage?
There are several separate steps between “power returns” and “I can see my desktop.” Enabling Tailscale covers one of them:
| Stage | What must happen |
|---|---|
| Power returns | The PC must turn on. Check its BIOS/UEFI power-recovery setting locally; names include “AC Recovery” or “Restore on AC Power Loss.” Firmware behavior was not changed or tested in this session. |
| Linux starts | An encrypted startup disk may ask for its unlock password before Linux and Tailscale can start. An existing automatic unlock mechanism could change this; verify your own machine. |
| Network connects | Tailscale’s system service starts automatically when enabled. A valid sign-in and working internet connection are still required. |
| Desktop starts | Log into the Omarchy graphical desktop. Sunshine starts with that desktop session. |
| Mac reconnects | Connect Tailscale, reopen Moonlight, and unlock the desktop if necessary. |
Verified on the original machine: tailscaled was already enabled and active, so no change was needed. Its root disk uses LUKS encryption. We did not reboot it or verify unattended disk unlocking. WayVNC and Sunshine were enabled for the graphical session. A locked, already-running desktop is different from a machine waiting for its first desktop login.
Check your own Linux machine:
systemctl is-enabled tailscaled
systemctl is-active tailscaled
systemctl --user is-enabled app-dev.lizardbyte.app.Sunshine
systemctl --user is-active app-dev.lizardbyte.app.Sunshine
If Tailscale is disabled, turn on startup with:
sudo systemctl enable --now tailscaledIn Tailscale’s admin console, also review the Linux device’s key-expiration date. An expired sign-in can require reauthentication even when the service is running. Decide on an expiration policy appropriate for your own device; do not assume this guide disables it.
Before relying on this while away: do a planned restart while you can physically reach the Linux computer. Note whether it stops at disk unlock or desktop login, then reconnect from the Mac. A UPS can help with brief outages. Fully unattended recovery needs a separate decision about firmware settings, disk unlocking and login; this guide does not silently enable automatic login or remove encryption. Enabling user “linger” alone does not create a Hyprland desktop.
12. If something does not work
SSH times out or says permission denied
Check both Tailscale apps are connected, the Linux computer is awake, and you used the Linux username with the Linux Tailscale address. An access-denied message may mean Tailscale policy or login authorization needs attention. A successful SSH connection is the prerequisite for the tunnel; solve that first.
“Address already in use” when opening the tunnel
A previous tunnel may already own port 47990. Close that tunnel with Control–C before starting another.
Sunshine will not start, or Moonlight cannot find it
systemctl --user status app-dev.lizardbyte.app.Sunshine --no-pager
journalctl --user -u app-dev.lizardbyte.app.Sunshine -n 80 --no-pager
ss -lnt | grep -E '47984|47989|47990|48010'
tailscale ip -4
The listening address should match the current Tailscale address. If Tailscale was late starting after a reboot, restart Sunshine after Tailscale connects. If the device was removed and re-added to Tailscale, update bind_address and the Mac connection details. Add the host manually in Moonlight; automatic local-network discovery may not find a Tailscale host.
If SSH works but Moonlight cannot reach the machine, check your Linux firewall and Tailscale access rules. Sunshine normally uses TCP 47984, 47989 and 48010, plus UDP 47998–48000. The web interface uses TCP 47990. Allow only the needed traffic from your authorized Mac over Tailscale; do not disable the firewall or open router ports. An administrator may need to make these narrowly scoped rules. Our existing network allowed the stream without a firewall change.
Picture works, but mouse or keyboard does not
First click inside Moonlight. For Super shortcuts, apply step 9 and reconnect. For all input failing, check Linux device permissions:
getfacl /dev/uinputOur Sunshine package installed a device rule and gave the logged-in user read/write access automatically. If your user has no access, log out and back into the graphical desktop after installation. You can reload the installed rules and retry:
sudo udevadm control --reload-rules
sudo udevadm trigger --subsystem-match=misc --sysname-match=uinput
systemctl --user restart app-dev.lizardbyte.app.Sunshine
Do not make every input device world-writable. If it still fails, consult Sunshine’s Linux setup documentation for your installed version.
Video is black, slow or choppy
Keep the monitor connected and awake for this setup. Start with 1080p, 60 FPS and roughly 15–20 Mbps in Moonlight, then lower the bitrate or frame rate for a slower connection. A wired Linux connection can help. Check Sunshine’s log for the encoder it actually selected. Test-probe errors for an unsupported codec (such as AV1 on our Intel UHD 630) do not necessarily mean streaming failed; our log subsequently found working H.264 and HEVC encoders.
No sound on the Mac
Check Mac volume, Linux application volume, and Moonlight’s audio settings. Sunshine creates a streaming audio sink; its log should show audio/Opus initialization. “Mute host PC speakers while streaming” controls whether sound is also heard at the Linux computer. Audio initialization was verified here, but subjective audio quality was not separately measured.
13. Stop or undo Moonlight access
To stop desktop sharing and prevent it from starting with future desktop sessions, run this on Linux:
systemctl --user disable --now app-dev.lizardbyte.app.SunshineThis keeps your settings, installed packages and Tailscale connection. Close Moonlight and stop the SSH tunnel as described above. To turn desktop sharing back on:
systemctl --user enable --now app-dev.lizardbyte.app.SunshineTo undo the Command-key change, disconnect Moonlight, open Settings, and uncheck “Capture system keyboard shortcuts.” Your physical Linux keyboard remains unchanged throughout.
14. Optional: add a Screen Sharing fallback
Continue to the separate WayVNC setup guide →
Keep Moonlight as your everyday viewer. WayVNC is a useful alternative when streaming is unavailable, but it was noticeably laggier in our setup. Both depend on Tailscale, a running Linux desktop and an awake computer, so the fallback does not bypass a power outage or a pre-login screen.
15. References and verification limits
The steps above are based on a real setup session, with fresh screenshots of the installed Moonlight menus. The screenshots show the saved settings after setup; they are not images of a fresh installation. The public guide omits private addresses and credentials. The setup commands were reviewed against the working configuration; the complete sequence was not rerun on a fresh machine.