Creating an Ubuntu Desktop VM on Proxmox VE
A tab-by-tab walkthrough of the Create VM wizard on a consumer desktop running Proxmox VE, with the two errors that arrive on day one and the reasoning behind each setting rather than just the setting.
· Scope: Proxmox VE 9.2.2 on consumer hardware, Ubuntu 26.04 Desktop guest.
Scope
This guide starts at a Proxmox VE 9.2 web interface that is already running and reachable on your network. Installing Proxmox VE itself is not covered here, and that installer erases the target disk — if the machine still has Windows or another operating system on it, that operating system is gone. Back up first, and be certain you have selected the disk you meant to.
Every screenshot below comes from one session on September 2, 2026. Where that session did something different from what this guide recommends, the caption says so rather than hiding it. Section 14 collects those gaps.
1 What You Are Building
One virtual machine on a hypervisor, with a graphical desktop you can reach two ways: through the browser console built into Proxmox, and — later, optionally — over the network from another computer.
| Layer | What it is |
|---|---|
| Proxmox VE 9.2 | A Debian-based hypervisor with a web interface on port 8006. It owns the physical machine. |
| The VM | Four virtual cores, 8 GB of RAM, a 64 GiB virtual disk, and a virtual network card bridged onto your LAN. |
| Ubuntu 26.04 Desktop | The guest operating system, installed from an ISO that Proxmox downloads for you. |
| noVNC console | A browser-based screen for the VM. Good for installation and rescue; not what you want for daily use. |
2 Before You Begin
Consumer desktops make cost-effective virtualization hosts, but two things need attention before the hypervisor is any use.
2.1. Firmware settings
| Setting | What to do, and why |
|---|---|
| Intel VT-x / AMD SVM | Enable. This is hardware virtualization. Without it KVM will not start a VM at all, so this one is not optional. |
| Intel VT-d / AMD-Vi (IOMMU) | Enable. Not needed today, but it is what lets you pass a physical GPU or NIC through to a guest later, and you will not want to reboot into firmware to find it. |
| Power state after AC loss | Set to Always On or Last State. A hypervisor that does not come back after a power cut is a hypervisor you have to walk to. |
| Secure Boot | Leave it as it is, and only disable it if the host will not boot. See below. |
Secure Boot is supported, despite what older guides say
Proxmox has shipped a Microsoft-signed shim since version 8.1 in November 2023, and it is installed by default on new installations — so "disable Secure Boot" is no longer standard advice, and it was never about DKMS or third-party driver signatures. There is a narrower, real reason to know about it: the 9.2 upgrade replaced the Proxmox shim packages with Debian's, and some boards do not cope with the dual-signed shim, producing a security violation at boot. If that is what you are hitting, disabling Secure Boot is a legitimate workaround. Disabling it pre-emptively is cargo cult.
2.2. Use wired Ethernet
Wi-Fi will not bridge
Proxmox puts guests on the network through a bridge — vmbr0 — attached to a physical interface. Each guest then appears on your LAN with its own MAC address. Ordinary Wi-Fi client cards refuse to carry frames for MAC addresses other than their own, so they cannot back a bridge without NAT or WDS workarounds. Plug the host into a switch or router with a cable.
3 Downloading the Ubuntu ISO
Proxmox can pull an installation image straight onto its own storage, which saves downloading six gigabytes to a laptop only to upload it again. In the left-hand tree, select local (pve), then ISO Images, then Download from URL.
Paste the URL and the dialog will look like this — filled in, but with the File name field outlined in red and the Download button greyed out:
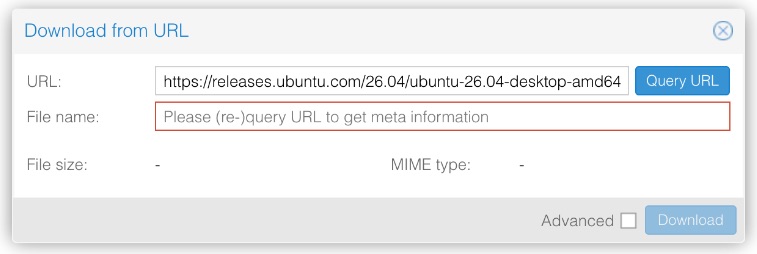
Click Query URL. Proxmox fetches the headers, resolves the filename, and unlocks the button:
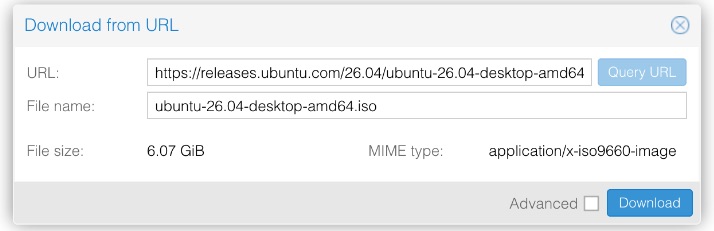
application/x-iso9660-image, Download now active. The URL text is identical in both captures — pressing the button is the whole difference.The URL used here was:
https://releases.ubuntu.com/26.04/ubuntu-26.04-desktop-amd64.isoPoint at the file, not the directory
The URL does have to name the .iso itself; https://releases.ubuntu.com/26.04/ is a directory listing and the query will resolve it to an HTML page, not an image. But that is a different failure from the one above, and it reports a different MIME type rather than a red field.
The task window streams the download and ends in TASK OK:
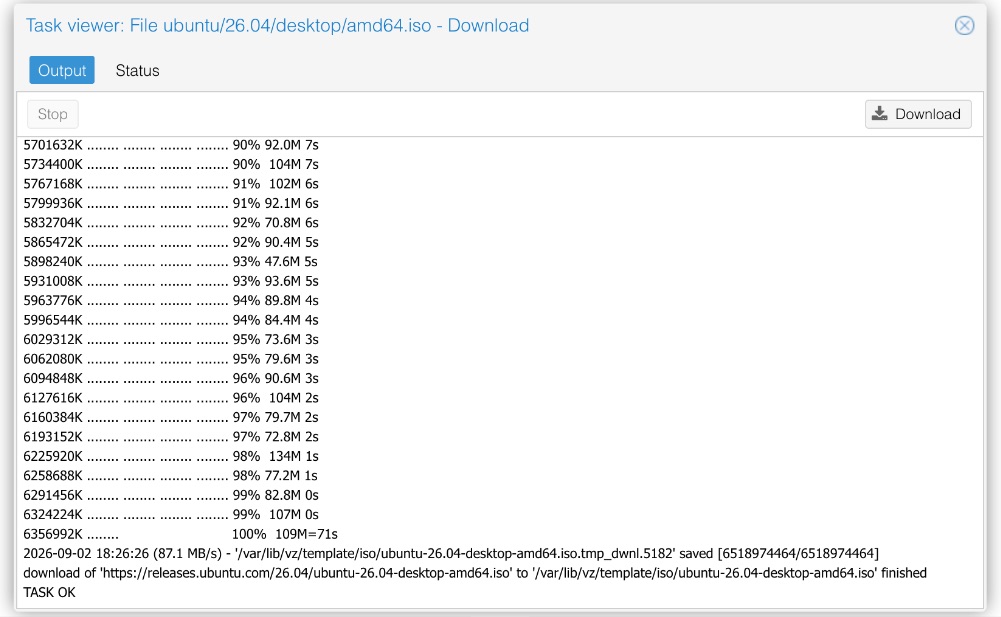
/var/lib/vz/template/iso/, then TASK OK. If the log ends any other way, the ISO is not usable — do not move on.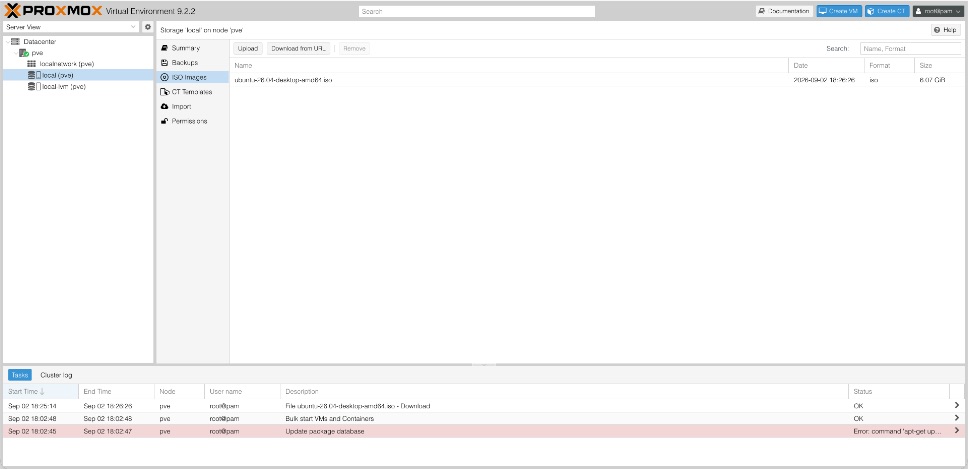
local (pve) → ISO Images, and is selectable from the Create VM wizard.With the ISO in place, click the blue Create VM button at the top right. The wizard has eight tabs; the General tab only asks for a VM ID and a name, so this guide starts at the second.
4 The OS Tab
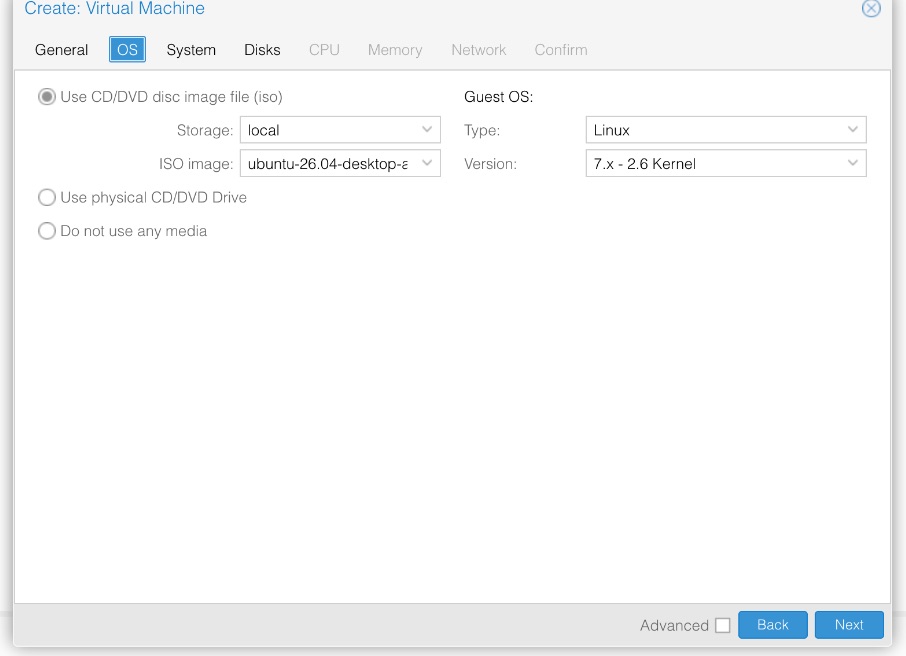
7.x - 2.6 Kernel — on Proxmox 9 that is the current Linux entry, and it is the one to leave selected.| Field | Value, and what it does |
|---|---|
| Storage | local — where the ISO was downloaded to. This is not where the VM's disk goes. |
| ISO image | ubuntu-26.04-desktop-amd64.iso. |
| Type / Version | Linux / 7.x - 2.6 Kernel. This only sets sensible defaults elsewhere in the wizard; it does not restrict what you can install. Both entries map to the same internal ostype: l26. |
5 The System Tab
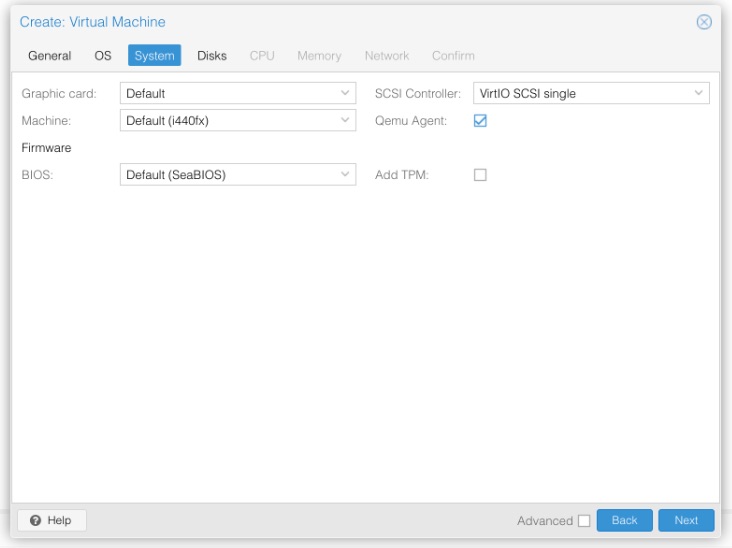
Default here; it was changed to VirtIO-GPU later in the session, which is why the Confirm tab shows vga: virtio. Either value works.| Field | Value, and what it does |
|---|---|
| Qemu Agent | Check it. The single most useful box on this tab. It lets Proxmox request a clean shutdown from inside the guest, report the guest's IP address, and read real memory use. It does nothing until you also install the agent inside Ubuntu — see section 13. |
| Graphic card | Default is fine. VirtIO-GPU is a paravirtualised adapter that generally gives a smoother desktop under Wayland, but it is not 3D acceleration — that needs VirGL, which is a separate thing this VM does not have. If the noVNC console misbehaves, switching back to Default is the first thing to try. |
| Machine | Default (i440fx) works and is what this session used. q35 is the more modern chipset, gives the guest a real PCIe bus, and is what you want if you ever plan to pass a GPU through. Changing it later is possible but disruptive, so if you already know you want passthrough, pick q35 now. |
| BIOS | Default (SeaBIOS) installs Ubuntu without trouble. OVMF (UEFI) is the modern firmware and is required for guest Secure Boot or a virtual TPM; it also needs an EFI disk, which the wizard will offer to add. |
| SCSI Controller | VirtIO SCSI single. Leave it — section 6 explains why it matters. |
6 The Disks Tab
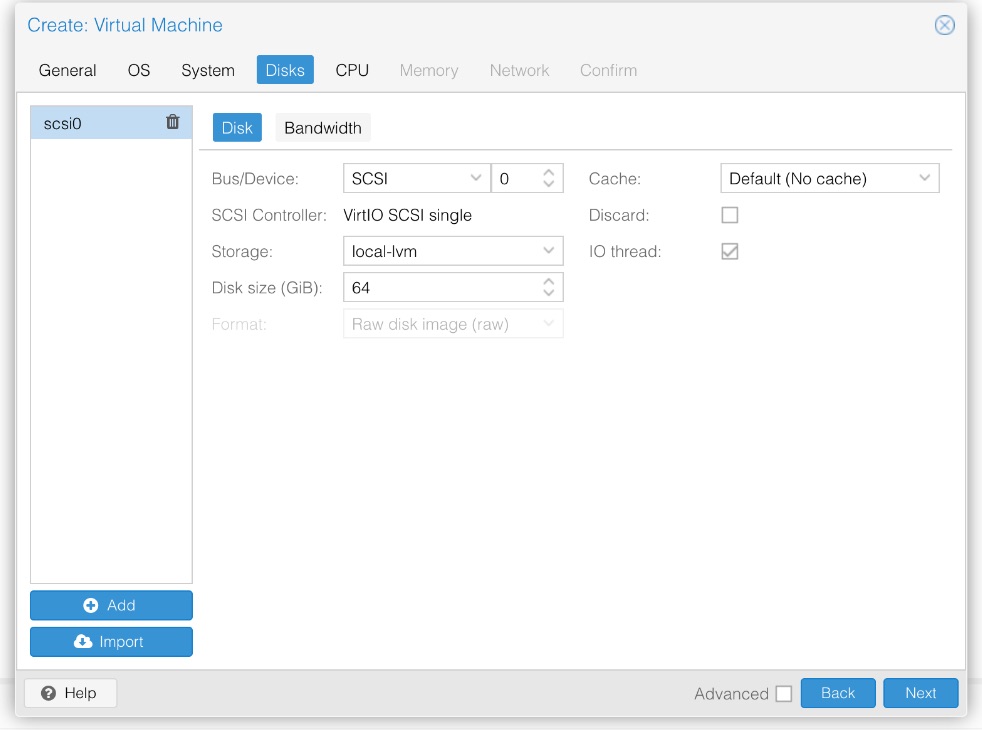
scsi0: local-lvm:64,iothread=on with no discard=on. Check it before you click Next, or add it afterwards under Hardware → Hard Disk → Edit.| Field | Value, and what it does |
|---|---|
scsi0 | The first virtual disk on the virtual SCSI bus. Inside Ubuntu it appears as /dev/sda. The Add button below the list attaches a second disk (scsi1) for separate data storage — you do not need one. |
| Storage | local-lvm (or local-zfs). This is thin-provisioned, so a 64 GiB disk does not consume 64 GiB up front. |
| Disk size | 64 GiB. Ubuntu Desktop plus a working set of applications wants 40–64 GiB. Growing an LVM-backed disk later is straightforward; shrinking one is not. |
| Discard | Check it, on SSD or NVMe backing. It passes TRIM from the guest down to the physical device, so blocks freed inside Ubuntu are actually returned — which keeps a thin-provisioned volume from growing to its full size and never shrinking. |
| IO thread | Already checked, because VirtIO SCSI single was selected. It gives this disk its own I/O thread in QEMU instead of sharing the main event loop, which keeps heavy disk activity from stalling the rest of the VM. |
6.1. Why SCSI rather than SATA or IDE
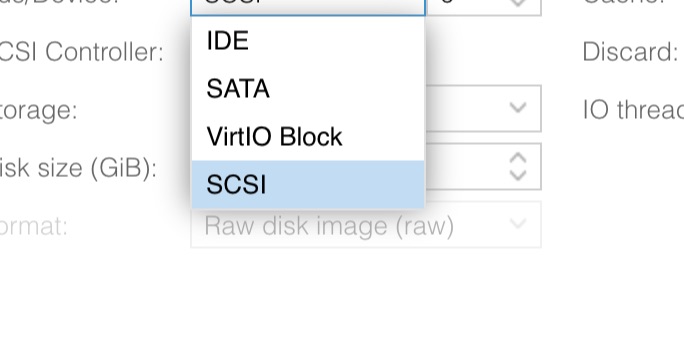
| Bus | What it is |
|---|---|
| SCSI | The default and the right answer. Paravirtualised through virtio-scsi: the guest driver and the host cooperate instead of the host pretending to be a disk controller. Supports discard, many devices per controller, and pass-through of real SCSI devices. |
| VirtIO Block | Also paravirtualised and also fast — and, contrary to a lot of older advice, it does support discard and multiple queues on any current QEMU. The reasons to prefer SCSI are narrower: uniform /dev/sd* naming, more disks per controller, and better behaviour with pass-through. |
| SATA / IDE | Emulated legacy controllers. The host imitates real 1990s hardware register by register, which is slow. Their purpose is booting operating systems too old to have VirtIO drivers. |
7 The CPU Tab
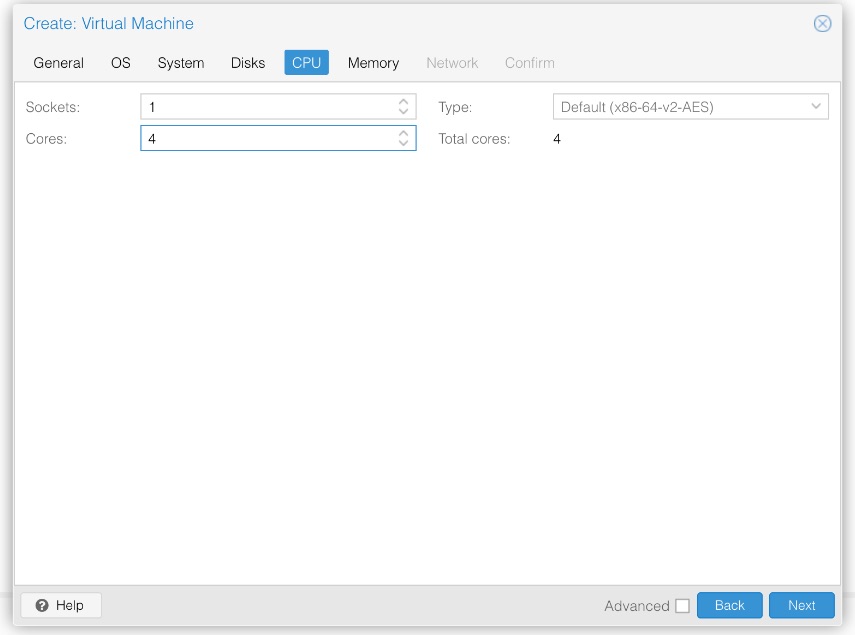
Default (x86-64-v2-AES).Virtual CPUs map onto logical threads on the host, not physical cores. A 10-core, 20-thread host presents 20 schedulable threads. Leave one socket and set cores directly; multiple sockets only matter when you are deliberately modelling NUMA.
Four cores suits a desktop guest. Six or eight is reasonable for compiling or rendering. Leave at least a few threads unclaimed so the hypervisor itself has room to handle disk and network work on the VM's behalf.
More vCPUs is not more speed
Proxmox will let you assign more cores than the host physically has threads, because CPU time is shared. Doing it to a single VM is counter-productive: the guest's scheduler believes it has processors that are not there, work gets queued behind threads that are not running, and the time lost shows up inside the guest as steal time. The VM ends up slower than it would have been with fewer cores.
7.1. Set Type to host
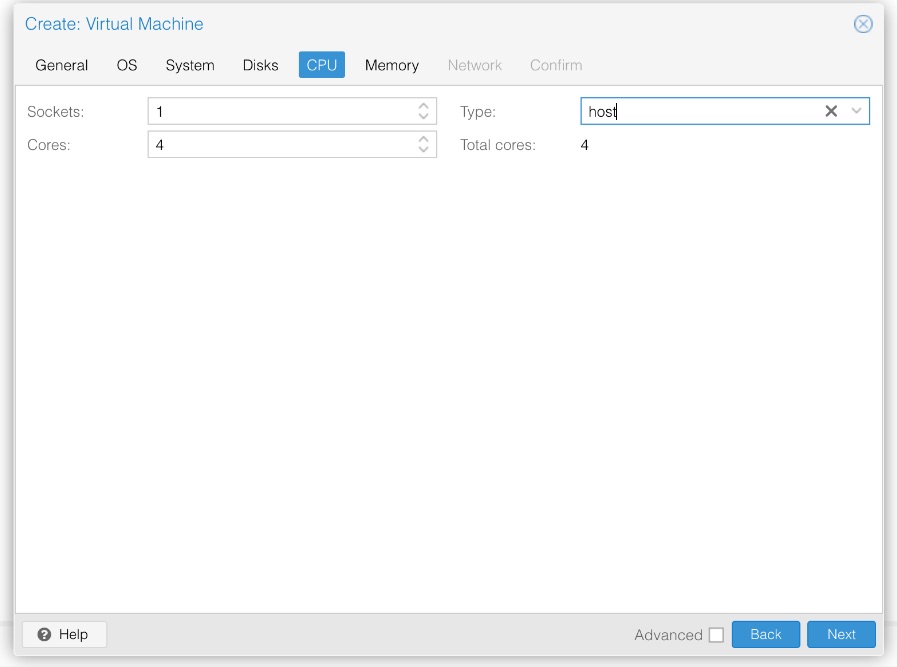
host. On a single machine that is not part of a migration cluster, this is close to a free performance win.By default Proxmox presents a generic, lowest-common-denominator model such as x86-64-v2-AES, so that a running VM can be migrated to a host with a different processor. On a standalone machine there is nowhere to migrate to, and that compatibility costs you instruction sets the hardware already has.
What host buys
The guest sees the physical CPU's own feature flags — AES-NI, AVX2, and whatever else the chip supports — instead of a masked subset. Anything doing encryption, compression, or vectorised maths benefits. The trade-off is that the VM can no longer be live-migrated to a host with a different CPU, which is not a constraint on a single-node install.
8 Memory and Network
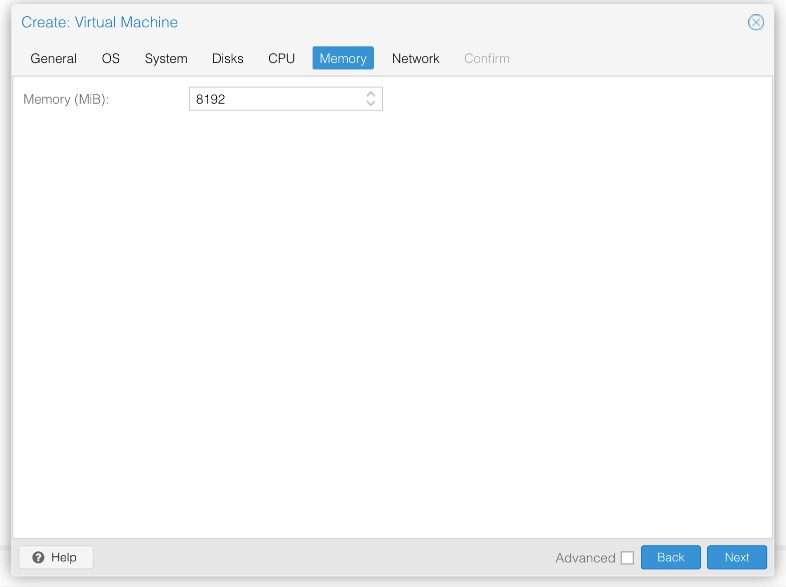
GNOME on Wayland plus a browser is the workload here. 4096 MiB is the floor; 8192 MiB leaves room for a real set of browser tabs and background services without paging. Whatever you choose, leave the host several gigabytes for itself — Proxmox will not stop you handing out memory it needs.
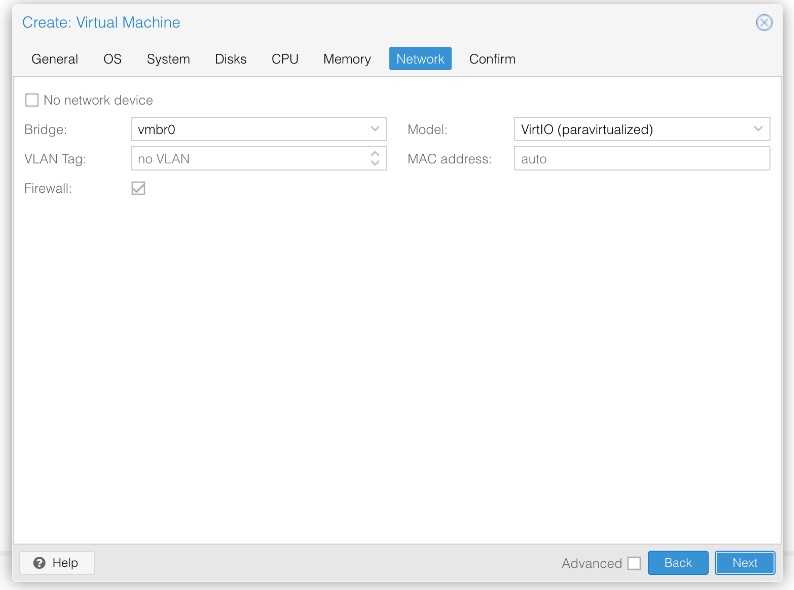
vmbr0, model VirtIO. The Firewall box is checked by default, which is what puts firewall=1 in the summary.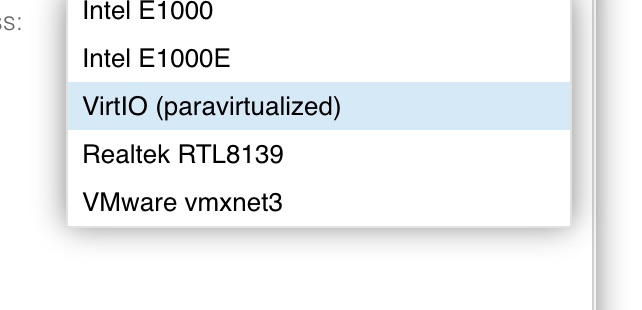
| Field | Value, and what it does |
|---|---|
| Bridge | vmbr0. The VM appears on your LAN as its own device and gets an address from your router's DHCP server, rather than sitting behind the host. |
| Model | VirtIO (paravirtualized). Packets move through shared memory between guest and host instead of the host emulating an Intel E1000 or Realtek chip register by register. Substantially faster than the emulated models, at substantially lower CPU cost. |
| Firewall | Checked by default. It has no effect until the Proxmox firewall is also enabled at datacenter or node level, which it is not out of the box — so this box alone neither protects nor blocks anything. Worth knowing before you spend an afternoon debugging rules that were never active. |
9 The Confirm Tab
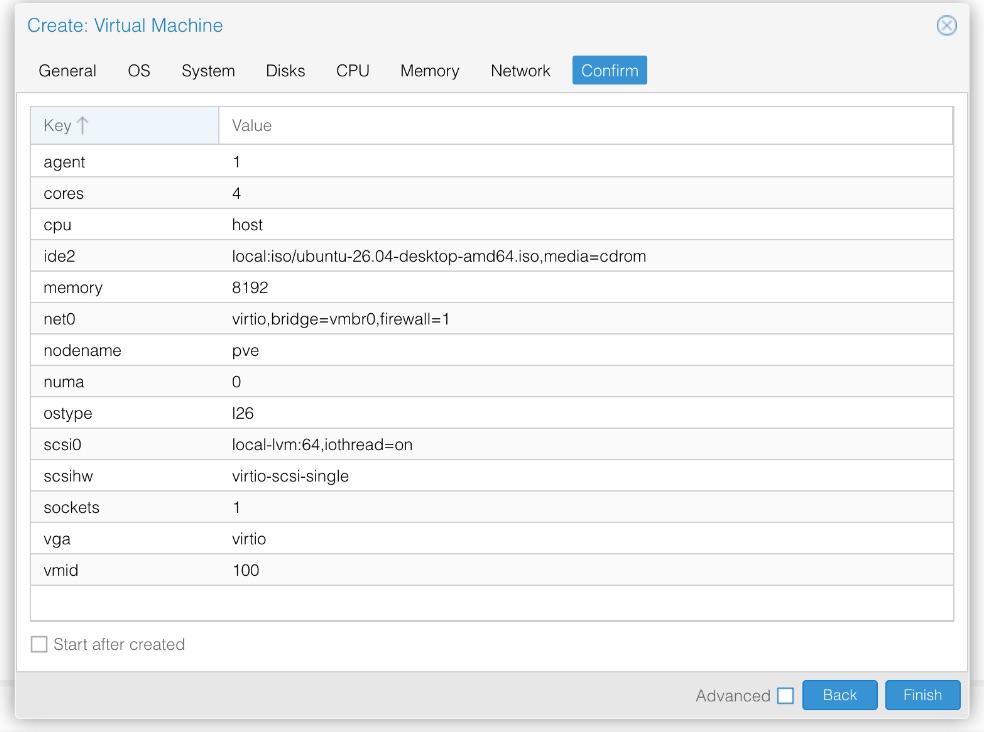
| Key and value | Meaning |
|---|---|
agent 1 | Guest agent expected. Still needs installing inside Ubuntu. |
sockets 1 · cores 4 | Four vCPUs on one virtual socket. |
cpu host | Native CPU feature flags passed to the guest. |
memory 8192 | 8 GiB. |
ostype l26 | Linux 2.6 or newer. Set by the OS tab. |
ide2 local:iso/…,media=cdrom | The installer ISO, attached as a virtual optical drive. |
scsi0 local-lvm:64,iothread=on | The 64 GiB disk with its own I/O thread. Note what is absent: no discard=on, because that box was left unchecked. |
scsihw virtio-scsi-single | One paravirtualised SCSI controller per disk — which is what makes iothread possible. |
net0 virtio,bridge=vmbr0,firewall=1 | Paravirtualised NIC on the LAN bridge, with the (inactive) firewall flag set. |
vga virtio | VirtIO-GPU. Absent entirely if you leave the card on Default. |
numa 0 · vmid 100 | NUMA off; the VM's ID, used throughout the interface and on the command line. |
Leave Advanced unchecked — it exposes NUMA pinning and per-device I/O limits, neither of which a single desktop VM needs. Click Finish.
10 The Repository Error
A fresh Proxmox install points at the commercial enterprise repositories. Without a subscription key those return 401 Unauthorized, and every attempt to refresh the package list ends the same way:
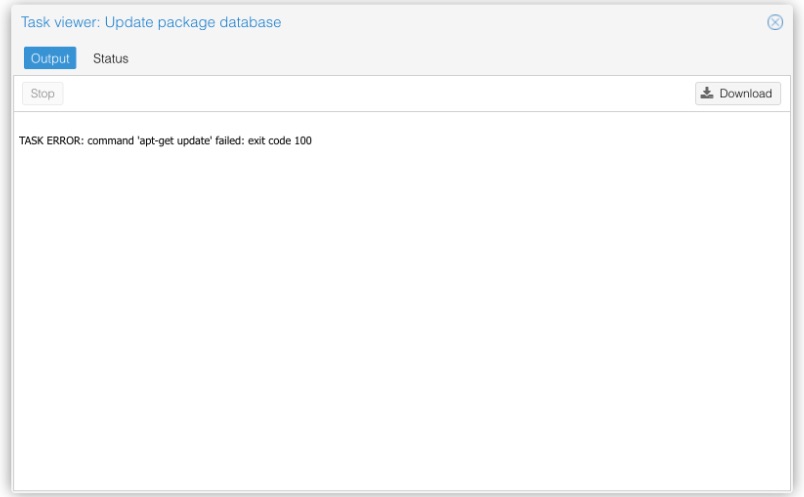
exit code 100 is apt's generic failure. The task log gives no detail; the cause is in the repository list.Go to pve → Updates → Repositories:
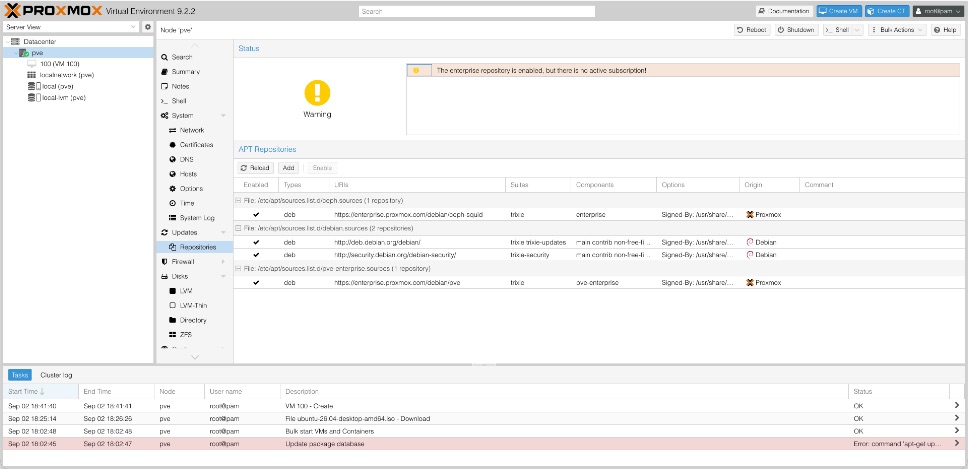
enterprise.proxmox.com, not one: pve-enterprise.sources and, above it, pve-ceph.sources. Both need dealing with.Disabling only the PVE enterprise repository is not enough
Almost every write-up of this error names pve-enterprise and stops there. The Ceph repository points at the same subscriber-only host, so leaving it enabled reproduces the identical exit code 100 — and because the obvious culprit has been dealt with, the second failure is far more confusing than the first.
In the Repositories panel:
- Select the
pve-enterprise.sourcesrow and click Disable. - Select the
pve-ceph.sourcesrow and click Disable. - Click Add, choose No-Subscription, and confirm.
- Click Reload, then run the update again.
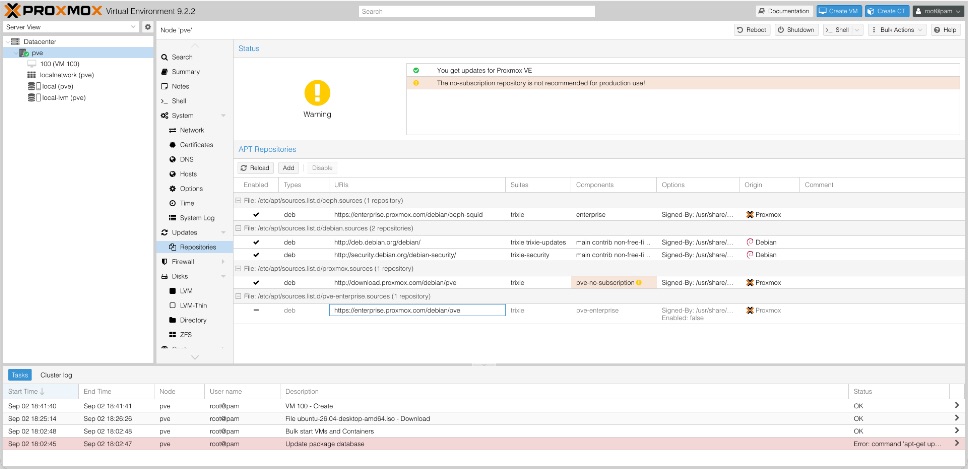
pve.sources now carries pve-no-subscription and pve-enterprise.sources shows Enabled: false — but the top row, pve-ceph.sources, is still ticked and still aimed at enterprise.proxmox.com. On this host apt update would still fail. Disable that row too.Proxmox 9 uses the deb822 format
Repositories now live in /etc/apt/sources.list.d/*.sources as multi-line stanzas, not one-line deb entries in sources.list. Disabling one from the shell means adding a line to its stanza rather than commenting anything out:
# Inspect what is configured
cat /etc/apt/sources.list.d/*.sources

# Disable a repository by adding Enabled: false to its stanza
echo 'Enabled: false' | sudo tee -a /etc/apt/sources.list.d/pve-ceph.sources

sudo apt update
The banner that remains afterwards — “The no-subscription repository is not recommended for production use!” — is informational. That branch receives the same packages on a less conservative schedule, and is the normal choice for a home or lab host.
11 The Console Error
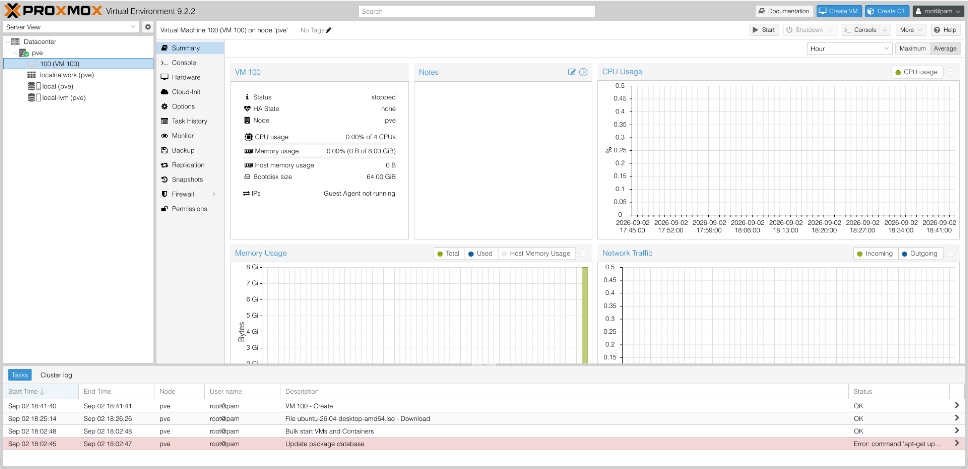
A freshly created VM is not running. Its summary page shows Status: stopped, and the Guest Agent line reads as unavailable because nothing is up to answer:
Click Console at this point and Proxmox returns an error rather than a screen:
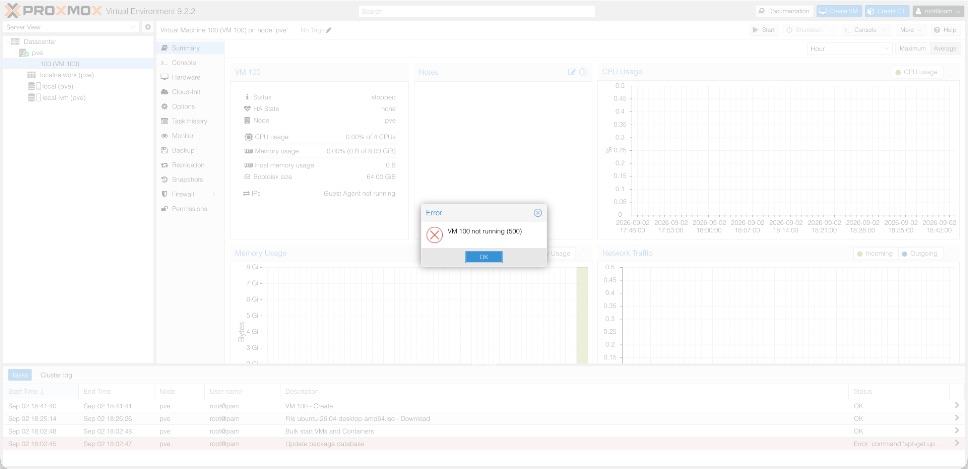
VM 100 not running (500). Nothing is wrong — the VNC server is part of the running QEMU process, so there is no console until there is a VM.- Click OK to dismiss the dialog.
- Click Start in the top action bar.
- Wait for the VM's icon in the left tree to turn from grey to green.
- Click Console.
12 Installing Ubuntu
The VM boots from the attached ISO and the Ubuntu splash appears inside the browser console:
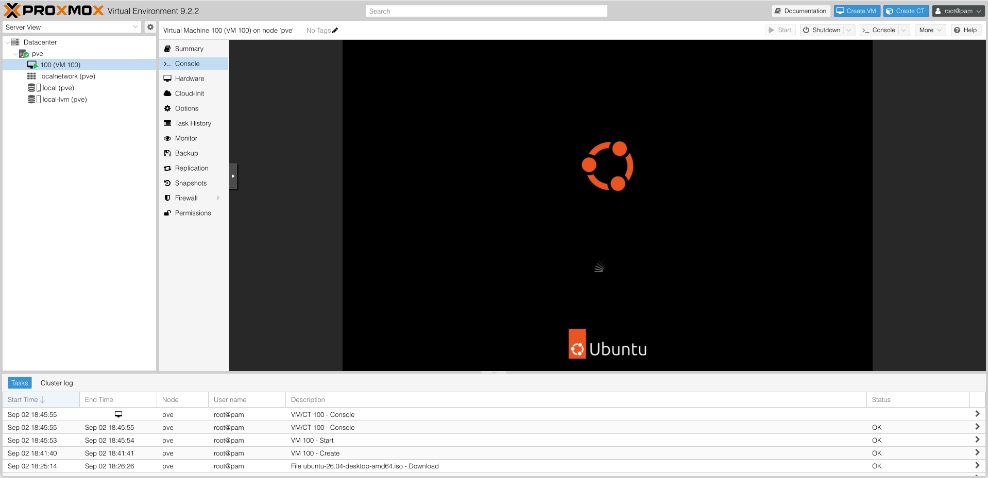
The guided installer is conventional. Three screens are worth comment.
12.1. Proprietary software
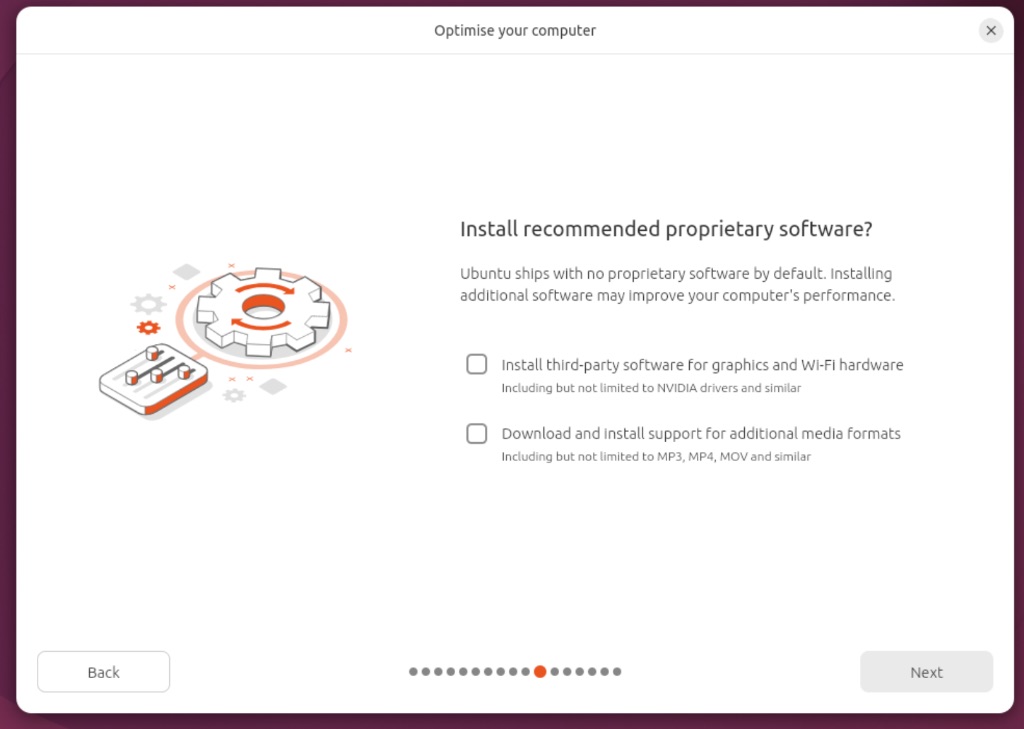
| Option | What to do |
|---|---|
| Third-party software for graphics and Wi-Fi hardware | Leave unchecked. This installs NVIDIA drivers and wireless firmware for physical hardware. The VM has neither — its devices are VirtIO. Ticking it does no damage, it simply finds nothing to install. |
| Support for additional media formats | Check it if you plan to play video or audio in this VM. The installer describes it as “MP3, MP4, MOV and similar”; in practice it pulls in the restricted-format codecs that browsers and media players expect. |
12.2. Use a local account
The account screen offers Active Directory. That requires a Windows domain controller to authenticate against, which a home or lab setup does not have. Create an ordinary local account with your name, a hostname, a username and a password.
12.3. Erasing the disk is safe here
“Erase disk and install Ubuntu” means the virtual disk
The installer can only see scsi0 — the 64 GiB virtual disk created in section 6. The host's physical drives, the Proxmox installation, and every other VM are invisible to it and untouched. This is the one place in the whole process where “erase everything” is the correct, safe answer.
12.4. The installation medium prompt
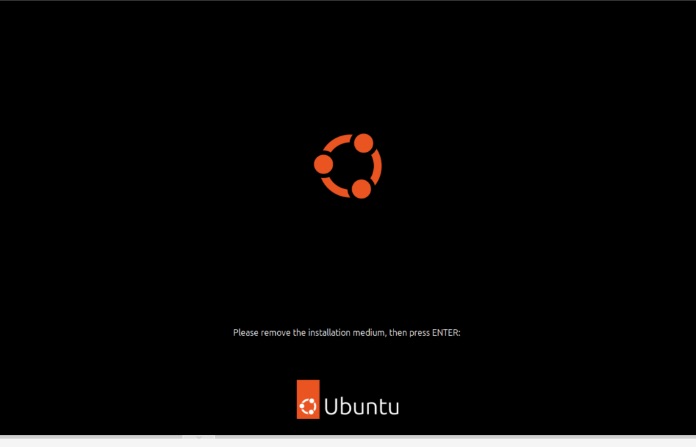
Click inside the console so it takes keyboard focus, then press Enter. If the installer has ejected its media, the VM can boot the installed system. Otherwise detach the ISO under Hardware → CD/DVD Drive and check Options → Boot Order before rebooting.
13 After the Install
13.1. Install the guest agent
Checking the Qemu Agent box in section 5 told Proxmox to expect an agent. This installs the other half, inside Ubuntu:
sudo apt update && sudo apt install -y qemu-guest-agent
sudo systemctl enable --now qemu-guest-agent
The VM's summary page then reports its real IP address instead of Guest Agent not running, shows true memory use rather than allocation, and Shutdown becomes a clean shutdown request to the guest rather than a simulated power button.
13.2. Remote desktop for daily use
Not verified in the captured session
The captures end at the installation-medium prompt. The guest-agent commands above and this remote-desktop procedure were not exercised in that session, and GNOME moves its remote-desktop settings between releases, so the exact menu path in 26.04 may differ from what is written here. Treat it as a direction, not a transcript.
The noVNC console is the right tool for installation and rescue — it works when the network inside the guest does not. For daily use it is the wrong tool: no clipboard sharing, no audio, and a picture that is being re-encoded and shipped through the hypervisor. GNOME's built-in RDP server is a better fit, and gives you a shared clipboard and a resolution that follows the client window.
- In Ubuntu, open Settings → System → Remote Desktop.
- Enable desktop sharing and remote control.
- Set the username and password it generates or asks for. These are separate from your login credentials.
- Connect from another machine with any RDP client — Windows Remote Desktop, Microsoft Remote Desktop on macOS, or Remmina on Linux — using the address the guest agent now reports in Proxmox.
Two services now listen on your LAN
The Proxmox web interface on port 8006 answers to anything that can reach the host, and you have just added an RDP service on the guest. On a home network behind a router that is a considered risk; exposed to the internet through a port forward it is not. Do not forward either port. If you need access from outside, put it behind a VPN, and give the Proxmox root account a strong password and two-factor authentication under Datacenter → Permissions → Two Factor.
14 What This Capture Set Does Not Show
The screenshots come from one session on a single machine. These are the places where they do not support what the guide recommends, collected rather than buried:
| Gap | Status |
|---|---|
| Installing Proxmox VE itself | Not captured and not covered. The guide begins at a running web interface. |
| Firmware settings in section 2 | Not captured. Every board's BIOS differs; the names given are the common ones. |
Discard on the virtual disk | Recommended here, but left unchecked in the session. The Confirm tab shows no discard=on. |
| The Ceph enterprise repository | Recommended here as something to disable; still enabled in the final repository screenshot. |
VirtIO-GPU and q35 | The System tab capture shows Default and i440fx. The graphics card was changed later; the machine type was not. |
| Media-format codecs | Recommended here, but left unchecked in the installer capture. |
| Guest agent and remote desktop | Not captured. The agent commands are standard; the GNOME menu path is unverified on 26.04. |
| Screenshot resolution | All captures are 1024 px wide before cropping, below this site's usual 1500 px for interface screenshots. Small interface text is correspondingly soft. |
15 Official References
- Proxmox VE Administration Guide — Qemu/KVM Virtual Machines
- Proxmox VE — Package Repositories
- Proxmox VE — Host Bootloader and Secure Boot
- Ubuntu releases
Interface layouts, defaults, and release numbers all move. This guide was written against Proxmox VE 9.2.2 and an Ubuntu 26.04 Desktop guest, from one session captured on September 2, 2026, and it says in section 14 where the session and the advice disagree.
Editorial and source review: September 4, 2026. Selected command and wording corrections were checked against documentation; this review did not rerun the server, GPU, VM, or cloud setup.