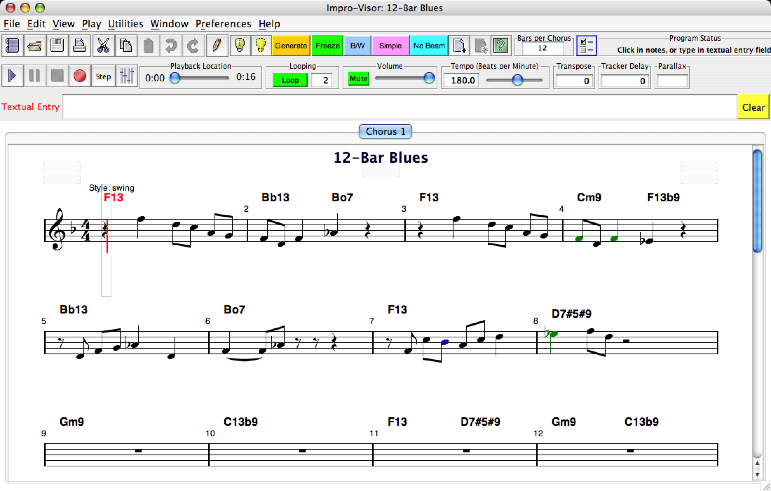
Impro-Visor Tutorial
Note: There is a
newer version of the Tutorial keyed to Impro-Visor Version 4
Bob Keller
Harvey Mudd College
13 May 2008
(keyed to Version 3.39)
This Document Copyright (c) 2008-2009 by Robert M. Keller, all rights reserved
Welcome to
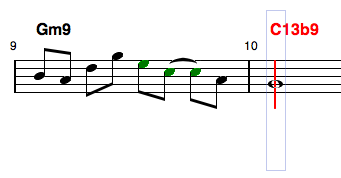
Impro-Visor, a program to
help musicians construct melodies similar to ones that might be improvised over
given songs. With Impro-Visor, you can playback your melodies as soon as you
enter them, with automatically generated rhythm-section accompaniment. In
addition to this aural feedback, you can also get visual feedback that will
help you learn which notes sound the best over which chords. You can also use
Impro-Visor for play-along practice, notation, transcription and song
composition.
Table of Contents
The screen shots
that you see in this document were made on a Mac running MacOSX. However,
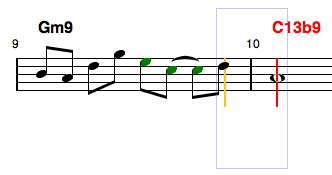
Impro-Visor also runs on Windows (XP, 2000, and Vista), and Linux. In short, it
will run on any platform that supports Java 1.5 or later. You must have such a
version of Java installed on your machine before running Impro-Visor.
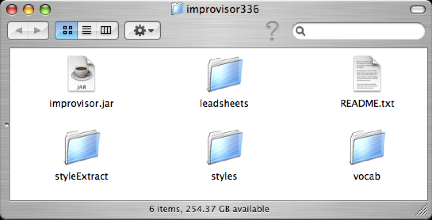
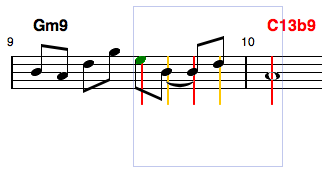
1.
The
Distribution Folder: It is assumed that you’ve downloaded the
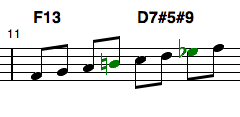
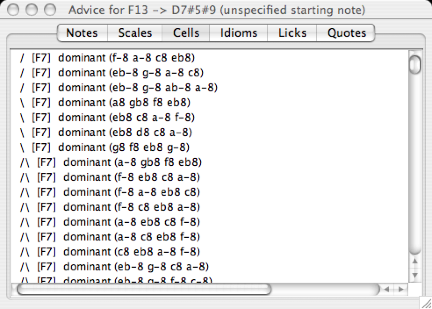
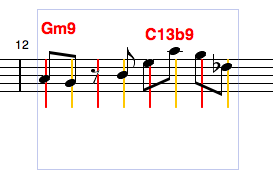
program from the user group website. If you open the Impro-Visor folder, you
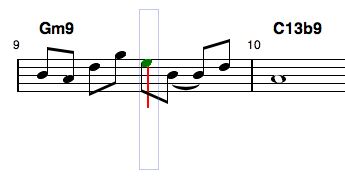
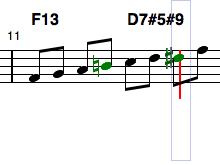
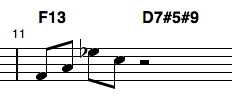
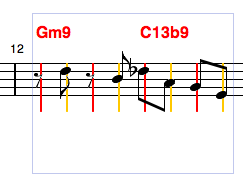
should see something like the following:
The Impro-Visor distribution folder
If you don’t have
this configuration, you may have not unzipped the release into a single folder.
In this case, you need to go back and do that.
With the exception
of the program file, improvisor.jar,
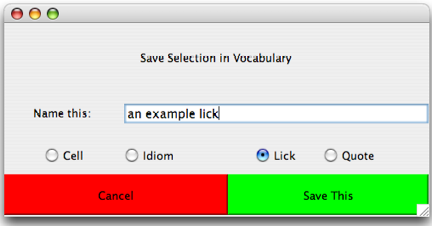
most of the files are text files, even though they may have an extension other
than .txt. You may look at these files with a regular text editor. However,
because many of them were produced on a Mac, they may lack niceties, such as
carriage returns. In any case, it is our intent that the files be opened from
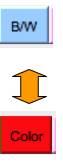
within the program. The content of these folders is:
|
Folder |
Contents |
|
leadsheets |
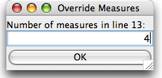
various kinds of
leadsheets that can be played with the program. Included here is “The Imaginary
Book” of chord changes to 2500 tunes or more |
|
vocab |
vocabulary
information and other information, such as preferences, that are loaded by
the program |
|
styles |
each file
represents a style that can be played by the program. More styles may be
added by the user |
|
styleExtract |
example for
extracting style specifications from MIDI files |
2.
Starting
the program: Double-click the improvisor.jar file. You should get a splash screen below
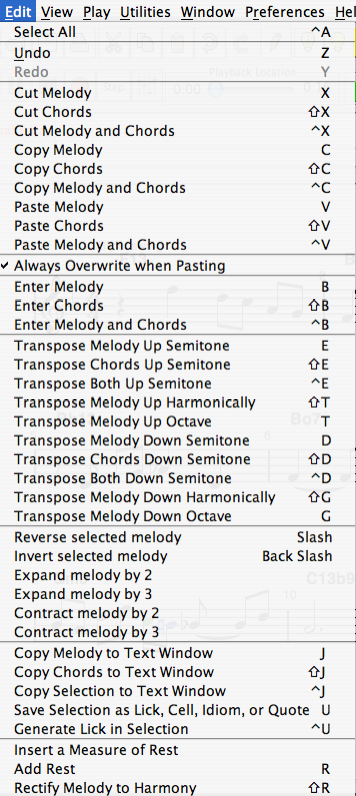
for a short while as Impro-Visor loads the vocabulary.
The Impro-Visor splash screen
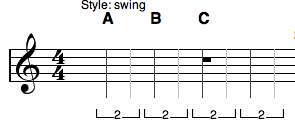
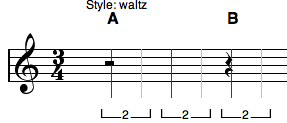
Then a window similar to the one below should open. (If the splash screen
persists for a long time, say several minutes, then something may be wrong with
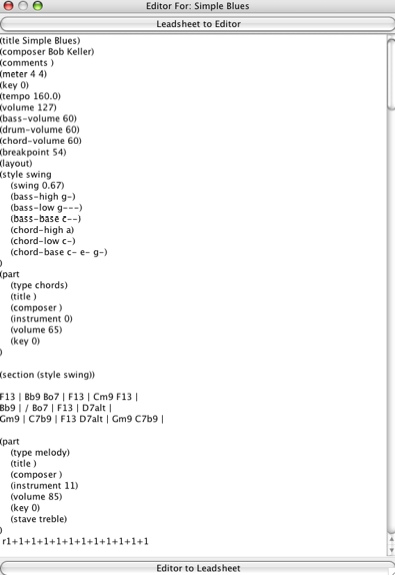
the configuration.)
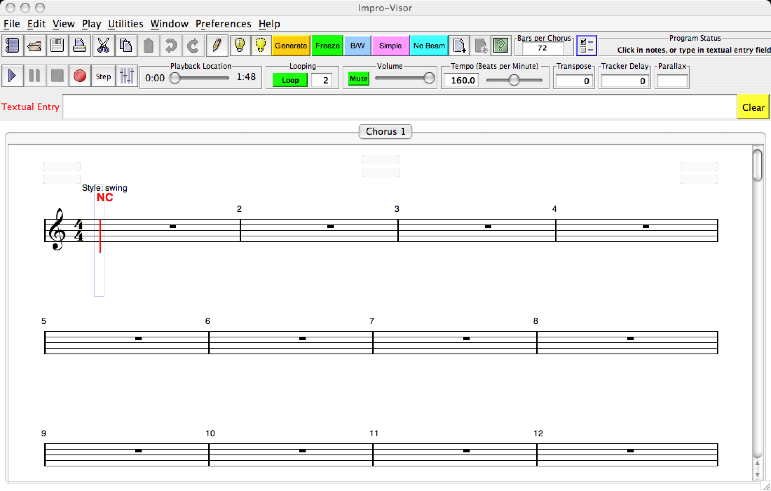
Impro-Visor leadsheet window
This window is a
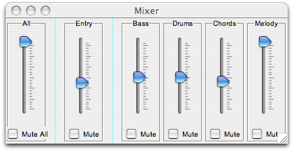
blank “leadsheet”, a sheet on which melody and chords are entered. Although
treble staves are showing above, bass and grand staves are also possible. It is
also possible to have multiple leadsheets open at the same time, and to cut and
paste between them.
3.
Loading an
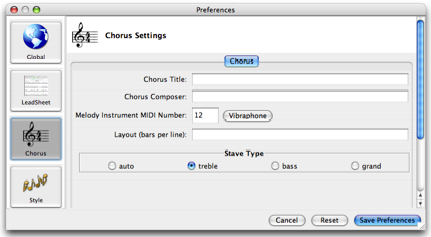
existing leadsheet: Click
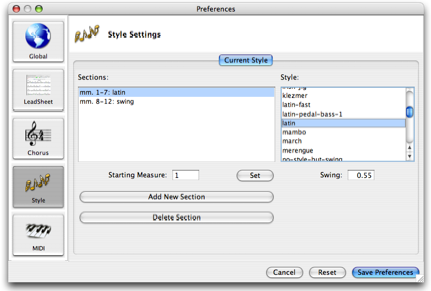
the open-file icon (the second icon on the upper left, which looks like a file
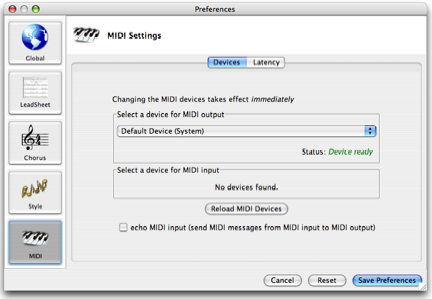
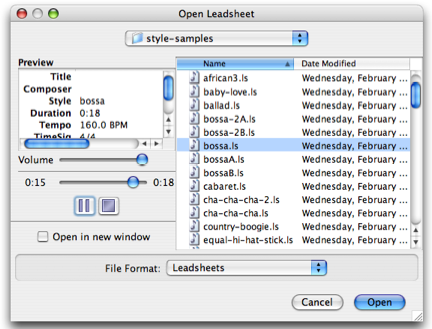
folder. You should get a file chooser similar to the one below.
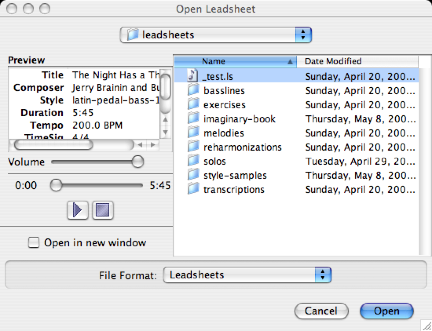
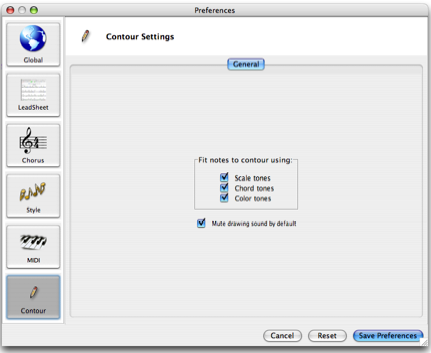
File chooser
4.
Open
exercises, then
_tutorial.ls, as a sample leadsheet.
This leadsheet is only 2/3 completed. Finishing it will be our first task.
Tutorial leadsheet
5.
Play this
leadsheet by clicking the
triangular icon in the second row. All sound from Impro-Visor comes through
MIDI (Musical Instrument Digital Interface). You may have to access a control
panel to make sure that MIDI playback is enabled on your computer.
6.
Controlling
playback:
You can pause playback by clicking the two vertical bars, or stop it by
clicking the box. There are also key strokes that start and stop, and these may
be more convenient in many cases:
|
Keystroke |
Effect |
|
k |
stops (“kills”)
the playback |
|
i |
starts playback
from the beginning |
7.
Positioning
the mouse on the staff: As you move the mouse over the staves,
you will note a some vertical lines become highlighted, and there are brackets
beneath, as shown:
Slot display
8.
We call the
vertical lines slots. These are places where notes can be
clicked in using the mouse. (Notes can also be typed in, but we will cover this
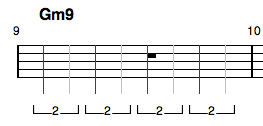
later.) By default, there are two slots per beat (as shown by the bracket 2’s),
so the duration between one slot and the next is that of an eighth note. There
are actually 120 slots in one beat, but only a few of them typically show, to
avoid clutter.
9.
Entering
notes: Click somewhere on the stave near the
first slot. You should get a note something like the following:
First note clicked (bar 9)
You
should hear your note in the context of the chord being played along with it.
(If you don’t want to hear it, you can silence everything by toggling the Mute
button.)
![]()
Mute button and volume control
10.
Shortening
notes: Most likely you did not want a note this long.
That’s ok. Impro-Visor is just trying to make it faster to enter notes, by not
requiring you to enter a duration for each note separately. To see how this
works, click on the next slot, to get a display similar to the one below:
Additional note clicked
Continue
entering notes with
different durations, until you have 7-8 notes, something like what is shown:
Several notes clicked
11.
Making
corrections: If at any point you don’t like what you entered,
just go back and click over it. Impro-Visor will never put more than one note
in a slot. Moreover, as you click a different pitch in a slot, then duration of
the note will remain the same.
Pitches were modified, but durations remain
the same.
12.
Selecting
a slot without entering a note:
To do serious editing with Impro-Visor, you will want to know how to select a
slot without setting or changing a note. Select a single slot outside the
current selection is a two
step process: (1) Hold the shift key and click on the slot, then (2) click
again. For example, to click on the e note above, I hold the shift key and
click there, then click again. The first step extends the current selection,
while the second reduces the selection to a single note.
Step (1): shift-click on e slot extends the
existing selection to that slot.
Step (2): shift-click reduces the selection
to a single slot.
Had
it been the case that there was no selection initially, only step 2 would have
been necessary.
13.
Summary of
selection sequences: While
the above steps might seem to be more complex than what you are used to, they
are designed to make editing go really fast. This is probably the most complex
sequence you will have to learn. So here is a summary:
|
Keystroke |
Effect |
|
click without shift |
enters a note |
|
shift-click, |
selects a slot,
without entering a note |
|
shift-click, |
extends
selection to the slot on which you clicked |
|
shift-click, |
selects just one
slot, without entering a note |
To
select the window without selecting a slot or creating a note, click in the margins on either side of
the staves.
Note
that a selection can extend over multiple staves.
14.
To un-select
everything, press the escape key. To select everything, press control-a.
|
Keystroke |
Effect |
|
escape |
un-selects
everything |
|
control-a |
select all slots |
15.
Adding
rests: To add a rest, you simply
select a single slot, as above, then press the r key. Rests have characteristics similar to
notes. They just don’t have any pitch. Thus the value of the rest will be that
of the note it replaces. The figure below shows a rest added where the e had been.
An alternate way to add a rest is to click on a slot while pressing both shift
and control.

Adding a rest using the r key.
|
Keystroke |
Effect |
|
r |
put a rest in
the selected slot |
|
shift-control-click |
select a slot
and put a rest there |
16.
Changing
the slot spacing: To enter
triplets, sixteenth notes, etc., the slot spacing needs to be changed. By
pressing a numeric key, one of 1, 2, 3, 4, 5, 6, 8, 9 the slot spacing changes
to that many slots showing per beat. Thus for eighth-note triplets, press three
and enter the notes or rests. For sixteenth notes, press 4 and enter the notes
as shown:
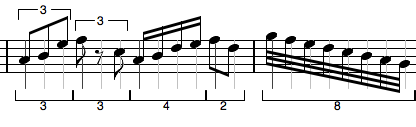
Triplet, sixteenth-, eighth-, and
thirty-second- note slot spacing.
The brackets on top are the triplet brackets. The brackets below show the slot spacing.
17. Playing a selection: Once you have entered some notes, you
might want to hear how just that phrase sounds. First select the phrase, using
the steps outlined above (requires two shift-clicks usually). Then press return (or enter on some keyboards). You should
hear just that selection played, with some accompaniment.
18.
To play
the selection, then continue playing to the end of the chorus: Hold shift when you press return.
19. Looping playback: Press the green Loop button to have the
playback repeated the desired number of times. If you set the times to 0, it
will loop until stopped (with the stop button or k key). Press the Straight
button to not loop any further.

Toggling the loop button
20.
Getting
Advice: Let’s move on and select the first slot
in measure 11.
Select first slot in bar 11
To ask Impro-Visor for advice on what might be played, we could click left-hand
light bulb icon:
![]()
Advice icon
A menu similar to
the following should open.
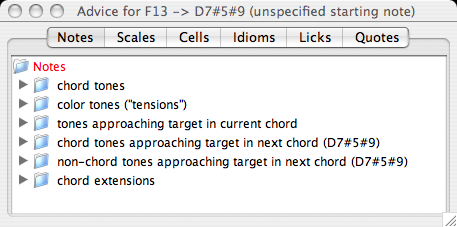
An advice menu
21.
Each item
opens to a set of things that might be played at this point. We encourage you
to explore these, as they contain elements of jazz music theory, indicating the
spelling of the first chord, scales that go with the first chord, and
transitional information. For example, the Scales tab opens the following menu of choices:
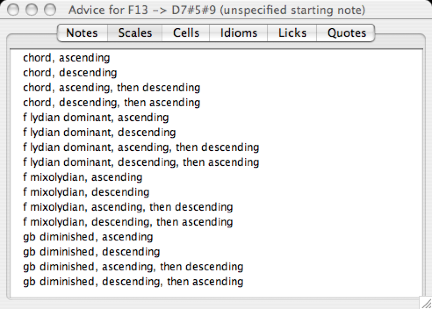
Scales tab of the advice menu
from which we can
select one of the suggested scales to see how its tones fit the progression.
F Lydian dominant scale
22.
Toggling
Enharmonics: If you wish to
toggle the enharmonic representation of notes in a selection (e.g. switch eb to
d#), simply press the space bar. This does not change the sound, only the
visual representation.
Toggling eb to d#
To do the same for chords (e.g. Db7 to C#7), press the space bar while holding
shift. To toggle for both notes and chords, press the space bar while holding
control.
|
Keystroke |
Effect |
|
space |
toggle
enharmonics of all notes in selection |
|
shift-space |
toggle
enharmonics of all chords in selection |
|
control-space |
toggle
enharmonics of all chords and notes in selection |
23.
Alternatively,
selecting the Cells tab
shows a variety of cells (short note sequences) over the current chord:
Cells tab of the advice menu
The slashes on the
left indicate the directionality of the sequence (/ for up, \ down for down).
Selecting, for example, /\ [F7] dominant (f-8 a-8 eb8 c8) gives us the
following, when transposed up an octave.
A simple cell from the vocabulary
24.
Cells and
other melodies are not always saved in the octave you might desire. To transpose a selection up an octave, press the t
key. To transpose down an
octave, press the g key.
|
Keystroke |
Effect |
|
t |
transpose
selected notes up an octave |
|
g |
transpose
selected down up an octave |
25.
Idioms are similar to cells, in that they are
selected based on one chord. However, the term idiom suggests a melody that is
a familiar jazz clichŽ. Below is an example of an idiom, which happens to be blues
oriented, /\ [F7] blues (b-8/3 c8/3 b-8/3 bb-8 ab-8 f-8):
A blues idiom from the vocabulary
26.
At the next
level of complexity are licks,
which are based on one chord or two consecutive chords. Here is an example of a
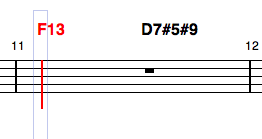
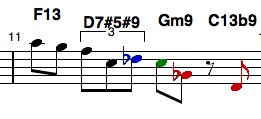
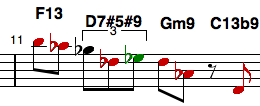
lick for the current two-chord sequence, \/\/ [F13 -> D7#5#9]
I7-VI7alt (a8/3 f8/3 d8/3 b-8 c8 gb8 eb8 ab8 r8):
A two-chord lick from the vocabulary
27.
Although
licks are indexed over at most two chords, they can be used over any number of
chords. The just might not sound as good. (The reason we index on only two
chords is to keep the licks short, which permits combining them together in
more ways than if we stored long licks.) For licks that don’t quite fit the
harmony, Impro-Visor provides a rectify feature that will pull arbitrary notes
in line with the chords. For example, if we try a lick intended for two chords
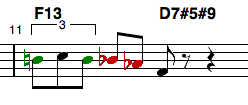
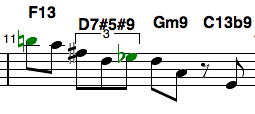
over a 4-chord sequence, we may get some disagreeable notes (shown in red):
A lick that doesn’t quite fit the chord
progression
we can rectify the sequence by pressing control-r with the sequence selected.
Rectified lick
28.
Notes entered
by point and click are generally rectified harmonically upon entry. For example, if the current
chord is C7 and the B line on the staff is clicked, you will get a B-flat,
corresponding to the chord. If you prefer simple, rather than harmonic entry,
toggle the simple button on the menu bar:
Toggling simple vs. harmonic note entry
29.
This seems
like an appropriate to bring up the other forms of transposition. Simple transposition raises the selection
up or down chromatically in half steps. We use the e key for up, and the d key
for down. Harmonic transposition raises the selection up or down harmonically.
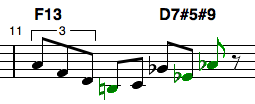
This is similar to chromatic transposition, followed by rectification. For
example, here is the previous lick transposed up chromatically:
Previous lick transposed up chromatically
and here it is
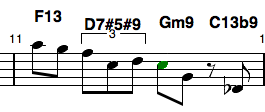
transposed up harmonically:
The lick before, transposed up harmonically
|
Keystroke |
Effect |
|
t |
transpose selected
notes up an octave |
|
g |
transpose
selected down up an octave |
|
e |
transpose
selected notes up a half-step |
|
d |
transpose
selected notes down a half-step |
|
shift-t |
transpose
selected notes up harmonically |
|
shift-g |
transpose selected
notes down harmonically |
|
shift-R |
rectify the
selection (bring in line with the harmony) |
Notes can also be
transposed up or down any number of steps by dragging any one of the notes in a selection. If you
hold the alt-key (option-key on Macintosh) when dragging, you will get harmonic
transposition. Otherwise you will get simple transposition. (Note: You cannot
drag both horizontally and vertically in the same action. This is by design.)
30.
The final tab
in the advice menu is Quotes,
which are melodies borrowed from other songs or solos. Quotes are considered a
form of humor in jazz improvisation, and the musician will learn to recognize
when a quote will work over particular chords based on sounds.
31.
Using the
Lick Generator: For the
final measure of the tune, we’ll take a different approach to getting advice:
Letting Impro-Visor generate a new lick for us. Select all of the slots in the
last measure:
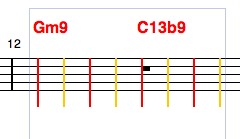
Measure 12 slots selected
Then press the Generate
button on the menu bar.
![]()
The following is
one example of a lick that might be generated.
A generated lick
If you don’t like
this lick, press Generate again and again until you find one that you do.
Here’s another example:
Another generated lick
You may
alternatively generate licks by key stroke:
|
Keystroke |
Effect |
|
control-u |
generate lick |
32.
If you press
Generate with only one slot selected, the lick generate will generate from that
point to the end of the chorus. If no slot is selected, it will generate the
entire chorus.
33. Undoing entries:
Impro-Visor supports unlimited un-do and re-do, so if you want to back
up an reconsider something that was entered or generated, then erased, use the z key to undo. Use the y key to redo what was undone. Not every action
is undoable, but most involving the entry and erasure of notes are. As an
alternative, the circular arrow buttons shown can be used to undo and redo:
![]()
Undo and redo buttons
|
Keystroke |
Effect |
|
z |
undo last action |
|
y |
redo last undone
action |
34.
Saving a
lick: When you run across
a lick that you’d like to save for future reference, you may save it in your vocabulary.
Then Impro-Visor can recall that as a suggestion, transposed to the key of the
moment. Pressing the u key
will open the following dialog:
Lick-saving dialog
The names do not have
any formal significance for indexing, but they do show up in the advice menu.
Optionally type a
name, as shown, and select one of the four categories, then press either Save
or Cancel. Once again, here is the meaning of the four categories:
|
Category |
Meaning |
|
Cell |
small sequences
of notes, often of uniform duration, such as eighth notes. Cells are indexed
in Impro-Visor by just the first chord in the selection. |
|
Idiom |
familiar-sounding
sequences. As with cells, they are also indexed by just the first chord. |
|
Lick |
tend to be more
complex sequences. Licks are indexed by the first two chords, or the first
chord if there is only one. |
|
Quote |
a melodic
fragment from a known tune or solo. As with licks, they are indexed by up to
two chords. I suggest naming quotes using the tune from which they are taken. |
|
Keystroke |
Effect |
|
u |
save lick,
quote, cell, idiom |
35.
To avoid
saving a duplicate lick or quote,
Impro-Visor checks new licks against all licks in the database, modulo
transposition. If a duplicate is found, you will get a warning:
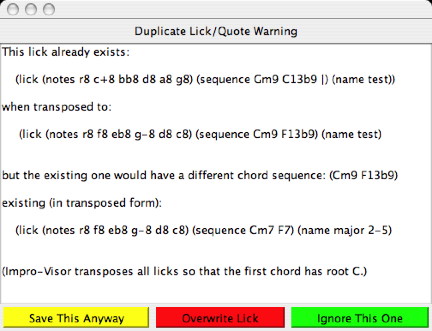
Duplicate lick or quote warning
No corresponding check
is made for duplicate cells, as cells generally can serve more than one chord.
36. Touching up melodies: Once you have a somewhat passable melody,
it is often worthwhile to go back and edit it some more, for example, to make
it “jazzier”. Before going on, consider playing the entire chorus, which
includes the given eight bars, plus the four we’ve filled in, as shown below:

Completed last 4-bars
Here
are some of the edits I typically make:
a. Introduce rests: Select a note (using the shift-click
technique), then type r. I tend to avoid starting a melody on the down-beat, so
that is one place I would tend to introduce rests. The other place is at the
end of long notes, to leave breathing space between it and the next note, and
to suggest the end of a phrase.
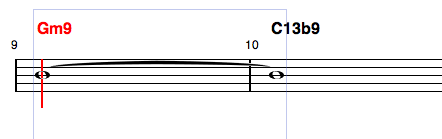
b. Eliminate notes, extending the previous note or rest into
their place. To do this, select the note, then type key x. Similarly, x on a note or rest following
another note can be used to extend the earlier note. This key can be used to make notes arbitrarily
long.
c. Add pickups: The current stored advice doesn’t have a
good way to represent pickups before the beat, so they tend to not be there. I
often introduce these myself, usually by adding an eighth-note a half-step
below or (less often) above then note that would follow. Sometimes I use two
sixteenths or a triplet instead of an eighth-note.
d. Replace a repeated note with a different
note: My personal preference is to avoid repeated
notes in a phrase, although there are exceptions for effect. The lick generator
will sometimes generate repeated notes, although it tries to avoid them. If I
spot them, I might change the pitch on one or more notes that are repeated.
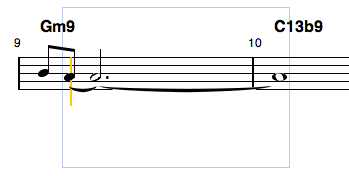
e. Jog the melodic line in time: One way to do this is to selected the
notes to be jogged. Then drag on one of the notes to the left or right, as
desired. The second figure below shows the result of dragging the first phrase
a half-beat to the left, which gives a different sound, partly due to the
difference in treatment of notes on and off the beat in a swing style.
Evidently, Thelonious Monk experimented a lot with jogging melodic lines in his
compositions (such as “Straight, No Chaser”, to name just one).

Previous melody line, touched up using a-d.

Previous melody line, with the last two phrases
jogged to the left.
37. Copying, cutting and pasting
melodies: To copy a melody
and paste it somewhere else on the sheet:
a. Select the notes to be copied.
b. Press the c key (for “copy”).
c. Select the starting slot where you wish to
paste the melody.
d. Press the v key (standard abbreviation for pasting).
Use the x key instead of c if you wish to cut the
original selection. Cutting, copying, and pasting is also achievable by the
following three buttons, respectively:
![]()
Cut, copy, and paste buttons
You may paste a copied selection any number of times. Use the z key to undo recent pastings. Once you have
pasted, you may wish to transpose the result or modify it in some other way.
You can also click in different pitches to the same rhythmic pattern, as we’ve
already described.
|
Keystroke |
Effect |
|
c |
copy melody (to
invisible clipboard) |
|
v |
paste copied
melody (from invisible clipboard) |
|
x |
cut melody (and
copy to invisible clipboard) |
A selected melody can
also be transferred to and from the textual entry area, which is not the same as the clipboard
used for cut and paste. Pressing enter in the textual area will paste the
melody starting at whatever slot is currently selected. This is convenient for
pasting the same melody more than one place. The following commands are also
useful in this context:
|
Keystroke |
Effect |
|
j |
copy melody
selection to text area |
|
b |
paste melody in
text area onto leadsheet at selected slot |
38.
Note
coloration: As you’ve
probably noticed, notes are shown in various colors. These colors have tutorial
significance, as explained below. If you don’t like coloration, you can turn it
off by pressing the button labeled B/W (for “black and white”), and toggle it
back by pressing Color.
Toggling note coloration
Here is the
default meaning attached to the colors, of which there are four:
|
Note Coloration Default Options |
||
|
Color |
Name |
Meaning |
|
Black |
Chord-tone |
The note is in
the current chord. |
|
Green |
Color-tone |
The note is not
in the current chord, but is complementary and compatible with it. |
|
Blue |
Approach tone |
The note is not
one of the above, but approaches a note in one of the above categories
chromatically. This is a common device used in jazz. |
|
Red |
Other |
This note is not
one of the above. If it is a short note, it might be acceptable as a passing
tone or neighboring tone. If long, it might suggest reconsideration, as it
will tend to make an aural statement. |
The user can easily
experiment with changing to a different note, for example by using the e (up)
and d (down) keys to transpose.
Impro-Visor note
categorization comes from the vocabulary file. If you disagree with a
categorization, it can be changed to suit by modifying the vocabulary.
39.
Note entry
parallax: The parallax
text field in the menu bar adds the indicated number of pixels in the vertical
dimension to your click position when entering notes. This can be used to
accommodate variations in monitors, monitor positions, and tastes. Use a
negative number to subtract pixels.
![]()
Parallax field
40.
Tracker
delay: When a selection is played, there is a
green vertical tracking line moving from slot to slot. On some systems, the
line starts ahead of the sound. This is a function of the MIDI playback, which
is not under Impro-Visor’s control. To delay the line from the sound, enter the
number of seconds, in decimal notation in this field.
![]()
Tracker delay field
41. Transpose: The transpose field transposes the playback up or down the indicated number of
semitones from what is written in the notation. The use envisioned is for
transposing instruments. For example, for a Bb instrument (trumpet or tenor
sax), use -2 and enter notes as if you were writing for that instrument. For an
Eb instrument, use +3. You need to adjust the key signature manually. Transpose
does not change the notation, just the playback.
![]()
Playback transposition field
Note: Generally, you
must press return to have the edit of a text field (such as the Transpose
field) take effect.
42.
Key
signature: The key
signature can be changed in the Preference > Leadsheet menu, or by the
following action: Position the mouse in the key signature area. Then slowly drag up to subtract flats and add sharps,
or down to do the opposite.
Drag up or down here to change key
signature
43. Time signature: The time signature also can be changed in
the Preference > Leadsheet menu, or by the following action: Position the
mouse over the time signature. Then slowly drag up or down. The numerator (upper number) increases the
fastest, then the denominator (lower number). The “highest” time available is
12/8 and the “lowest” is 1/1. Odd times, such as 11/4 are allowed.
Drag up or down here to change time
signature
44. Adjusting the layout: Impro-Visor tries to lay out the measures
based on the note and chord density. However, it is not perfect. There are two
ways to adjust the layout to suit: By control clicking on a stave, a menu will open giving you the
option of setting the number of measures for that stave:
The control-click popup
By selecting the
first item, you get
Single-line measure adjustment
allowing you to
enter the desired number of measures. This approach is best for temporary
fixes.
45.
Freezing and
thawing: A more permanent
layout is obtained by “freezing” the layout. Pressing the Freeze button will
keep the measure distribution as it is now.
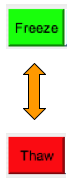
Freeze and thaw buttons
You can also specify the layout explicitly in the Chorus preference menu:
![]()
Chorus measure adjustment
Specified in this
line are number of measure per line, line by line. If there are fewer numbers
than there are lines, the last number is used for the remaining lines. For
example, the specification above indicates 4 bars for the first line, 2 each
for the next two lines, 4 for the next, then 2, then 4 for all remaining lines.
Having any numbers in the Layout field is equivalent to having the layout
frozen. (Since this layout really affects all choruses, it more properly belongs in the
Leadsheet preferences menu.)
46.
Adding
choruses: Any number of
choruses can be played. The current model for Impro-Visor is that there is one
chorus structure, which can be played any number of choruses with different
melodies. Although the chord sequence and length is the same for each chorus,
the background will vary among choruses. To add a new chorus, press the page +
icon:
![]()
Button for adding a new chorus
Currently, new
choruses are added only following the existing choruses.
47.
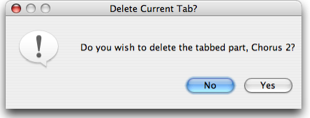
Removing
Choruses:To remove the
currently-selected chorus, press the page * icon:
![]()
Button for deleting the current chorus
Note: Removing a
chorus is not undoable. The contents will be lost, unless you have previously
copied it. You will be asked whether you want to delete a chorus:
Chorus deletion dialog
Choruses are
referred to as “tabbed parts” because they are accessible by clicking the tabs
at the top of the stave area:
![]()
Chorus tabs
The highlighted
tab corresponds to the current chorus.
48.
Changing the
number of bars in choruses
may be done with the Bars per Chorus field. Impro-Visor opens a new leadsheet with a generous
number of bars. Often, this number should be shortened to accommodate the
current song. If shortening would truncate chord or melody information in any
chorus, a warning dialog is issued first, so that content is not inadvertently
lost. Again, all choruses have the same length, so that shortening one will
shorten them all. Also please note that changing the length of choruses is not
undoable currently.

Chorus truncation dialog
49.
Starting a fresh leadsheet: From the File menu, select New Leadsheet,
or use the shortcut control-N. This opens a new blank leadsheet, in addition to
ones that may be open already. It will look like the one at the beginning of
this tutorial. You may cut and paste melody and chords from one to the other.
You can close one or more of the open sheets. If you have unsaved
modifications, it will offer to save them first.
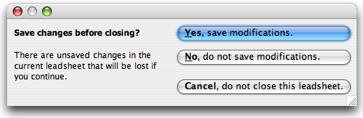
Unsaved modifications dialog
50.
Opening another leadsheet: This uses the current window. It does not
create a new one. If there are unsaved modifications, you will be given the
chance to save them.
51.
Entering chords: Let’s suppose that we start with a new
leadsheet, with the first two bars as shown.
New leadsheet, with first slot selected
When chords are
entered, entry always starts at the currently selected slot. The quickest way
to enter one or more chords is to select the Textual Entry window, and enter
the chord names. Measures can be separated either with the vertical bar, or
with commas. (Don’t use slash, which has a different meaning.)
![]()
Using textual entry for chords
When return is
pressed, these chords are transferred to the leadsheet:
Chords transferred to the leadsheet
52. Slash chords (which specify a bass note after the
slash) are indicated with a forward slash, such as D/E.
53.
Polychords (one chord stacked atop another) are
indicated with a backward slash, such as D\Bb.
54.
The
textual entry field itself can be edited by using the edit features of the operating system, such as
cut, copy, and paste. On a Macintosh, for example, these would be command-x,
command-c, and command-v. This can be extremely handy.
55.
An
alternate way to transfer the chords to the leadsheet is to select the slot where the transfer
is to begin after entering the chords, then press the (upper-case) B key. This is particularly convenient when the
same sequence is to be transferred multiple times, as you don’t have to return
to the textual entry field and press return each time.
56.
To
transfer chords in a selection back
to the leadsheet, select the chords, then press the J key.
57.
To copy,
cut, and paste chords from the leadsheet: The commands are analogous to those for melody, except the
shift key is held. The C key
copies the chords, the X key
cuts the chords, and the V key
pastes the chords.
|
Keystroke |
Effect |
|
shift-C |
copy chords (to
invisible clipboard) |
|
shift-V |
paste copied
chords (from invisible clipboard) |
|
shift-X |
cut chords (and copy
to invisible clipboard) |
|
shift-J |
copy chords from
selection to text area |
|
shift-B |
paste chords
from text area to current slot |
58.
To copy,
cut, and paste chords and
melody together from the leadsheet:
The commands are analogous to those for melody, except the control key is held.
The Control-c key
copies melody and chords, the Control-x key cuts the melody and chords, and the Control-v
key pastes the melody and
chords.
|
Keystroke |
Effect |
|
control-c |
copy chords and
melody (to invisible clipboard) |
|
control-v |
paste copied
chords and melody (from invisible clipboard) |
|
control-x |
cut chords and
melody (and copy to invisible clipboard) |
|
control-j |
copy chords and melody
from selection to text area |
|
control-b |
paste chords and
melody from text area to current slot |
59.
To transpose
chords, or chords and
melody:
|
Keystroke |
Effect |
|
shift-E |
transpose chords
up a half-step |
|
shift-D |
transpose chords
down a half-step |
|
control-e |
transpose chords
and melody up a half-step |
|
control-d |
transpose chords
and melody down a half-step |
60.
Entering
melody textually: Melody
is saved, and may be loaded, using a textual notation, in the same textual entry
field as chords. In distinction to chords, which always begin with upper-case
letters, melody notes begin with lower-case letters. A melody note consists of:
For example,
entering the following melody as text:
![]()
Using textual entry for melody
produces

Melody as entered from textual edit
61.
To
transfer selected melody from the leadsheet back to the textual entry field, press the j key.
62.
Both
melody and chords can be entered at the same time. The two are separated into “tracks” using
the upper- and lower-case distinction for chords vs. melody.
63. To transfer both selected chords and melody to the leadsheet from the textual entry, use Control-b, and to transfer back, use Control-j.
64. A summary of most of the key stroke commands can be obtained by examining the edit menu:
Edit menu contents
65. The Drawing feature allows a melody to be drawn on the screen. It is automatically adjusted to conform to chords and scales. Thus this is a feature that could be used by the musically unsophisticated to draw a melodic line with a particular shape. To use it, click the button with the pencil icon:
![]()
Drawing button
Then
drag the mouse over the part of the staff at which a melody is desired, moving
up and down as you go. The notes are determined by the slot spacing.
Drawing a melody with the mouse
66.
Uneven
spacing of chords is
achieved by using single slash characters (separated from chords by blanks).
The rule is that all chord and slash symbols within a bar are counted up and
the space divided evenly among them. For example, to produce the following
distribution, where C gets half of the space:
Uneven chord distribution
To get the
distribution above, use the sequence A B C /. This is much more convenient that
the alternative of clicking each indivual slot and entering the chord
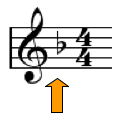
separately. As another example, in ¾ time, we might want the following:
Uneven chord distribution in ¾ time
To achieve the
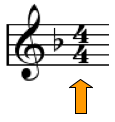
preceding, use A / B, since there are three beats to a bar. If you were to
instead to use just A B, you’d get a duplet rhythm, which, while interesting,
would be less common:
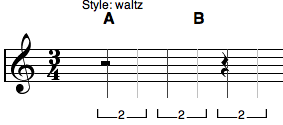
Duplet chord distribution in ¾ time
67. Chords can be aligned to
any slot, by using enough
slashes to divide up the space. Currently 120 slots per beat are available,
giving many gradations. Slashes can be combined with the NC (no-chord) symbol
to achieve hits, breaks, and other effects.
68.
Leadsheet text editor: Additional meta-data, such as the key signature, tempo, and so
on, will be automatically saved when a leadsheet is saved from Impro-Visor.
Thus one can simply start with a fairly bare file of chords, read it into
Impro-Visor, then write it back out and the meta-data will have been inserted.
These items can be edited with any text editor, such as NotePad, Emacs, Word,
etc. Impro-Visor itself also provides a minimal text editor that can be used to edit the file. If we
open this editor from the Utilities menu, we can see the form in which
Impro-Visor will save it. Changes made in this editor will not take effect
until the Editor-to-Leadsheet button is pressed. These changes are not
undoable, although you can always re-edit the content and press the
Editor-to-Leadsheet button again.
Textual editor for the entire leadsheet
The textual editor
is useful for changes to the leadsheet that can’t be done by a few simple actions,
such as inserting a few bars of chords or melody at arbitrary points within.
Changes made to the text can affect the number of measures in the leadsheet.
|
Keystroke |
Effect |
|
control-f |
Open the textual
leadsheet editor. |
69.
Files
should be saved with extension .ls (“leadsheet”)
for future loading:
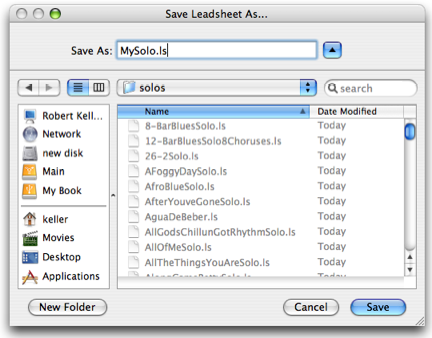
Leadsheet save dialog
70. MIDI files of the playback can be saved by selecting Export Leadsheet to MIDI from the File menu.
71.
You can control
the volume of individual instruments and note entry by opening the mixer
panel using this button:
![]()
Mixer panel button
72.
The mixer
sliders control the volume
of each instrument and the note entry separately:
Mixer panel
73.
MIDI recording
from an external MIDI instrument
can be done by clicking either the red circle button for continuous record, or
pressing the Step button for step recording.
![]()
Record buttons
This
feature requires a third-party MIDI program on the Macintosh, such as Mandolane
(http://www.mandolane.co.uk/). This is
because Java sound is not well supported on Macs. Also, at one point there was some kind of conflict between
MIDI recording and printing on the Mac. This needs to be checked. MIDI
recording is one of the least exercised features of the program.
74.
The
preference dialogs can be
opened using this button:
![]()
Preferences button
There are several
separate panels. The current preference panel can also be opened with just the p key.
|
Keystroke |
Effect |
|
p |
Open the
preference dialog. |
75.
Global
settings control default
values, such as are used when new leadsheets are opened.
Global preferences
The “Always use
this” boxes over-ride the setting
in the leadsheet itself. For example, if you always want the leadsheet to open
with bass clef, click Bass
and Always use this.
Similarly, you can over-ride the instrument choices that are present in the
leadsheet.
76. Leadsheet settings control those things that are specific to
the leadsheet (vs. specific choruses):
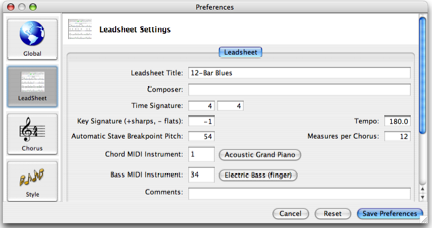
Leadsheet preferences
77. Chorus settings control those things specific to a chorus:
Chorus preferences
Currently the Layout, however, applies to all choruses, not just
this one. It is a series of numbers indicating the number of measures on each
line of the leadsheet. If this is blank, Impro-Visor will adjust the layout
automatically. This field can be set manually, or automatically, by toggling
the Freeze button on the menu bar, as was described earlier.
78. Style settings control the style, and permit the
introduction of new sections of a chorus with different styles:
Style settings
If the leadsheet
has only one style section, it may be changed by selecting a different style in
the right-hand menu.
If there are
multiple style sections, as indicated by the left-hand menu, then each section
is set independently. Adding a new section splits the current section into two
equal pieces. The boundary is then adjusted by setting the Starting Measure of
the second section of the split.
79. MIDI settings control the MIDI interface
MIDI settings
80.
Drawing
contour settings control
the drawing interface, which is explained below.
Contour settings
81. The lick generator controls are in a separate panel, which can be opened by clicking the right-hand light bulb button.:
![]()
Lick-generator opening button
The lick generator opens with lots of buttons and numbers, but you can ignore most of them for starters. Simply press the Generate button below the small window in the upper left. If you don’t like what you get, press again.
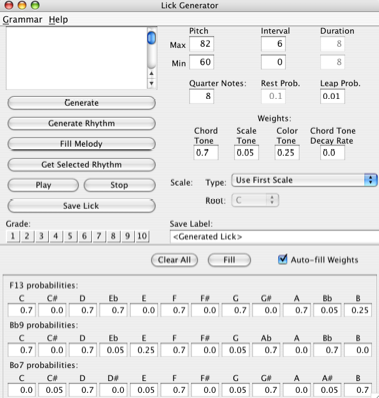
Lick-generator controls
Below are some samples generated by the Lick Generator for this particular setting.


More generated licks
82.
The lick
grammar can be edited by
selecting edit from within the lick generator. The editor functions in a manner
similar to the leadsheet editor. We won’t go into how the grammar works here,
but it is described in some of our publications. If you decide to change it, it
might be good to save a backup copy. The contents of the grammar distributed
with version 3.36 is shown below. There is additional meta-data in the upper
part of the grammar file which is not shown here.
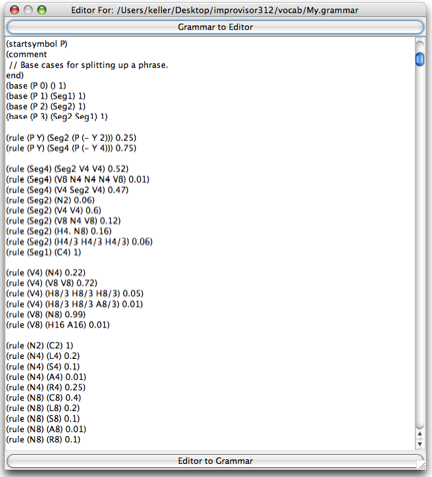
The grammar editor window
83.
The style
editor is a new feature in
version 3. It takes the form of a spreadsheet as shown below. A description of
how to use the style editor will be provided at a future time. However, there
is a separate help window available in style editor for hints. At present,
there is no undo/redo in the style editor, so please be careful. It is a good
idea to back up your styles directory before editing.
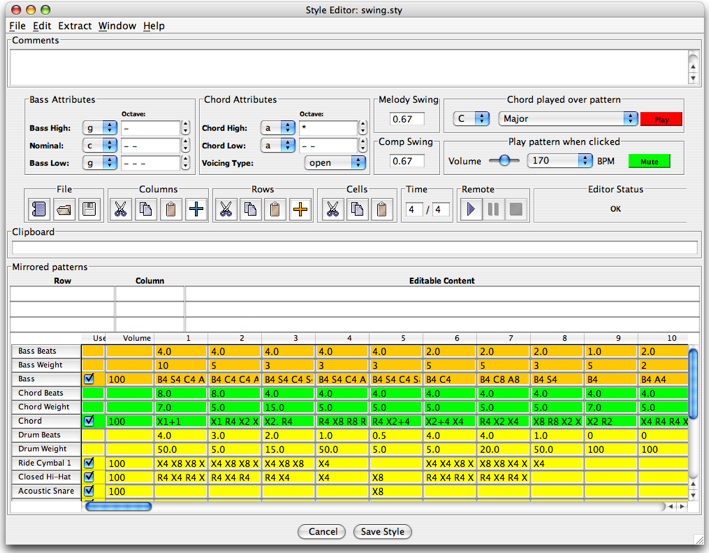
The style editor window editing the “swing” style
The Chord
popup in the style editor provides a display of all chord currently available,
and allows you to hear the chord in isolation.
|
Keystroke |
Effect |
|
control-y |
Open the style
editor. |
84. The Chord Voicing Utility allows you to sample various chord voicings in isolation. It does not allow you to enter new voicings into the vocabulary, although you can play them. Currently voicings are entered into the vocabulary file using a text editor. This utility also provides a good way to explore available chords.
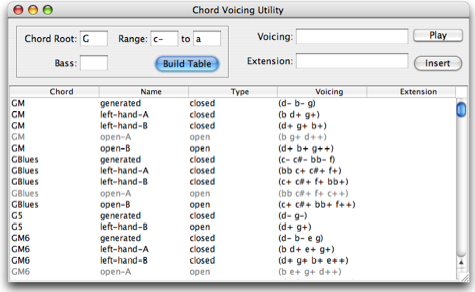
Chord voicing utility
85.
Style
sample leadsheets have been provided.
As we add styles, we will try to keep a leadsheet that exhibits the style in
the leadsheets/style-samples directory. A convenient way to preview styles is
to press the play button with this directory. Then you can go from one style
sample to the next to get an idea of how each style sounds, without actually
loading the leadsheet.
With play button pressed, click on the styles you are interested in previewing.
86.
The Style
extractor is a new
facility that will extract a style from a MIDI file accompanied by a leadsheet
file that contains the chords. Chose Extract Style (Control-e) from the Extract menu. A sample MIDI file
and accompany leadsheet file has been provided in the directory style-extract
in the current release. The
Style Extractor has its own set of windows, that will be opened if the
corresponding preference box is checked. This window gives details of how raw
data is clustered to produce the style rules. However, it is not usually
necessary to view the workings at this level to be able to extract a style.
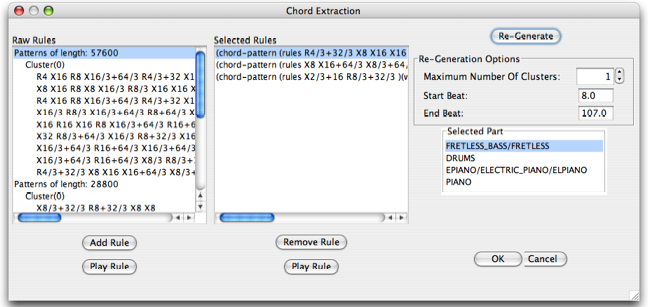
One of the style extractor windows
87.
Conclusion: This concludes the Impro-Visor tutorial for
the present. Please contact improvisor AT cs DOT hmc DOT edu if anything is
unclear. For additional information, visit the Impro-Visor home page:
http://www.cs.hmc.edu/~keller/jazz/improvisor
88.
Acknowledgment: The software described here were designed
and developed by the author, together with Martin Hunt, Stephen Jones, David
Morrison, Belinda Thom, David Wolin, and Steve Gomez (Dartmouth College), Jim
Herold (Cal Poly Pomona), Brandy McMenamy (Carlton College), Sayuri Seojima,
and John Goodman (Open University in the U.K.). This project was supported by a
Mellon Foundation Faculty Enhancement grant to Professors Keller and Thom, and
by the National Science Foundation REU Program under
grant Award No. 0451293 to Harvey Mudd College, and by a grant from the
Baker Foundation.
|
Glossary of Impro-Visor
Terminology |
|
|
Term |
Meaning |
|
advice |
Suggestions
for melodies that can be played over given chords. |
|
approach
tone |
A
tone not in a chord that is adjacent to a tone that is in the chord. |
|
bar |
A
colloquial term for a measure of music. |
|
cell |
A
small melodic fragment aligned with one chord. |
|
chord symbol |
A
somewhat standardized notation for representing chords with a few characters. |
|
chorus |
One
time through the chord changes of a piece. |
|
clipboard |
A
metaphor designating a place off-screen to which content is copied. |
|
color
tone |
A
tone not in a chord but compatible with the sound of the chord. |
|
dialog |
A
user interface feature for entering information, such as preferences. |
|
freeze |
To
set the numbers of measures per line in a leadsheet. |
|
harmonic
entry |
Entering
notes that are aligned to the current chord, rather than chromatically. |
|
idiom |
A
familiar jazz melodic fragment aligned with one chord. |
|
jar |
A
file type, standing for Java archive. |
|
leadsheet |
A
sheet with chord symbols and a melody line, which can be used to represent a
song or a solo over the chords. |
|
lick |
A
short melodic fragment aligned with one or two chords. |
|
meta-data |
Data
that is not melody or chords directly, but which provides additional
information, such as key signature, time signature, etc. |
|
MIDI |
Musical
Instrument Digital Interface |
|
mixer |
A
device that combines several sound tracks together in specified volumes. |
|
NC |
Abbreviation
for No Chord. |
|
parallax |
The
change of apparent location depending on viewing angle. |
|
pickup |
A
note or a few notes placed before the downbeat of a melody. |
|
polychord |
A
chord constructed of one smaller chord stacked atop another, such as a triad
over a dominant chord. Polychords are noted using the back-slash \ in
Impro-Visor. See also slash chord. |
|
quote |
A
melodic fragment from a familiar song or solo. |
|
rectify |
To
align a melody to be consistent with a chord sequence. |
|
slash
chord |
A
chord consisting of a chord and a specific bass note, which may or may note
be in the original chord. In Impro-Visor, slash chords are indicated with /.
See also polychord. |
|
slot |
A
symbolic time at which a chord or melody note can be played. Impro-Visor
currently has 120 slots per beat. A subset of the slots typically shows
within the beat at a given time. |
|
style |
A
specification of how the accompaniment (chords, bass, percussion) are
generated. |
|
thaw |
To
unset the numbers of measures per line in a leadsheet, leaving those numbers
open to dynamic adjustment. |
|
transpose |
To
raise or lower the pitch of all notes or chords in a selection. |
|
vocabulary |
A
file containing the specification of musical material, such as scales,
chords, licks, etc. |
|
voicing |
The
order in which the various notes of a chord are stacked. |
|
Area |
Stroke |
Effect |
|
Playback |
k |
stops (“kills”)
the playback |
|
i |
starts playback
from the beginning |
|
|
Select
all of chorus |
escape |
un-selects
everything |
|
control-a |
select all slots |
|
|
Add
rest |
r |
put a rest in the
selected slot |
|
shift-control-click |
select a slot
and put a rest there |
|
|
Transposition |
t |
transpose
selected notes up an octave |
|
g |
transpose
selected down up an octave |
|
|
e |
transpose
selected notes up a half-step |
|
|
d |
transpose selected
notes down a half-step |
|
|
shift-t |
transpose
selected notes up harmonically |
|
|
shift-g |
transpose
selected notes down harmonically |
|
|
shift-E |
transpose chords
up a half-step |
|
|
shift-D |
transpose chords
down a half-step |
|
|
control-e |
transpose chords
and melody up a half-step |
|
|
control-d |
transpose chords
and melody down a half-step |
|
|
Rectification
and other edits |
shift-R |
rectify the
selection (bring in line with the harmony) |
|
/ |
reverse
the selected melody |
|
|
\ |
invert
the selected melody |
|
|
Enharmonics |
space |
toggle
enharmonics of all notes in selection |
|
shift-space |
toggle
enharmonics of all chords in selection |
|
|
control-space |
toggle
enharmonics of all chords and notes in selection |
|
|
Undo/Redo |
z |
undo last action |
|
y |
redo last undone
action |
|
|
Licks |
control-u |
generate lick |
|
u |
save lick,
quote, cell, idiom |
|
|
Cut/Paste/Copy |
c |
copy melody (to
invisible clipboard) |
|
v |
paste copied
melody (from invisible clipboard) |
|
|
x |
cut melody (and
copy to invisible clipboard) |
|
|
j |
copy melody
selection to text area |
|
|
b |
paste melody in
text area onto leadsheet at selected slot |
|
|
shift-C |
copy chords (to
invisible clipboard) |
|
|
shift-V |
paste copied
chords (from invisible clipboard) |
|
|
shift-X |
cut chords (and
copy to invisible clipboard) |
|
|
shift-J |
copy chords from
selection to text area |
|
|
shift-B |
paste chords
from text area to current slot |
|
|
control-c |
copy chords and
melody (to invisible clipboard) |
|
|
control-v |
paste copied
chords and melody (from invisible clipboard) |
|
|
control-x |
cut chords and
melody (and copy to invisible clipboard) |
|
|
control-j |
copy chords and melody
from selection to text area |
|
|
control-b |
paste chords and
melody from text area to current slot |
|
|
Editors |
control-f |
open the textual
leadsheet editor |
|
control-y |
open the style
editor |
|
|
p |
open the
preference dialog |
|
|
Files |
control-n |
open
a new leadsheet window |
|
control-o |
open
a new file in the current window |
|
|
control-s |
save
the current file |
|
|
control-w |
save
the current file, specifying the name |
|
|
control-r |
revert
the current file from the saved copy |
|
|
control-p |
print
the leadsheet |
|
|
control-q |
quit
Impro-Visor |
The meaning of each scale is defined in the
vocabulary text file vocab/My.voc, where each scale is defined relative to a
tonic C. Note that some scales are synonyms for one another.
|
altered arabian augmented augmented
heptatonic balinese bebop bebop dominant bebop locrian bebop major bebop minor blues chinese composite blues diminished diminished whole
tone dominant dorian dorian augmented double harmonic
lydian double harmonic
major egyptian enigmatic flamenco |
flat six
pentatonic flat three
pentatonic gypsy harmonic major harmonic minor hindu hirajoshi hungarian minor in-sen indian ionian
pentatonic iwato kafi raga kumoi kumoijoshi leading whole
tone locrian locrian major locrian
pentatonic locrian#2 lydian lydian #5
pentatonic lydian augmented lydian dominant |
lydian dominant
pentatonic lydian minor lydian
pentatonic lydian
pentatonic major major blues major flat two
pentatonic major pentatonic malkos raga melodic minor melodic minor
fifth mode melodic minor
second mode minor #7
pentatonic minor bebop minor blues minor hexatonic minor pentatonic minor seven flat
five pentatonic minor six
diminished minor six
pentatonic mixolydian mixolydian
pentatonic mystery #1 neopolitan major |
neopolitan major
pentatonic neopolitan minor oriental pelog pentatonic persian phrygian piongio pomeroy prometheus purvi raga ritusen romanian minor scriabin spanish spanish
heptatonic super locrian super locrian
pentatonic todi raga vietnamese 1 vietnamese 2 whole tone whole tone
pentatonic |
The root pitch is placed in front of any of
the following. Any may be followed by a slash for the bass note, or a backslash
for a polychord for more combinations. The meaning of each symbol is defined in
the vocabulary text file My.voc, where each chord is defined relative to a
tonic C. Note that some chords are synonyms for one another. My preference for
chord symbols is:
|
Symbol |
Meaning |
|
M |
Major |
|
m |
Minor |
|
o |
Diminished |
|
sus |
Suspended
(4 by default) |
|
7,
9, 11, 13 |
Dominant
if used alone |
I’ve introduced other symbols such as Maj or maj because people have asked for them. I
don’t prefer them myself because they take up precious space on the chord line,
and also take longer to type. Also, the list of possible alternatives is pretty
open-ended. I introduced h
as a short-hand for half-diminished, which would ordinarily be m7b5
(minor-seven, flat five) for this reason. Here is the full list of chords in
the vocabulary as I write this.
|
+ +7 +add#9 +add9 11 11b9 13 13#11 13#9 13#9#11 13b5 13b9 13b9#11 13no5 13sus 13sus4 2 4 5 6 6#11 67 69 6b5 7 7#11 7#11b13 7#5 7#5#9 7#5b9 |
7#5b9#11 7#5sus4 7#9 7#9#11 7#9#11b13 7#9b13 7+ 7add13 7add6 7alt 7aug 7b13 7b5 7b5#9 7b5b13 7b5b9 7b5b9b13 7b6 7b9 7b9#11 7b9#11b13 7b9#9 7b9b13 7b9b13#11 7b9b13sus4 7b9sus 7b9sus4 7b9sus4 7no5 7sus |
7sus4 7sus4b9 7sus4b9b13 7susb9 9 9#11 9#11b13 9#5 9#5#11 9+ 9b13 9b5 9b5b13 9no5 9sus 9sus4 Bass Blues M#5 M#5add9 M13 M13#11 M6 M6#11 M69 M69#11 M6b5 M7 M7#11 M7#5 |
M7#5sus4 M7#9#11 M7+ M7add13 M7b5 M7b6 M7b9 M7sus4 M9 M9#11 M9#5 M9#5sus4 M9b5 M9sus4 Madd9 Maj#5 Maj13 Maj13#11 Maj7 Maj7#11 Maj7#5 Maj9 Maj9#11 Maj9#5 Mb5 Mb6 Msus2 Msus4 add2 add9 |
add9no3 addb9 aug aug7 dim dim7 h11 h7 h9 m m#5 m+ m11 m11#5 m11b5 m13 m6 m69 m6b5 m7 m7#5 m7add11 m7add4 m7b5 m9 m9#5 m9b5 mM7 mM7b6 mM9 |
mM9b6 mMaj7 mMaj7b6 mMaj9 mMaj9b6 madd4 madd9 maj#5 maj13 maj13#11 maj7 maj7#11 maj7#5 maj9 maj9#11 maj9#5 mb5 mb6 mb6M7 mb6b9 o o7 o7M7 oM7 phryg sus sus2 sus24 sus4 susb9 |
I
might add more abbreviations, but if you can’t wait, just edit the My.voc. For
example, if you want – to stand for minor, add the following:
(chord
(name
C-)
(pronounce
C minor)
(same Cm)
)
Make
sure the parentheses balance, otherwise some aspects of your vocabulary could
be ignored.
It is best to use a text editor such as Emacs, which flashes matching
parentheses.