CS181AA Projects
(Spring 2021)
This course is about software project skills other than programming
(e.g. concept development, requirements, architecture and design, reviews,
testing, and management). You will be asked to form teams, and come
up with a single (large) project concept.
Then, over the course of the semester, you will work on different
aspects of that one project:
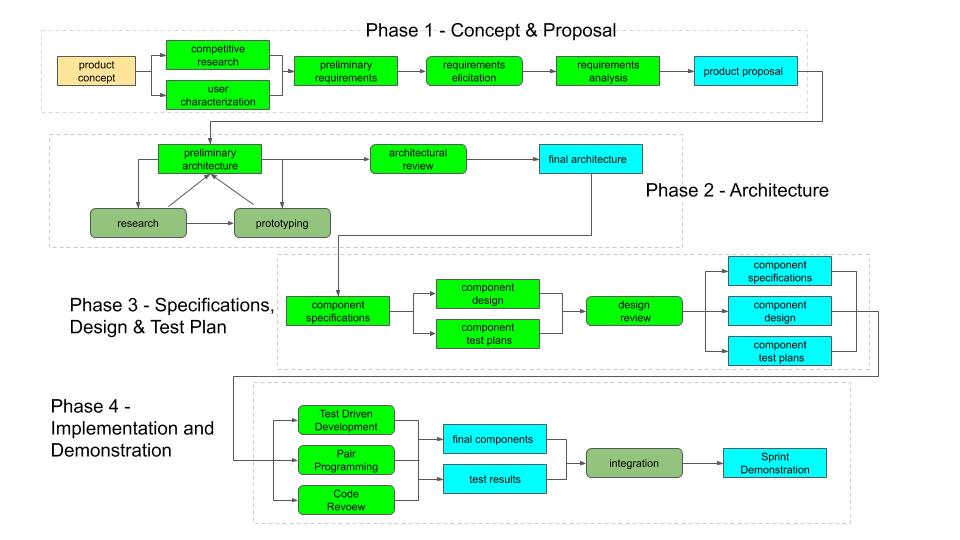
| Due Date1 | Assignment2 | Summary of Activities |
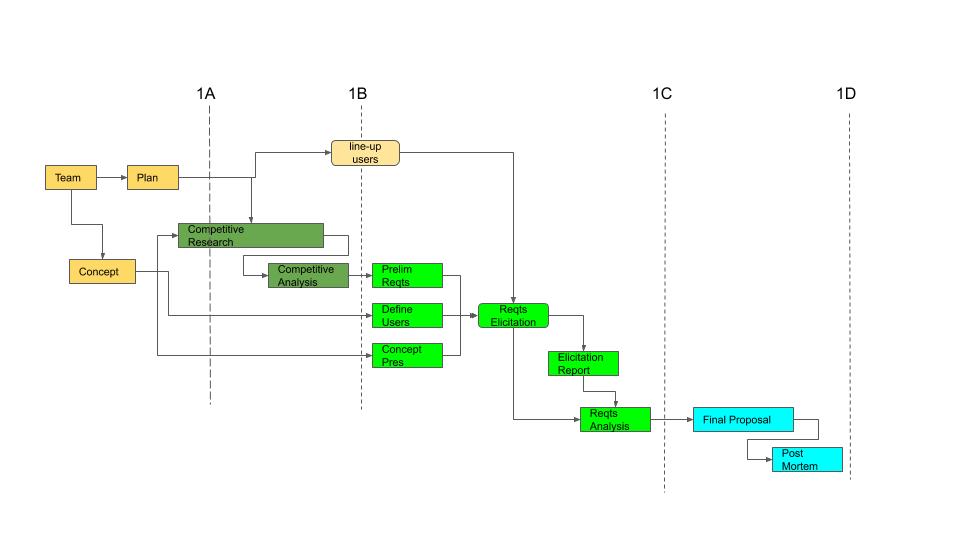
| Phase 1: Concept Development, Requirements and Proposal |
| Sun 1/31 | 1a. Team, Concept, Plan |
Form teams, identify a preliminary concept, write plan for turning it into a proposal. |
| Sun 2/7 | 1b. Competitive Research |
Research existing products in this space, position your proposal against this field,
and develop a competitive value proposition. |
| Sun 2/14 | 1c. Requirements Development |
1. Create a concept presentation to introduce people to the type of product you are exploring
2. Identify and characterize potential users
3. conduct interviews to gather requirements
4. analyze and report on the results. |
| Sun 2/21 | 1d. Final Proposal |
1. Combine all of the above into a complete project/product proposal
(what will be built, why you will be successful)
suitable to be summitted for funding/approval.
2. Review the processes you followed in this project to see what lessons you can learn
for how to do things more effectively in the future.
|
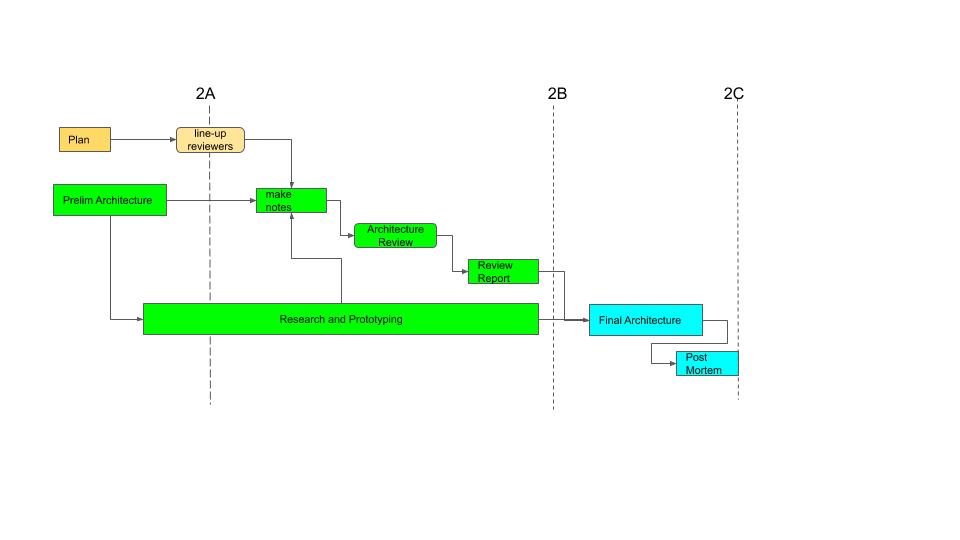
| Phase 2: Architecture and Review |
| Sun 02/28 | 2a. Plan and
Prelimnary Architecture |
1. Develop a plan for this project, dividing the work over
your team members and the available time.
2. Develop and document an architecture and high-level component specifications
for your project. This includes doing any required research and prototyping to
address critical questions.
|
| Wed 03/17 | 2b. Architecture Review |
1. Study another team's architecture, and prepare notes for a design review,
as they will study and pepare for a review of yours.
2. Conduct a design review with that other team, as they will with you.
3. Write up a report of the review.
4. Continue to work any issues with the team that raised them.
|
| Sun 03/21 | 2c. Final Architecture |
1. Revise your preliminary architecture based on the results of your review and investigations,
and submit a report on the identified issues and their resolutions.
2. Prepare and submit a final architectural proposal.
3. Review the processes you followed in this project to see what lessons you can learn
for how to do things more effectively in the future.
|
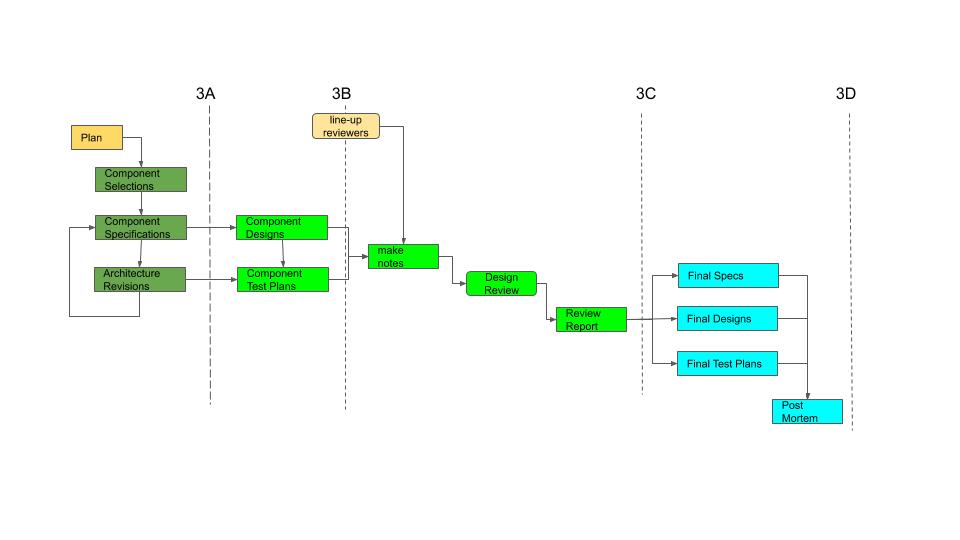
| Phase 3: Component Specifications, Design and Test Plan |
| Sun 03/28 | 3a. Component Selection and Specifications |
1. Select the system components to be designed and implmented
2. Select an owner for each component
3. Develop a schedule and assign responsibilities for the remaing phases
4. As a team, elaborate the architecture above the chosen pieces to
develop detailed specfiications for each.
5. As individuals, write up detailed specifications for your assigned component.
|
| Sun 04/04 | 3b. Component Design and
Test Plan |
1. As individuals, prepare a detailed design for your assigned component.
2. As individuals, prepare detailed unit-testing plans for your assigned component.
|
| Sun 04/11 | 3c. Design Review notes,
meeting and report. |
1. As individuals, package your specifications, design and test plans for review.
2. As individuals, read each package and prepare notes.
3. As a group, review each package, and write a report for each review.
|
| Sun 04/18 | 3d.
Final Specification, Design, and Test Plan |
1. As individuals, revise your specifications, designs, and test plans
to address all important issues raised in the review.
2. As a team, review the processes you have followed, and write up a
post-mortem report.
|
| Phase 4: Implementation and Testing Sprint |
| Fri 05/07 | 4. Final Reports |
1. Each of you will
implement the component
you designed in phase 3.
2. Two of you will spend (at least) one session doing
pair-programming
and write up a brief report on the experience.
3. (at least) one of you will develop your code in a
Test Driven Development
fashion (implementing and running tests as you complete each routine or feature)
and write up a brief report on your experience.
4. (at least) one of you will implement your component and then submit it to
code review
by other members of your team and produce a report from that review.
5. Each of you will implement the
component test plan
you designed (in phase 3)
and use it to validate the correctness of your implementation.
6. As a team, design a
demo
that shows your (independently implemented) components working together.
7. As a team, prepare and present a brief sprint review and demo.
8. As a team, review the processes you have followed, and write up a
post-mortem report.
|
1 Submissions are (modulo late-day-use) due by midnight at the end of the due date.
2 The same
general submission process
is used for all project deliverables.
Each deliverable (including how it will be graded) is
described in the associated
project descriptions.
Your submissions should not assume that your readers have
access to any special or proprietary software.
The best submission formats are probably:
- ASCII text for simple prose
- pdf or Google Docs URLs for formatted reports w/figures
- csv or Google Sheets URLs for spread sheets
We will in many cases be looking at how plans or specifications have evolved.
This can be captured with Github commits,
or by enabling history in
Google Docs.
For anything you submit as a URL (e.g. Google Docs or Github repos),
please ensure that they are publicly accessible to anyone with the URL.
Work-products will be considered to have been submitted at the time of the last
update or commit and push.
General comments on project rules and grading can be
found at the end of the project descriptions.
Project Phase 1
Concept Development, Requirements and Proposal
Introduction
What is the difference between a concept and a proposal?
- A concept is something that can be discussed.
- A proposal is something that can be acted on.
Before a grant is given or a new project is funded, a clear
proposal has to be developed for the work to be done, why
it is worth doing, and why the proposed effort is likely to
be successful. There are many steps on the path from
concept to proposal.
- developing an understanding of the problem to be solved
- developing a description of the work to be done
- verifying the feasibility and likely value of the proposed work
- developing a plan for the (above) investigation to be performed
The primary goal of this project is to give you real experience with the
development of a concept, the gathering, organizing and prioritizing of
requirements, and the development of a proposal for a software product.
A secondary goal is to develop your abilities to intelligently
plan a group endeavor, effectively manage it, and critically evaluate
the completed effort.
You are to form into small (idealy 4 person) teams and come up
with a concept for a new or improved software product.
You will spend the next few weeks developing that concept into
a proposal.
There are multiple phases to this project, each of which has its
own goals, processes, and deliverables:
3 less 10% for each unexcused late day.
4 If you submit these early enough, we will try to turn them around
quickly enough to enable you to improve your final proposal based on the
feedback from these earlier assignments.
P1A - Concept and Plan
Every project begins with:
- a concept for something to do
- a plan for exploring the concept
A concept document is a very brief description of what you propose to
do and a justification for why it is worth doing.
The living document that lays out the plan (du-jour), its progress, and its
evolution over the course of the project is the Management Plan.
P1A.1 Concept
Write up a brief (e.g. no more than one page) description of your idea, including justifications
for why you believe it to be:
- valuable as a product
- something that could actually be built and used
- something that you would (given sufficient time) be capable of designing and building
- fun for you to work on
In order to exercise a full range of software engineering skills
(e.g. competitive analysis, requirements, research and prototyping,
architecture, etc), the project you propose must be a fairly large one.
Many acceptable proposals are too large to be implemented by four people
in one semester. Fortunately you will only be required to implement
a few pieces of the whole product.
In choosing your project, make sure that it is one that will enable you
to meet all of the future requirements. Your project must ...
- be a software development project (designing and implementing
a moderately large amount of code). A research project, user interface,
web site or extending existing code will not do.
- be in a space where there is some existing software that you
can research, and against which you can position your proposal.
- have potential users from whom you can gather (a few pages of)
functional requirements.
- require some architecture ... typically this means four or more
distinct functional components (other than the platform on which they execute)
for which you can specify functionality, interfaces, and the means in which
they interact to provide the desired service.
Whether these components interact via calls, client-server protocols,
or through shared data is entirely up to you.
It is acceptable if one or two of these components already exist
(e.g. in standard toolkits or services) ... but you must design the
architecture.
Creating a new plug-in for an existing architecture is unlikely to meet this
requirement
- have multiple (e.g. at least one per person) moderately large
and complex (e.g. a few hundred lines of non-simple code) components
that you are capable of building, testing, and combining to yield
demonstratable product functionality.
Your initial concept will be graded on the basis of:
- 40% clarity - I understand what you propose to build, and for whom.
- 20% value proposition - I understand why I (or someone else) would find it valuable.
- 20% practicality as a product - I believe it could be successfully built and delivered.
- 20% practicality for this project - I believe you can gather requirements, specify,
design and build it (given sufficient time).
P1A.2 Management Plan
Most of the individual sub-tasks associated with this project can be done
in a couple of hours by one or two people. But there are a great many of these
tasks to be performed, and (you will discover) not a great deal of time in which
to get them done. The only way you will succeed is if you have a plan (who is
going to do what, when, and then who will do what with it) for the entire project
(from initial concept through final proposal and Post Mortem report).
Each team will prepare a task-breakdown, identify the dependency relationships between
tasks, and owners for each sub-task, assign due-dates, and schedule regular reviews
of both work-products and progress (to enable adequate time to deal with the
problems that will happen).
A good plan will ensure that all work is done before the
due date, but allow people a reasonable amount of slack
in when they have to do each particular task.
A plan to defer everything to the last minute is likely
to fail when last-minute problems are discovered.
An aggressive plan that people won't be able to
achieve guarantees a fire-drill in a few weeks
when it finally becomes clear that it cannot be followed.
Experience has shown that vague plans are easier to create
up-front, but create problems down-stream (when people
turn out to have been unclear about exactly what they were
supposed to do, by when, and in what form they were to
deliver their output). Similarly if you do not specifically
map out the dependency relationships among the tasks, you
may find that your schedule is unrealistic, because it
does not allow sufficient time for sequential tasks.
More complex deliverables (like the concept presentation and
final proposal) should be broken into sub-tasks. The most
obvious sub-task is to prepare and review a table of contents
before actually writing the content.
If any deliverable appears to be non-trivial, discuss it in
a team meeting and identify (more straight forward) sub-tasks
that it can be broken into.
The keys to ensuring problems are detected (while there is still time to fix them)
are regular communication, and continuous status tracking
(of actual progress vs the plan).
A good management plan will include regular (e.g. daily) status checks:
- status updates, new realizations, and other discussion topics should
be recorded in a file (e.g. minutes.txt in your repo
or in a Google Doc with history).
- As problems are recognized and you respond to to unanticipated events,
you will have to revise your plan to deal with them.
Your plan too should also be maintained a a file
(e.g. plan_1.txt in your repo or a Google Doc with history).
- If deadlines are missed, or deliverables fail to pass review,
the fact, as well as the causes and the plan to remedy them must
also be documented.
You can prepare and submit this plan in any form you like
(e.g. perhaps a Google Sheet), but the sort of information I had in mind was:
| Task/Deliverable |
Due Date |
Owner |
1st Draft |
Review Due |
Final Version |
Dependencies |
Risks |
Comments |
| concept | 9/9 |
Algernon |
9/6 | 9/6 | 9/7 |
none | it will be too hard to spec/design |
discuss implementability in our review |
| management plan | 9/9 | Zebulon | 9/7 | 9/7 | 9/8 | careful reading of assignment | leave something out |
multiple people read assignment, review against deliverables and grading standards |
| list of competing products | n/a |
Xenophon |
9/9 | 9/10 | 9/11 |
concept | miss important competitors |
review list before continuing |
| competitive research | 9/16 |
Xenophon |
9/12 | 9/14 | 9/15 |
list | miss important features |
first review is outline of key features |
| ... |
   MEETINGS AND PROGRESS MONITORING:

        We will have a face-to-face meeting every Tuesday after class to review
        our plan for the week.

        We will have a 5 minute chat each day at 8PM for a quick status check.
        Other working meetings will be scheduled as needed.

        If something goes wrong, send-email to the rest of the team THAT DAY.

 Zebulon will ensure that all of these are added to minutes.txt
 on a daily basis.
Your initial Management Plan will be graded on the basis of:
- 40% good use of time and resources (work apportioned reasonably over the available time)
- 20% specificity of plan (clear responsibilities: who, what, when)
- 20% provisions for early detection of problems, and time to deal with them
- 20% completeness (with respect to tasks and activities)
Maintain your concept description with history (e.g. ASCII text on Github or in Google Docs).
Depending on format, you might prefer to keep your plan in Google Docs, but documenting the changes.
You will probably be updating them daily, and we will be reviewing this history.
When you are ready to submit them for grading:
- prepare your proposal (e.g. ASCII text in a file named concept_1a.txt)
- prepare your management plan (e.g. management_1a.txt)
- put a standard submission prologue on the front of each file
- up-load them for submission (only one person on the team needs to do this)
P1B - Competitive Research and Positioning
Before building a new software product, one should first study the
products that are already available:
- to understand the features they already provide.
- to understand how those features do and do not address users' needs.
- to learn lessons from the things they have done well.
- to learn lessons from the things they have done poorly.
- to understand what value could be added by a new program.
Do research to identify existing products in your space
(or the closest existing products to a new space),
their capabilities, strengths, and weaknesses.
The existing products might be commercial products,
private projects, or open source efforts.
Identify multiple ways in which you could
significantly improve on these products.
(if you cannot significantly improve on existing products,
then there is no need for a new one).
This research is not merely perfunctory:
- if we are to create new value in a space we must understand
the functionality that is already available.
- if we are to be successful, we must learn why and how
those who have gone before us succeeded (and failed).
Start with a brief overview of your product-space, the way(s)
in which you seached for comparable offerings, and your rationale
for choosing the ones you choose to study more deeply.
Write up a brief description of the existing products,
how they arose, how they are used,
and notes on their key strengths and weaknesses.
Note the (positive or negative) lessons you can learn
(about either features or implementation approaches)
from each of these products.
Write up a list of feasible and valuable improvements that you
could reasonably make in a new product, and briefly justify
their value and practicality (e.g. why/how you should be able to do better).
Note that this is a list of ideas, and will be graded on
organization, quality of analysis, and clarity of insight.
It will not be graded as prose (e.g. complete sentences).
Your research and analysis will be graded on the basis of:
- 20% how well you found and described competing, similar
or related products.
- 40% the depth, clarity and credibility with which you
understood and described their capabilities, and called out
ways in which they were successful or unsuccessful.
- 20% the depth and cogency of your comparison of their features
with the feature set that you propose.
- 20% the value you gained from this research (features, approaches
and ways in which your proposal could be improved).
Maintain your research report with history (e.g. on Github or in Google Docs).
When you are ready to submit it for grading:
- prepare your report (ideally ASCII text in a file named report_1b.txt)
- put a standard submission prologue on the front of it
- up-load it for submission (only one person on the team needs to do this)
P1C - Requirmenents Development
Clarity is power.
Many well-funded projects have failed because they did not deliver functionality that people
actually needed (or did not deliver it in a usable form).
Our success in building a new software product is a function of
how clearly we understand its intended functionality.
Its success in satisfying its users is a function of how well
we understand their needs.
If we do not clearly understand what must be done,
it will only be by accident that we do the right things.
Requirements Development is the (often ignored by developers)
process of developing those critical understandings.
In this phase of the project you will:
- develop your own proposed list of product requirements.
- identify and characterize the types of users for which your product is intended.
- conduct requirements elicitation interviews with representative users from each major class.
- analyze the results of those interviews and develop a set of formal requirements for your project.
P1C.1 - Preliimnary Requirements
Brainstorm on your product concept and discuss the capabilities of
existing products to get ideas for what your product should
be able to do.
Identify different types of users (who might have different abilities or needs)
and then identify capabilities, characteristics, and/or use cases for each.
The specific form in which you choose to represent these
requirements is up to you. Basic capabilities may be best
captured by simple declarative sentences. Complex or role
based interactions may be best captured by use cases. Use
the forms that you think best capture the requirements in question.
Again, there is no need for this document to be any more
than organized notes.
Your preliminary requrements document should include:
- the various types of people who might want to use your product.
- the goals that each user would have for the product.
- the needs (features they require in order for the product to be useful),
expectations (features that will make the product more attractive to them),
and abilities (e.g. skills and domain sophistication) different types of users would bring.
- the types of users to which you feel best able to respond
- the requirements you think your product would need to meet to satisfy those users
This is only a brain-stormed initial list. You will gather considerably more input
from potential users in your requirements elicitation.
As such, it probably doesn't make sense to try to go into too much detail
or prioritize these preliminary requirements.
These preliminary requirements will be graded on the basis of:
- 20% how well you understood different types of possible users
- 40% how well you anticipated their likely abilities and expectations
- 40% how well and clearly you were able to capture these needs in requirements
Maintain your requirements with history (e.g. on Github or in Google Docs).
When you are ready to submit it for grading:
- prepare your report (e.g. ASCII text in a file named reqts_1c.txt)
- put a standard submission prologue on the front of it
- up-load it for submission (only one person on the team needs to do this)
P1C.2 Concept Presentation
Before asking potential users for requirements suggestions, we have to give
them some idea of what we are talking about. This should be a brief (five
minutes or less) presentation on the type of product being considered.
This is not a sales pitch!
As we will discuss in our lecture on requirements,
it is crucial that we not contaminate the panel with our own thoughts. The purpose
of a requirements elicitation is for us to get information from potential users.
As such, the presentation should be limited to establishing a context for the discussions to follow.
A brief (3-6 minutes) prepared presentation (including slides and/or other visual aids)
introducing the product concept as background for the requirements elicitation.
This presentation will be graded on:
- 40% its effectiveness in establishing context (the interviewees
understand the form, purpose, and use of the intended product).
- 10% how effectively it stimulates interest in the product, making them
eager to provide input.
- 10% its length: 3-6 minutes
- 10% the extent to which it does not otherwise contaminate or prejudice the
panel members.
- 20% logical/information presentation structure.
- 10% how good an impression it makes (polished and professional).
This presentation will be given at the
start of your requirements elicitation session, but
any prepared materials (e.g. slides) must be prepared
and made available for review prior to the actual elicitation.
You may prepare and deliver this presentation in any
form you choose, but the written submission should be
in some relatively universal format (e.g. pdf, HTML,
Google Presentation).
Maintain your concept presentation on github (or in a Google Presentation with history).
When you are ready to submit it for grading:
- create a standard submission prologue
(that includes a URL to the source or viewable slides/html) entitled
entitle it concept_1c.txt
- up-load it for submission (only one person on the team needs to do this)
P1C.3 - Requirements Elicitation
As described in the Requirements lecture, there are many possible sources
of product requirements. One of the most important sources is the intended
users. The better we understand what they do, and how the proposed product
would be used, the better we can design a product to meet their needs.
Each team will be asked to plan and conduct a session in which they will
gather requirements information from potential users.
This is a ~30 minute face-to-face meeting with potential users where
you will gather information to develop and validate requirements.
-
Briefly (in less than 60 seconds) introduce yourselves and the agenda
-
Give your concept presentation
-
Start with open-ended information gathering about the relevant activities,
how they pursue them, what problems they encounter, and what they wish they could do.
-
Then move into more specific questions, following up on interesting points
raised in the open-ended questions, and posing the more directly product-focused
questions that you have come up with.
-
Get their comments on information you have gained from other sources.
Note: It is possible that, in the process of giving you
their own requirements, the customers will actually
touch on all of your own previously gathered requirents.
If this is the case, when you get to that part of the
agenda, specifically affirm that they have reiterated
(or how they have changed) that prior input.
-
Present a summary of the key messages you have gotten from them today,
and give them the opportunity to correct/amend those.
-
Thank them for their participation.
Team roles:
- Moderator: Leads the meeting, discussions, etc.
- Scribe: Takes notes, and present a summary of what has been heard at the end.
- Others:
All team members will play important parts in making this a success.
The moderator and scribe may be too busy to actually
think about and process what is being said in real time.
Other team members should
-
Distill long discussions into punch-lines for the summary.
-
Keep track of points that need further clarification before we are done.
-
Check off comments that relate to previously suggested requirements,
and maintain a list of requirements that still require validation.
- Watch the agenda and the clock,
and help the moderator keep to the agenda and
make sure that nothing is missed (because it is difficult to think while talking).
This process will be graded on the basis of:
- 25% the extent to which you are able to adhere to the process (which will be described,
in the reading, given to you in writing, and demonstrated in class).
- 50% the extent to which you are able to obtain, clarify, and digest useful information
from the panel about their activities, needs and pior experiences, and perceptions
in this area.
- 25% the extent to which you are able to confirm the correctness of your
understandings and the information gained, and validate/clarify prior
assumptions and questions about requirements.
When you have identified a panel of potential users, schedule an appointment
(with me or a grader) for your requirements elicitation session.
P1C.4 - Elicitation Report and Requrements Analysis
After the elicitation session, scribe should write up
a summary report, review it with the team, and add it to your repo.
This report should include:
- When and where the session took place and who attended.
- Interesting information gained during the open-ended
information gathering.
- Clear statements of significant new requirements that
were suggested, along with an assessment of how important
each is and why.
- Significant input on previously gathered requirements,
affirming, refuting, or changing them.
- Any other useful results gained from the meeting.
This report is a record/summary of what you learned in the elicitation.
It can certainly call out new things, and organize the input into
clear messages. But this report should be treated as "raw data",
and it is probably best not to add opinions (agreement or disagreement
with what they said) to this record. Those can be explored in the
(subsequent) requirements analysis.
This report will be graded on the basis of:
- 20% form (capturing who, when where, topic)
- 20% completeness (all key points captured)
- 20% the clarity, organization and readability of the report
- 20% understanding what the customer said (correctly, and deeply)
- 20% a summary that captures and organizes the key input
When you are ready to submit your elicitation report for grading:
- prepare your report (e.g. ASCII text in a file named report_1c.txt)
- put a standard submission prologue on the front of it
- up-load it for submission (only one person on the team needs to do this)
The elicitation report is raw input to the requirements development process.
The characteristics of good requirements are discussed in both
the reading and the lecture on requirements. Starting with
your initial (brain-stormed) requirements:
- revise them based on customer feedback (and your
evolving understanding of the problem)
- add the new requirements gathered from customers.
- look for ambiguous requirements, and clarify them.
- assign a value (e.g. high/medium/low) to each requirement,
and justify that assignment.
- assign a confidence (e.g. high/medium/low) to each requirement
(that you have properly understood it and/or its value).
- look for conflicting requirements, and resolve the
conflicts.
- assign a difficulty (easy, moderate, hard) to each,
and (briefly) justify this assignment.
- assign a priority (e.g. must-have, should-have, nice-to-have)
(based on the combination of value and difficulty)
to each requirement, and then ladder them by priority.
- suggest a cut-off line for release 1.0, and justify
why that is the right place to draw the line.
When you sit down to come up with a final set of requirements,
it is likely that you will discover that some of the input
you got in your elicitation was not as clear as it seemed at
the time. When this happens, you have a few options:
- If it is unclear, go back to the person from whom you got the requirement
and seek clarification.
- If there are contradictions, understand why different people have
different needs, and see if there is a way to satisfy both (or give
up on one set of users).
Based on the results of your requirements analysis, prepare a priority
ordered list of product requirements. For each, list:
- the stated requirement
- your confidence in that requirement, and where that confidence came from
- its priority, and your justification for that determination
(e.g. your confideince that it is needed by many users,
and why you believe that priority is the correct one).
- its difficulty (to implement), and your basis for that assessment
The requirements analysis will be graded on the basis of:
- 40% completeness of the lists and traceability of the requirements
(e.g. to user input or existing standards).
- 20% reasonablness/appropriateness of the requirements
- 20% prioritization and rationale for that prioritization
- 20% clarity, organization and readability of the report
Maintain your requirements analysis with history (e.g. on Github or in Google Docs).
When you are ready to submit it for grading:
- prepare your report (ideally ASCII text in a file named analysis_1c.txt)
- put a standard submission prologue on the front of it
- up-load it for submission (only one person on the team needs to do this)
P1D - Final Proposal and Post Mortem
Having thought about what you want to build, describing it to others,
and getting their feedback, you should now be prepared to:
- write up a proper proposal for your project.
- assess how this process went, and what you have learned from it.
P1D.1 - Final Proposal
The key deliverable is a written proposal (likely to management or a granting agency)
about what this project is and why they should approve (or fund) it:
- It should include an overview of the problem space and concept.
- It should describe the key types of users and the needs to which your proposal responds.
- It should include competitive positioning information.
- It should include validation (from your customer interviews or other research)
that your proposal responds to a real need and would be a compelling product.
- It should include a list of key requirements the product must satisfy
(and why these requirements can be trusted).
- It should include some basis for believing this project to be feasible
for implementation (given enough time) by this team.
Most of this information has already been assembled (in your initial proposal,
competitive analysis, concept presentation and requirements analysis).
Now you are assembling it into a final form.
Hints (about the real world):
The director to whom you are submitting this proposal can be
viewed as another type of user, with her own sets of needs.
Your product need not respond to your director's needs ...
but your proposal (if it is to be successful) must do so!
This means you need some idea of who your director is, what
constraints she is under, and what problems she is trying to solve.
Note that executives (even R&D directors) are very busy, and
often suffer from short attention spans ... so brief and to-the-point
is generally better than long and elaborate.
This proposal will be graded much more on content than on format, so ASCII
text is completely acceptable. If you want to submit it in a
richer format (e.g. so you can include images), PDF, Googledocs,
or HTML are also acceptable.
This proposal will be graded on the basis of:
- 20% clarity problem domain and cogency of the concept
- 20% clarity and depth of the target user descriptions
- 10% clarity, depth, authoritativeness, cogency of the competitive analysis
- 20% clarity and persuasiveness of the value proposition
- 10% clarity, reasoanbleness, prioritization, provenance of the key requirements
- 10% likelihood that I would fund this effort
(because I believe it can be built and will address a real need)
- 10% likelihood that I would hire the people who prepared this report
(because of the depth and clarity of the analysis and presentation)
Maintain your final proposal on github (or in a GoogleDoc with history enabled).
When you are ready to submit it for grading:
- prepare your report (e.g. proposal_1d.txt or .pdf)
- put a standard submission prologue on the front of it
- up-load it for submission (only one person on the team needs to do this)
P1D.2 - Post-Mortem Analysis
This project is a learning exercise, and one of the major ways
we learn is by analyzing past experiences (positive and negative).
You will, as a team, review all aspects of this project. One of you will then
summarize that process into a post-mortem analysis report.
A report, summarizing the key issues raised in your post-mortem,
and the conclusions you came to. Your post-mortem discussion
should include:
- the concept definition, planning, research, and brainstorming activities
- the creation of the concept presentation
- the customer requirements elicitation planning, execution, and results analysis
- the organization and creation of the final proposal
- the planning and ongoing management of these activities
- the overall project as an educational exercise.
The submission and grading of Post Mortem reports is described
in the General Grading information.
Make sure that you have kept your meeting minutes and management plan up-to-date.
When you are ready to submit the Post-Mortem report (and management notes) for grading:
- prepare your report (ideally ASCII text in a file named postmortem_1.txt)
- put a standard submission prologue on the front of it
- make sure that it also contains copies or URLs for your meeting minutes and (updated) management plans
- up-load it for submission (only one person on the team needs to do this)
P1D.3 - Work Share Estimates
Most of your grade for this project will be based on the team deliverables, but some of it will
be based on the quality, amount, and timeliness of work done by each team member. Towards this
end, we ask each team member to estimate the
amount of work done by each team member on this project.
Please prepare your own assessment of how much work was done by whom and submit it as
workshare_1.txt (or perhaps workshare_1.csv).
Project Phase 2
Architecture and Review
Introduction
If something is simple, a well-trained person can just sit-down and do it.
But real-world problems often defy simple solutions,
and complex systems tend to be confronted by non-obvious challenges,
and to exhibit unanticipated behaviors. We would like to
simply sit down, start writing the parts that are obvious, and trust that
the rest will become clear to us as we move down that path. That story
has been told countless many times, and it almost always ends in tragedy.
Now that you have a well formulated idea of what your product should do, it
is time to figure out how such a product can be built.
This design must be elaborated and described well enough that outside reviewers can
evaluate it, assess its feasibility, and identify holes in your design.
This project will exercise a great many key design skills:
- coming up with a viable high level architecture
- working out the implications of your architecture to component definitions
- identifying questions and risks best addressed through research and/or prototypes
- validate your architecture against your requirements (and general goodness properties)
- describing that architecture well enough that others can understand it
- reviewing someone else's design, understanding the issues, and
articulating them in a useful form
- working the issues that are inevitably discovered to yield
an architecture that actually has a chance of working.
All of the above skills are fundamental to any significant software development effort.
There are multiple parts to this project, each of which has its
own goals, processes, and deliverables:
P2A.1 Plan
The development of the architecture may prove much more difficult
than you imagine, the process of describing it clearly in writing
may prove extremely challenging, and you will probably discover that
(after your design review) you have some non-trivial work
to do to fix your design. Also, remember that design is a wicked
problem:
- The architecture evolves with your evolving
understanding of the problem.
You may not be sure how many components you
have to specify and analyze until your
architecture is largely complete.
- You may not have any sense of how difficult
the component analyses will be, or how many
iterations you will have to make over the
architecture until you have gone through a
few rounds of revisions, and can judge the
difficulty of the issues and rate of convergence.
- You may not have any sense of the number
or difficulty of the issues that will be raised
in the design review until after it has been
completed. (If you had recognized those issues
you would have dealt with them before the review)
In project 1, you were given a relatively complete list of things
you had to do, along with some guidance on how to do them.
In project 2
- the list of things you have to do depends on your
chosen project and approach to accomplishing it.
- you cannot know how much work these (design, research,
prototyping) tasks will be (or even if they will be
successful) until you start pursuing them.
These factors can cause the work to very quickly
grow much larger than your initial estimates.
Many students consider the development and description of the
preliminary architecture to be the most difficult part of the entire course.
Many final post mortem analyses express regret for not having adequately
investigated issues and options in project 2 that caused them considerable
difficulty in projects 3 and 4.
This means you need to get started as soon and fast as possible,
and budget a great deal of time for experimentation, revision and rework.
Each team will prepare a task-breakdown, identify the dependency relationships between
tasks, and owners for each sub-task, assign due-dates, and schedule regular reviews
of both work-products and progress (to enable adequate time to deal with the
problems that will arise).
A good management plan will include regular (e.g. daily) status checks, whose
results should be recorded in a minutes.txt file in your repo.
As your understanding of the problem
evolves and you respond to unanticipated events,
you will have to revise your plan (not merely estimates, but
the work to be done).
If deadlines are missed, or deliverables fail to pass review, the fact, as well
as the causes and the plan to remedy them must be documented.
Your initial Management Plan will be graded on the basis of:
- 20% good use of time and resources (work apportioned reasonably over the available time)
- 20% specifically calling out important research and/or prototyping activities
- 20% specificity of plan (clear responsibilities: who, what, when) including
lining up and preparation for reviews
- 20% provisions for early detection of problems, and time to deal with them
- 20% completeness
Maintain your plan (and status update minutes) on github.
You will probably be updating them daily,
and we will be reviewing this history.
When you are ready to submit your plan for grading:
- prepare your management plan (management_2a.???)
- put a standard submission prologue on the front of each file
- up-load it for submission (only one person on the team needs to do this)
P2A.2 Preliminary Architecture
You will design and specify a set of components that is (in combination)
capable of delivering your version 1.0 product functionality.
It is tempting to draw some high level pictures and a brief
set of descriptions and call it an architecture ...
but the devil is in the details.
The hard part is working out the implementation and
characteristics of the architecture
in sufficient detail to demonstrate that
the described system is buildable and likely to work:
- the described assembly of components is capable
of delivering the required functionality.
- each of the described components is
well defined and reasonably implementable.
- the described interfaces are reasonably abstracted
(understandable and convenient) from the clients'
perspective.
- the described interfaces are reasonably abstracted
(clear, implementable, with good information hiding)
from the component's perspective.
- the development can be accomplished with mature and usable tools
and technology (ideally using off-the-shelf components).
Please keep in mind that
a description of proposed screens/commands and the paths between them is not an architecture.
That is a proposal for a user interface and functionality.
An architecture describes the structure of the software
(e.g. programs or classes) that will implement that functionality,
and the interactions of those components with one-another and
external services or agents. For each component in your
architecture, you should be able to characterize its interfaces
(e.g. procedure calls, HTTP gets) and functionality (e.g. the methods
or operations it supports).
In Chapter 3.5 of Code Complete, McConnell provides an overview
(and check-list) for the things that you might want to cover in your
architectural description;
The most relevant (for this project) sections from his presentation are probably:
- Program Organization
- Major Classes
- Data Design
- Architectural Feasibility
- Buy-vs-Build and Reuse Decisions
- General Architectural Quality
Recall that McConnell described design as a
wicked problem, in that you may not even have a list of
problems to be solved until you have designed (and discarded)
a few solutions. This is a highly iterative process, and these
iterations may consume a great deal of your time.
Often, the best way to convince ourselves of the feasibility
of an architecture
is to sketch out possible implementations of each major
component, looking for options and issues. Such preliminary
research, design, analysis, and prototyping is an important
sanity check on the viability of the proposed architecture.
The goal of these investigations is not to fully design the
major components, but merely to present a compelling argument
for the "feasibility" of the proposed component descriptions:
- Where familiar off the shelf technology is available,
this may require no more than a brief description of its
capabilities and how it will be used.
- Where newer or unfamiliar technology
(e.g. langauge, API, tool kit or service) is chosen, it may be
necessary to do a further research (and/or prototyping) to
confirm its usability and suitability
for its proposed role in the project.
- For new components that must be constructed from scratch,
it is common to construct a high level design ... with
enough detail to convince ourselves that such a component
is buildable, and unlikely to involve any "hard" problems.
Your architecture need not result in a complete top-down
design for the whole system. A component analysis only needs to be
complete enough to convince the reviewers that the major
likely problems have been identified, and are all likely to be solveable.
Every major component should be analyzed to this "feasibility" level.
Each member of the team should take ownership of the analysis
for at least one major architectural component. If you have many
more components than people, each person should choose at least
one interesting component for thorough analysis or one
interesting question to resolve through a prototyping effort.
If you have too many questions and components, it may be impossible
for you to do all of the necessary design and prototyping within a
few weeks. After each person has taken on a difficult component or
question, you can do a more superficial job on the simpler questions
and components (but note explicitly in each that you are doing so).
In the unlikely situation that you have more people than
interesting components,
sub-divide your major components to create more pieces or find a
problem that requires further analysis or prototyping.
NOTES ON INVESTIGATIONS
- Please be aware that if you gloss over problems in this phase,
you may find that those problems make it impossible to complete
the subsequent design and implementation phases of this project.
Architectural investigation, design and validation are critical prerequisites;
Treat them like a matter of life and death ...
because for a non-trivial software project, they often are.
- It is quite possible that you will not be able to complete all
of the required investigations and protyping in a single week.
- if this proves to be the case, it is a confirmation
of the signifcant risk associated with those issues,
and of the criticality of deeper investigation.
- you should define the problems to be investigated
as part of this submission, but those investigations
do not need to be completed until you submit your
final architecture.
Your architectural description should include:
This should be backed up by a set of component analyses
(research, designs, analyses, prototypes, etc) that were done to establish
the feasibility of implementing each major component:
- where existing technology is being used, provide references
and summarize the investigation you did to determine its
adequacy and usability.
- where analysis was done, provide a write-up of the issues
investigated, the means of the investigation, and results.
- where prototyping was done (e.g. to assess the usability
of a new tool or viability of a proposed approach), describe
the questions and risks to be addressed, a summary of the approach,
and the results
(and github URLs for the actual prototypes constructed).
- where new design work was done, provide design documentation
similar to (but hopefully much simpler than) that described
for the architectural description.
You may want to sketch out parts of the user interface
(e.g. screens, web pages, operations and navigational options)
to guide your definition of required functionality.
These may be a key foundation for the architecture that
will implement them, and valuable background for reviewers
of that architecture.
But these are not software architecture, and will not satisfy
the requirements for either the preliminary or final architecture.
Getting Started and Early Feedback
To help you through the most difficult parts of this process, we suggest
that you (within first two days):
- conceive a list of proposed software components.
- prepare a one-line description of what each
component does and its role in the product.
- draw a diagram showing their relationship to one-another and
the context in which they run and interact with the outside world.
- prepare a list of the issues (e.g. new technologies, available tools,
non-obvious APIs, difficult algorithms, etc)
that might arise in the implementation of each component.
- schedule a presentation with me (and/or a Grutor) to review
those component descriptions and concerns.
- get feedback on what else you might need to do before you start
researching tools, doing prototypes and elaborating designs.
Once you have a reasonable model of how your functionality can be
implemented and the questions/risks that must be examined you will
know what research, prototyping and design examinations you need to complete.
But if you do not have a reasonable starting point and list of issues
to address, you may wind up wasting a few weeks of work, much of which
winds up being thrown away, and does not enable you to move forward.
Describing an Architecture
There is a stereotype that scientists and engineers tend not to be good writers.
To the extent there is any truth in this sterotype, it is strange and tragic ...
because story-telling is fundamental to what all researchers and engineers do.
They may spend much of their time doing experiments, models, and designs, but
understandings of complex phenomena and systems are of little value until they
have been explained to others (who will apply and/or instantiate them).
Scientists and engineers do not (or at least should not, as part of those jobs)
write fiction;
But they do none-the-less create stories where characters,
with satisfying backgrounds, fulfill their roles,
and traverse their arcs,
in accordance with, and exemplifying compelling themes.
You understand the system you have designed;
Now you have to devise a story that will recreate that vision for others:
- who are the characters in your story, and what are their roles?
- what descriptions and naratives will most fully portray them?
- what key challenges do they face, and what principles/strategies guide them to success?
- what background is necessary to enable readers to absorb this story?
You will note that:
- there is much reading on what makes a good architecture
- there are two full lectures on developing and evaluating architectures
- you have (listed above) a two-digit number of things that
you need to describe about your architecture
But I do not give you examples, forms, or even a table of contents for
your architectural description.
There are a few reasons for this:
- Every system is unique in both structure and constraints, and
its story probably requires a unique telling. Giving you
samples that did not fit the needs of your particular project
would probably do more harm than good ... as you tried to force
your square peg into that round hole.
- Among the (difficult and soft) skills we want you to develop
are
- learning to visualize complex systems
- developing the ability to communicate those visions in technical prose
The ability to describe complex technical concepts and issues is a
fundamental skill for any scientist or engineer,
and I expect that working out how to best
tell your story will prove to be a highly educational exercise.
- Figuring out the best way to tell the story is far more important
(and often more difficult) than telling it.
Once you have the right outline for your story,
drawing the pictures and writing the prose are relatively straight forward.
Your preliminary architecture will be graded on the basis of
- 25% overview
- clarity of the conceptual roles of each components
(note user screens are not software component descriptions)
- clarity of their interactions and how the cooperate to provide
the required services,
- diagrams depicting component roles and relationships
- diagrams depicting external and inter-component interfaces
- how well this document prepares the reviewer for the specifications
and issue discussions to follow.
- 15% component specifications
- completeness/clarity of functional descriptions
(of the proposed implementation)
- completeness/clarity of S/W interface descriptions
- completeness/clarity of S/W component requirements
- adequacy of this spec to guide future design and implementation
- 10% issue recognition and understanding
- completeness of the list (are there obvious issues missing)
- worthiness of these issues (are these real architectural issues)
- depth of the understanding of the issues
- insightfulness of propsed solutions
- 10% architectural rationale
- how well it captures the issues that drove or challenged the architecture
- how well it justifies the responses to those issues
- clarity and soundness of the analysis and rationale
- 10% component design analyses
- covers all non-trivial components (screen descriptions don't count)
- how clear it is that your component can be implemented
- how reasonable the proposed implementation is
- good use of off-the-shelf tools and existing technologies
- how clear it is that your implementation will work
- how clear it is that your component can meet its requirements
- quality of the analysis, how well the rationale was captured,
and value added by this analysis.
- 10% prototypes and practical investigations
- are all key risks identified and targeted for investigation
- does each investigation have clear and appropriate goals
- reasonablness of the planned investigation
- quality of the implementation of that plan
- quality of the investigation and value added by this work.
- 20% overall quality of the architecture
- clarity and simplicity
- is the architecture a reasonable response to the requirements
- does it exhibit good modularity and interface abstraction
- how effectively have the recognized issues been responded to
- is this architecture likely to be buildable
- is this architecture likely to work
Maintain your architecture description with history (e.g. on Github or in Google Docs).
When you are ready to submit your preliminary architecture for grading:
- create a standard submission prologue
(that includes a URL to your architecture description), and
entitle it architecture_2a.txt
- up-load it for submission (only one person on the team needs to do this)
P2B Architectural Review
As we refine a design, we become prone to confirmation bias.
It is easy to become convinced that we have
made the right decision and that our design is therefore correct.
After we have done our best at refining our architecture, it is time
to seek independent validation from people who haven't already bought-in
to our solution.
Each team will read over another team's architectural presentation,
prepare detailed notes, conduct a formal design review, produce a
written report, and work with the designing team to ensure reasonable
resolution of all outstanding issues. You will select a moderator,
who will work with the submitting team to ensure that the package
is ready for review before it is sent to the rest of your team for
review. Please document any discussions between your moderator and
the submitting team.
It is likely that the reviewing team may need a little bit of background
before they can fully review the proposed architecture. It is suggested
that, along with your preliminary architecture, you also send a copy of
your (P1D) final project proposal, and URLs for general background on
any tool kits or APIs you are proposing to use.
P2B.1 Review Notes (per person submissions)
Digesting other peoples' designs is another fundamental skill
for scientists and engineers.
Prior to your review meeting, each of you (individually) will read
the submitted architecture description and prepare detailed notes
on all questions and concerns. These notes must be submitted at
least 24 hours prior to the actual review session. They should be
neat notes, describing legitimate issues clearly enough to be sent
as email, and organized for discussion (e.g. in the recommended
review order). But these are notes, and there is no need for
polished prose, or even complete sentences.
Note that the primary purpose of the architectural review is to identify
issues with the proposed architecture, and you will be graded on your
ability to understand and explore the implications of the described
architecture.
But, you are also invited to make observations about the proposed
functionality and competitive positioning. While these are not
architectural, they may well be within scope for early stage
project reviews.
When you have completed your study notes in preparation for the review,
each individual should prefix them with a
standard submission prologue
and submit them (with the name review_notes_2b.txt).
NOTE: Late points cannot be used for this submission.
- Full credit if it is submitted 24 hours before the review meeting.
- 50% credit if it is submitted prior to the review meeting.
- 25% credit if it is submitted after the review meeting.
P2B.2 Review Meeting (graded for the revewing team)
Your team will conduct a formal design review of the submitted
architecture. The team that submitted that architecture will be
present to answer questions, but will have no other formal role
in the process.
Schedule your review meeting with the professor (or Grutor). Make sure the
submitting team can get you the architectural package far enough in advance
to enable you to do the required study and prepare your notes prior to the
review meeting.
P2B.3 Review Report (graded for the reviewing team)
The designated scribe for your review session will write up a report
of all conclusions reached in the design review. This is specifically
not "meeting minutes" (including all questions, answers, and discussion
points).
Rather it is a distillation of key issues and decisions.
It should be carefully written and reviewed. It must contain:
- a clear summary of each important issue rased
- a characterization as a defect, issue, or question
- a characterization as must-fix, should-fix, or comment
- a disposition for the entire project of
- approved
- approved with required changes
(which you are confident the team can make)
- requires another meeting
(the required changes are sufficiently great or complex
that the project should be re-reviewed after they have been made)
- rejected (this cannot be made to work)
Please note that must fix does not mean I feel strongly about this;
It means:
In our judgement, unless this problem is fixed the proposed product
cannot (reasonably) be built (or will not work)
Thus, unless it is obvious, it is often a good idea to accompany must fix
designations with a justification/rationale.
When you are ready to submit your review report for grading:
- prepare your report (ideally ASCII text in a file named report_2b.txt)
- put a standard submission prologue on the front of each file
- up-load it for submission (only one person on the team needs to do this)
You should also send a copy to the team whos project your reviewed, so they can
start working on the required changes.
These submissions be graded on the basis of:
- 25% individual notes prepared in advance of review
- the thoroughness of study (i.e. understanding
of the proposed architecture and its implications)
to which they attest
- how clearly articulated (specific vs vague) the issues are
- all comments appropriate and within scope
- issues reasonably organized for discussion
- 50% the review process
- everyone is well-prepared and participating constructively
- agenda and flow
- meaningful discussions of in-scope issues
- all viewpoints heard, avoid rat-holes
- each discussion ends in a clear (explicitly stated) characterization
(defect, issue, question),
and disposition (must-fix, should-fix,
or comment/suggestion).
- ensure issues are understood, but do not try to resolve them
- all discusion is within scope
(primarily architectural, but some functional and positioning
issues may also be included)
- culminates in a clear (explicitly stated) project disposition
(approved, approved w/required changes,
requires another review or rejected).
- review the product critically but courteously
- review was a valuable and productive experience
- 25% the review report
- time, place, project, attendees
- clarity with which issues are presented
- explicit disposition of each issue
- completeness and accuracy
- scope of the report (just issues, no opinions)
- explicit disposition of the entire project
P2C.1 Revised Architectural Proposal
You will get considerable feedback on your initial architecture proposal
from the professor (or Grutor) and the team that reviews it. Based
on this feedback, you should revise your architecture to address all
of the must-fix issues, and as many as possible of the should-fix issues.
You will be graded on these resolutions, so make sure you document all
changes made and agreement from the reviewers.
Your final proposal is a new version of the original proposal,
revised based on the feedback from the graders and reviewers.
The grading criteria for the revised architectural proposal will be
similar to the initial architectural presentation, but with the
additional expectation that your rationale and issue discussions
will include issues raised in the reviews, and your design will
have responded to those suggestions:
- have all must-fix issues have been responded to
- quality of the responses to must-fix issues
- quality of the responses should-fix issues
Please make sure that your final architecture acknowledges this
feedback and explains how you have responded to each item.
The key questions we will ask when grading your final architectural proposal are:
- Have all significant implementation risks been addressed?
- Are the descriptions of all software components now sufficiently
complete that I could now sit down and start writing detailed
specs and designing each?
- Do I believe all of the software components to be buildable,
and that if they were built as described, the product would work?
Prepare a new architectural description (or revise your original description)
with history (e.g. on Github or in Google Docs).
When your team has addressed all issues and you are ready to submit your final architecture for grading:
- create a standard submission prologue
(that includes a URL to your architecture description), and
entitle it architecture_2c.txt
- up-load it for submission (only one person on the team needs to do this)
P2C.2 Post-Mortem Report
This project is a learning exercise, and one of the major ways
we learn is by analyzing past mistakes. You will, as a team,
review all aspects of this project. One of you will then
summarize that process into a post-mortem analysis report.
A report, summarizing the key issues raised in your post-mortem,
and the conclusions you came to. Your post-mortem discussion
should include:
- creation of the preliminary architecture (from initial
brain-storming through its evolution and refinement).
- component design analyses
- creating draft architectural description (trying to tell your story)
- studying for your design review
- the design review meeting (as a reviewer)
- the design review meeting (as a reviewee)
- writing up the review report and working the issues
- revising your architecture to address the issues
- the planning and ongoing management of these activities
- the overall project as an educational exercise
The submission and grading of Post Mortem reports is described
in the General Grading information.
Make sure that you have kept your meeting minutes and management plan up-to-date on Github.
When you are ready to submit the Post-Mortem report (and management notes) for grading:
- prepare your report (ideally ASCII text in a file named postmortem_2.txt)
- put a standard submission prologue on the front of it
- make sure that it also contains URLs for your meeting minutes and management plans
- up-load it for submission (only one person on the team needs to do this)
P2C.3 - Work Share Estimates
Most of your grade for this project will be based on the team deliverables, but some of it will
be based on the quality, amount, and timeliness of work done by each team member. Towards this
end, we ask each team member to estimate the
amount of work done by each team member on this project.
Please prepare your own assessment of how much work was done by whom and submit it as
workshare_2.txt (or perhaps workshare_2.csv).
Project Phase 3
Specifications, Design and Review
Introduction
Thus far, most of your work has been team activities. Moving forward,
you will do much of your work as individuals, tho still with considerable
coordination, collaboration, and assistance from other team members.
The architecture has described the roles, functionality, and interfaces of each of
the key components in our system. A few components may be simple enough
that we can simply sit down, code them up, and watch them work ... but most
components are more complex than that. Before we start coding a non-trivial
component we need to make sure that:
- we understand (completely and in detail) what our component will do.
- we understand how we will implement those things.
- we understand how we will test the correctness of that implementation.
- we have not made any obvious mistakes in our plans for the above.
In this project, we will complete our implementation prerequisites.
In this phase you will create specifications, designs and testing plans
for chosen components.
In the next (and final) phase you will execute these plans, building,
testing, integrating, and demonstrating working software.
I suggest that you review the work you will have to do in projects 3 and 4,
and then give considerable thought to which components (or parts of which
components) you want to choose.
Depending on your architecture, these could each be a complete architectural component,
or small pieces (e.g. an applet or a few classes) from a single architectural component,
or even from multiple components:
- each of the chosen pieces should be somewhere in the range of
100-400 lines of code.
- each chosen piece must implement an algorithmically interesting
(much more than initializers, mutators, accessors, and routines that
pass a request on to another service) program, module, or class.
- each chosen piece must have sufficiently complex behavior to require
a significant number of test cases ... including several
white-box test cases (that go beyond simple verification vs interface
specifications).
- each person should be capable of independently building and
testing his/her chosen piece.
- each of these pieces must be automatically unit-testable.
- when you are done, it should be possible to combine all
of these individual pieces together to create a working
(all the pieces working together) and demo-able component.
Note, however, that you are each implementing only one (or a few) module(s) ...
just enough to require a reasonable amount of design and coding work, and
a modest number of test cases. It is not required that the sum of these
modules must add up to the whole of your proposed product.
Neither must each of you implement a single complete architectural component:
- if a single component in your architecture is likely to be
on the order of 400-800 lines of code, you can break it
up into multiple classes, and implement only a few of them.
- if you very much want to implement a component that is too simple
(because of the value it adds to your program), you
may need to choose multiple components to implement. But if
none of those components meet the complexity and test case
requirements, you may have trouble earning full credit
in projects 3 and 4.
It is very important that you consider these requirements when choosing
the components to be implemented.
It would be unfortunate of you chose components A, B, and C, and only later
realized:
- component A was too large or required the use of new tools
that would take weeks to master.
- component B was too simple to earn full points for the
design and/or test plan.
- component C cannot be tested (or even built) until after
components A and B are complete and working.
- it would be very difficult to show, at the end of the final
integration, these three components working together.
Give some thought to how each component could be (independently) built
and tested, and how you might demonstrate their successful integration.
If you have any questions or doubts, please talk to me or your grutor before
finalizing your decisions.
Your pieces can be implemented in any appropriate language or combination of languages,
and use any tool-kits or middle-ware you find convenient ... but it must be
compilable/executable code with some algorithmic complexity
(much more than U/I widgets, data, HTML or images),
and must be accompanied by a fully automated unit test suite.
The warning about choosing U/I components is based on two concerns:
- Putting up U/I widgets and responding to their call-backs is
so simple that it is commonly assigned as a project in introductory
programming classes.
- If the primary inputs to your component are touches/clicks,
and your primary outputs are pixels on the screen
- it may be difficult to create a comprehensive automated unit-test suite
- most of the code being tested is not yours, but the GUI tool kit.
But this does not mean that it is impossible for U/I components to satisfy the
design and implementation requirements:
- If your U/I component does significant analysis of the input
(e.g. syntax parsing, keyword recognition, validity checking,
carrying out complex request protocols)
such processing might qualify as both non-trivial and auto-testable.
- The same might be the case if you have to do signficant processing
(e.g. turn partially-ordered pairs into a visual tree) to filter and transform
complex data into a form that is usefully presentable to the intended user.
- Some U/I toolkits incorporate unit-testing frameworks, that
permit user selections to be simulatable (e.g. click_button("Select File"))
and results (to be displayed) tested by examining object state
(e.g. chosen_file.getText()).
If your U/I is rich
enough in functionality (e.g. several hundered lines of code
involving complex widgets and event processing), does much
error checking, and and is thoroughly exercisable with such tools,
it could easily qualify as a component for design and implementation
in the next phases of the project.
If you believe you have a U/I component that would qualify, review it with
me before completing your selections and plans.
The first draft designs and test plans for the chosen components are due in the second week
of this project ... but you will be defining the interfaces
you will be exporting for use by other team members this week.
These interfaces represent critical inter-dependencies between otherwise individual
development efforts, and must be negotiated between the producers and consumers.
- Sketching out and discussing those interfaces up-front will make it much easier
to pursue your (individual component) design activities next week.
- As you pursue your own designs, you will likely come to a better understanding
of what functionality (and interfaces) you need from the other components with
which you interact.
Thus, component interfaces must be well specified before you begin your detailed designs,
but it is quite likely that those interfaces will change as a result of understandings
gained in the process of doing those detailed designs.
Even though detailed designs are not due until the next phase, you should already have
some pretty good ideas about how each component will be implemented. If not, you may
find that you have specified something that cannot be built ...
and all of the work done based on that specification may wind up being thrown away.
There are multiple phases to this project, each of which has its
own goals, processes, and deliverables (most of which are individual rather than team):
P3A.1 Plan
Perhaps the most important part of your plan is which components or classes
each of you will implement.
But each team will prepare a task-breakdown, identify the dependency relationships between
tasks (and components), and owners for each sub-task, assign due-dates, and schedule regular reviews
of both work-products and progress (to enable adequate time to deal with the
problems that will arise).
Most of the work involved in creating your specifications, designs, and test
plans will be individual. But team-mates will still have significant
dependencies on one another:
- the specifications (and changes to them) must
be agreed upon by the producers and consumers.
- the design reviews must be accomplished within
a short period of time, which means that reviewers
must be lined up in advance and the documents to
be reviewed must be in good form prior to the
scheduled review dates.
Even though much of this work will be done individually,
the team must agree on (and meet) a schedule for when
materials will be ready and reviews will happen.
A slip in one person's schedule may cause delays for
team-mates who are depending on those results.
One of the advantages of team activities is that
regular meetings (e.g. daily stand-ups) keep
us on schedule.
Thus, you are encouraged to continue having regular status
updates and to maintain a minutes.txt file (in your repo or GoogleDocs).
The amount of work required to refine your architecture to the point that
it is possible to identify and specify your chosen components will vary
greatly from one team/product to the next, and I would encourage you to get
this behind you as quickly as possible. Once you have a sense of what
the chosen components are, you should have a pretty good idea of how much
work it will be to do the designs and test plans. You should, however,
leave yourself ample time for discovering issues with the chosen components,
the initial designs, and making the required changes.
As your understanding of the problem
evolves and you respond to unanticipated events,
you will have to revise your plan (not merely estimates, but
the work to be done). Make sure that you document each of these
problems and the manner in which you decide to respond to it.
If deadlines are missed, or deliverables fail to pass review, the fact, as well
as the causes and the plan to remedy them must be documented.
Your initial Management Plan will be graded on the basis of:
- 20% well chosen components (in terms of size, complexity, testability)
- 20% good use of time and resources (work spread reasonably over the available time)
- 20% specificity of plan (clear responsibilities: what, when)
- 20% provisions for early detection of problems, and time to deal with them
- 20% completeness
Maintain your plan (and status update minutes) with history (e.g. on Github or in Google Docs).
You will probably be updating them daily, and we will be reviewing this history.
When you are ready to submit your plan for grading:
- prepare your management plan (management_3a with an appropriate suffix)
- put a standard submission prologue on the front of it
- up-load it for submission (each person must submit his/her own plan)
P3A.2 Specifications
Each team member will take ownership of one or more modules (or components).
To prepare a specifications, you will:
- (perhaps) expand the architecture (above the chosen components)
to describe them and the components with which they interact.
If you have decided to implement pieces of your system that
are smaller than complete architectural components (from project 2),
you will have to expand and refine that architecture down to the
level of the pieces you want to use for projects 3 and 4. Note that
you do not have to expand everything in your architecture to this
level of detail. You only have to do a top-down refinement along
the path to the components you will be using for this project.
If a component to be implemented was already fully described
(detailed specifications for all external interfaces/public methods)
in the (Project 2) architecture, no further expansion is required.
If further top-down refinement is required, your component specifications
should be accompanied by addenda to the (submitted for project 2) architecture.
It may be possible that a single addendum (created by the entire team)
could be used for all of the component specifications.
- generally describe the functionality of each of the component(s)
to be designed, and their role(s) in the overall architecture.
- determine the requirements to be imposed on each of the component(s) to
be designed, based on the product requirements
and the components' roles in the overall architecture.
- enumerate all of the external interfaces/public methods (in both directions)
between the component(s) to be designed and the rest of the system.
- write a complete specification (both form and function,
detailed enough to define acceptance criteria)
for all of the external interfaces/public methods to the chosen components.
There is no universal definition for what "specifications" should describe,
in how much detail. The answers to those questions depend on:
- what is being described
- to whom
- for what purpose
In this case, we are asking you to describe
- the external entrypoints (public methods) to be exposed by your component
- the (exact, as will be used in code) name of the method
- the name, type, and meaning of each parameter,
and any validity assertions that might apply to it
- the contents/format/schema of any data on which it will operate
(in-coming or out-going)
- a functional description of everything that is expected to
happen as a result of having called this method
- the type(s) and meaning(s) of the return value(s)
- to your team members and your grader (who have a reasonable familiarity with your project
and the toolkit(s) to be used in its construction)
- it is intended that these specifications be sufficiently detailed:
- to enable other people to write correct code to call those entrypoints
and use the services this component provides
- to provide an adequate specification for developing a complete set
of black-box test cases
- to completely specify all of the requirements that must be met by
the (coming soon) design and implementation.
It is possible that your component will have no requirements beyond delivering above-described
functionality. But it is likely that, as a result of its role in the overall architecture,
and the things that other components need it to do, there will be additional requirements
imposed on the manner in which your component provides its functionality or cases that must
be handled.
How can you know if your specifications are adequate?
Give these specifications to your team-mates, and ask them if they
now know everything they need to know in order to correctly
write code that uses the services of your component.
If anyone still has any questions, the specifications should be updated
to address them.
The form in which you provide this information is up-to-you, but the most obvious form is (compilable) declarations and comments.
Specifications can be written as prose, but we are probably describing class
and method APIs. The most obvious form for representing APIs is as
(class, method and field) declarations (in the language in which they will be
implemented) with Docstring comments to describe them:
- this will be understandable by the intended audience (other programmers)
- such declarations are unambiguous, and can be checked by the compiler
- this creates a template for the more detailed design and code that will follow
- readily available tools can process this code and automatically generate
both API documentation and class diagrams.
You are free to choose the format that best tells your story, but we have provided
an example of an architectural overview, at the end of which is a table
of links to
sample
specifications, designs, and test plans.
This submission be graded on the basis of:
- 30% clarity and reasonableness of component's functionality and role in the overall system,
and its suitability (in terms of size, complexity, testability) for the assignment.
- 20% completeness, clarity and measurability of requirements:
- derived from the architecture and overall product requirements
- new requirements arising from the component definition
- 10% spec covers all required functionality in this module
- 10% clear and complete (ready to compile) declarations for all public methods
and instance variables
- 10% clear and complete (ready to code) functionality descriptions for all public methods
- 10% well abstracted module functionality, and reasonably chosen methods and parameters
- 10% interface definitions lend themselves to automated compliance testing
Maintain your specifications with history (e.g. on Github or in Google Docs).
When you are ready to submit your component specifications for grading:
- create a standard submission prologue
(that includes your specifications or a URL to them), and
entitle it spec_3b.txt
- if you need to expand your (project 2) architectural description, create an
addendum (only the changes, not a whole new copy) and either include those
changes (or a URL to them) in front of your specifications.
- up-load it for submission (each person must submit his/her own specifications)
Design and Test Plan
P3B.1 Component Design
Each team member will prepare a detailed design for one or
more modules, ideally comprising 100-400 lines of code when complete.
This design need not be at the level of complete pseudo-code, but
(in combination with the specifications) should be sufficient to
enable a skilled programmer to easily and correctly implement the specified module(s).
Each module design should include:
If any of these design elements are non-obvious, the rationale
for those decisions should be described so that the implementer
can better understand what must be done. People are more likely
to make mistakes when working on things they do not understand.
You can prepare your designs in any form you find convenient,
but you may find it easiest to create them as
code modules with compilable declarations (complemented by full JavaDoc/PyDoc tags),
and algorithmic comments (rather than code).
Overview and rationale can be presented as comments in front of the described elements.
Many people regularly do most of their designs in this way:
- the design documentation becomes a template for the code that
will be added later.
- even before the code bodies are filled in, the compiler can
check for the correctness of the declarations, and
inter-module consistency.
- when the code is added, it will be inseparable from the design
documentation ... which will help future developers understand
the code, and make it much easier to keep the design documentation
up-to-date as the code evolves.
- automated tools (e.g. Doxygen/PyDoc/umlgraph) can be used to automatically
extract this information from the code and automatically generate
class diagrams and standard format documentation
(and thus eliminate the need for you to manually create much of the prose documentation).
The sample
architectural overview includes
links to
class descriptions and API documentation
that were automatically from
source code and comments
with the Epydoc tool.
If the chosen component is of reasonable size, complexity, and testability
this design be graded on the basis of:
- 10% the defined methods and instance variables are
sufficient to fully implement the component interface
specification.
- 10% all methods (including internal) well enough specified
to enable a skilled programmer (other than the designer)
to write code to correctly use them.
- 20% all methods (including internal) are well enough described
to enable a skilled programmer (other than the designer)
to implement them (with no more research than having
to read the referenced documentation).
- 10% all variables and data structures (including internal)
are described well enough to enable a skilled programmer to use
and update them correctly.
- 10% the correctness (likelihood of working) of the described implementations.
- 10% the reasonableness (after having read the rationale)
of the describged implementations.
- 10% reasonable exploitation of language and tool capabilities.
- 5% the simplicity (relative to the problem) of the proposed implementations.
- 5% the likely efficiency of the described implementations.
- 10% the readability of the design document, including the
clarity and adequacy of the overview and rationale
to provide the required background.
Maintain your component design with history (e.g. on Github or in Google Docs).
When you are ready to submit your component design for grading:
- create a standard submission prologue
(followed by your design or a URL to it), and
entitle it design_3c (with a type-appropriate suffix)
- up-load it for submission (each person must submit his/her own design)
P3B.2 Component Test Plan
Once you have specifications and a design to satisfy them, you have
to figure out how you will test your implementation, to demonstrate
that it actually works.
-
Review your specifications, and develop a set of automated comprehensive
(black box) test cases to determine whether or not your component meets
its interface requirements and specifications.
-
Review your design, consider special cases (or combinations
of cases) that would exercise different code branches, and develop
a set of (white box) test cases to demonstrate that each interesting
situation is handled correctly.
-
Review your design, and consider any possible/plausible component
misbehavior that would not be detected by the the above-described
specification-based acceptance tests.
If you find such, define additional (white box) test cases to exercise
and validate the code's behavior in those error cases.
-
Consider your component's interfaces and all of the above test
cases, and design a means for performing all of those test cases
in a fully automated fashion ... ideally using a standard existing
unit testing framework (to structure your test case implementations,
invoke them, and collect the results).
-
Review the overall list for completeness (is everything covered),
efficiency (are there redundant tests) and value (are there
tests for things that don't matter or will never happen), and
try to optimize out the low-value tests. If there are no such
tests, briefly describe the analysis that led you to that conclusion.
It is possible that, in the process of developing your test plan, you will find
assertions that are hard to measure, or functionality that is difficult
to verify (or verify automatically). If this happens, you may need to
revisit your requirements, specifications and design in order to make
those aspects of program behavior more testable.
Please feel free to ask for help if you find yourself in such a situation.
The difference between black-box and white-box testing (based on specifications vs implementation)
sounds like a simple binary distinction based on a three-word test ...
but the real world often declines to conform to our simple classifications:
The notion of black-box is not limited to the specified interfaces for
public methods. If we are testing simple private
(e.g. mutator and accessor) functions by storing
values, retrieving them, and confirming that the expected value was returned,
the mere fact that we put the word private in front of those methods
does not turn trivial specification-based tests into white-box test cases.
But, if a public method is required to do complex processing to
understand the input or create useful output, there may be
numerous combinations of input parameters or error cases that exercise
different parts of that code ... and non-trivial analysis may be required
to identify a set of test cases to exercise all of them.
The mere fact that the specifications defined the expected input/output
relationships does not prevent a comprehensive exercise of
a full range of input combinations from qualifying as white-box testing.
Even a method that performs a (nominally) simple function may have to
do a considerable amount of input validation or handle a wide range
of possible errors. These too represent a great many different cases
to be tested and may require non-trivial analysis to figure out how
to cause each, and confirm correct handling.
The bottom line is that you have been asked to demonstrate your ability to design
non-trivial software. I also want you to demonstrate the ability to
recognize situations that might result in different computations,
and to devise test cases to verify the correct handling of each.
In general, your test plan should include:
-
A general overview of the functionality to be verified,
and the general approach(es) that will be taken to verification.
-
A description of the framework(s) under which this testing will be performed.
-
A complete list of test cases ... for each:
- a brief summary of the assertion to be tested,
including (if it is not obvious) its traceability to specifications
or requirements.
- any special set-up required before this test can be run
- how the situation to be tested will be generated
- how correctness of behavior will be ascertained
(e.g. what assertions will be tested)
- any special clean-up required after this test
This could be a fair amount of information.
Please do not feel you have to give me a half-page of
prose for each of a two-digit-number of test cases.
- to the extent that different test cases are merely different parameter values
(or entries in a table), the set-ups do not have to be written out in English prose;
The different test cases can be enumerated by entries in a table.
- the assertions to be tested need not be written in complete English sentences,
but need only be understandable by a programmer.
The following is an example of a concise representation of test cases, where
the assertions being tested are obvious from the names, set-ups and
expected result.
| Name | Set-up | Test | Expected Result |
| passwd-correct |
dbase: USER1 w/password PASSWD1 |
command: LOGIN USER1 PW=PASSWD1 |
response = 200 (success) |
| passwd-incorrect |
dbase: USER1 w/password PASSWD1 |
command: LOGIN USER1 PW=PASSWD2 |
response = 510 (failure) |
| passwd-badname |
dbase: no such user as XXX |
command: LOGIN XXX PW=XXX |
response = 511 (failure) |
| auth-user-OK |
dbase: USER1 as a normal user |
logged in as USER1
command: STATUS USER1 |
response = 200 (success) |
| auth-user-priv |
dbase: USER1 as normal user
dbase: USER2 as normal user |
logged in as USER1
command: STATUS USER2 |
response = 523 (not allowed) |
| auth-manager-priv |
dbase: MGR1 as manager
dbase: USER2 as normal user |
logged in as MGR1
command: STATUS USER2 |
response = 200 (success) |
The sample submission
on the web site includes general overview of the proposed approach
to testing, and a list of the specific test cases to be written
for each class.
Your test plan will be graded on the basis of:
- 30% black box tests
- traceability to specifications
- reasonableness of test cases
- completeness of suite
- form and quality of descriptions
- 30% white box tests
- traceability to design
- reasonableness of test cases
- completeness of suite
- form and quality of descriptions
- 20% testing framework
- automated execution and pass/fail determination
- use of off-the-shelf technology
- reasonablenss practicality of using this tool for this testing
- 10% overall completeness (how much confidence this suite will give us)
- 10% overall efficiency (low value or redundant tests, overly expensive executions)
Maintain your test plan with history (e.g. on Github or in Google Docs).
When you are ready to submit your test plan for grading:
- create a standard submission prologue
(followed by your test plan or a URL to it), and
entitle it test_3c (with an appropriate suffix)
- up-load it for submission (each person must submit his/her own test plan)
Design and Test Plan Reviews
Because your component has some algorithmic complexity and requires a non-trivial number
of test cases your design and test plans should be submitted for review.
In Project 2 we required you to follow a fairly formal process (with another team
supplying the facilitator and scribe). This is a simpler design, entirely appropriate
to be reviewed by other members of your team (all of whom should already be well-familiar
with what your component does).
You are welcome, for this less formal process, to act as the facilitator and scribe
for your the review of your own component.
But the other basic rules (e.g. about content, scope and behavior) still apply:
- the committee should still vote on the resolution (must fix, should fix, comment)
of each issue/observation.
- a report, covering all non-trivial issues and their resolutions must be
produced and approved by the reviewing team.
Each member of the team will submit his/her preliminary specifications,
design and test plans for review by the one or more other team members. Each
team member will participate in the reviews of the designs and plans
submitted by other members of his/her team.
P3C.1 Review Notes
Prior to each review meeting, each of you (individually) will read
the submitted specifications, designs, and test plan and prepare detailed notes
on all questions and concerns. These notes must be submitted at
least 24 hours prior to the actual review session. They should be
neat notes, describing legitimate issues clear enough to be sent
as email, and organized for discussion (e.g. in a reasonable
review order).
Each set of review notes will be graded on the basis of:
- 40% submitted 24 hours before scheduled review
- 30% the thoroughness of study to which they attest
- 10% how well articulated the issues are
- 10% all comments appropriate and within scope
- 10% issues reasonably organized for discussion
When your notes are eady for submission and grading:
- prepare your notes (ideally ASCII text in a file named notes_3d.txt).
If you are reviewing multiple components, it would be best if you combined
all of those notes into a single submission.
- put a standard submission prologue on the front of the file
- up-load it for submission (each person must submit his/her own notes)
P3C.2 Review and Report
You will conduct design reviews for each submitted
Specification/Design/Test Plan package. The process will similar
to the architectural review ... but because this is
simpler and you have already followed this process
(for your architectural reviews) these
reviews will not be observed and graded.
You also have much more latitude in these reviews:
- you can have the entire team review each person's proposal,
or you can break it up into smaller groups for each review.
- you can have a scribe (who is not the owner of the module
being reviewed) who writes and submits the report, or the
module owner can act as the scribe and write up the report
for his/her own review.
But each person must create and submit notes for (at least) one review,
and must write up a report for one review.
As with the architectural review,
the report is not "meeting minutes". Rather it is a distillation of key issues and
decisions. It must contain:
- the time, date, and attendees
- the component to be reviewed
- a clear summary of each important issue rased
- a characterization as a defect, question, or issue
- a characterization as must-fix, should-fix, or comment
- a disposition for the entire proposal of
- approved
- approved with required changes
- requires another meeting
- rejected (this cannot be made to work)
Each review report will be graded on the basis of:
- 10% form: time, place, project, attendees
- 20% scope of the report (just issues, no opinions)
- 50% clarity with which issues are presented
- 10% clear disposition for each issue
- 10% disposition of the entire project
When your review report is eady for submission and grading:
- create a standard submission prologue
(followed by your review report or a URL to it), and
entitle it review_3d.txt
- up-load it for submission (each person must submit his/her own review report)
P3D Final Component Specifications (P3D.1), Design (P3D.2) and Test Plan (P3D.3)
Note: this is likely to be a relatively light week for project work.
You would be well advised to use this opportunity to get an
early start on the project 4 implementation ... so that you can
have that out of the way in your (likely) otherwise busy final weeks.
It is likely that your design and test case development, and their
reviews will turn up issues that require changes to your specifications,
design and test plan.
Address those issues (by revising your specifications, design and test plan),
document the changes that were made to address each, and get agreement from the
reviewers that the issues have been satisfactorally addressed.
The primary parts of the final design submission are:
- an updated component specification.
- an updated updated component design.
- an updated test plan.
Each of thes should include a discussion of the issues that were
discovered (since the preliminary submissions), and a summary of
the changes that have been made, and the reasons for each.
This submission be graded on the basis of:
- 15% quality and completness of the final specifications,
including responses to issues identified in the
reviews and grading of the earlier versions.
- 30% quality and completeness of the final design,
including responses to issues identified in the
reviews and grading of the earlier versions.
- 15% extent to which the final design meets the
algorithmically interesting requirement
(you will be implementing a significant amount of
non-trivial code).
- 25% quality and completeness of the final test plan,
including responses to issues identified in the
reviews and grading of the earlier versions.
- 15% extent to which the final test plan meets the
requirements for fully automated testability, and
significant tests based on design/implementation
rather than interface specifications.
When you have addressed all of the issues raised in your review and are
ready to submit your final component specifications, design and plan,
- prepare your spec (ideally ASCII text in a file named spec_3e.txt)
- prepare your design (ideally ASCII text in a file named design_3e.txt,
or perhaps with some other language-specifc suffix)
- prepare your test plan (ideally ASCII text in a file named test_3e.txt)
- put a standard submission prologue on the front of each file
- up-load them for submission (each person must submit his/her own files)
P3D.4 Post-Mortem Report
This project is a learning exercise, and one of the major ways
we learn is by analyzing past mistakes. You will, as a team,
review all aspects of this project. One of you will then
summarize that process into a post-mortem analysis report.
A report, summarizing the key issues raised in your post-mortem,
and the conclusions you came to. Your post-mortem discussion
should include:
- architectural refinement and specification development.
- development of the component designs.
- development of the test plans.
- the review process and the resulting design/plan changes.
- the planning and ongoing management of these activities.
- the overall project as an educational exercise.
The submission and grading of Post Mortem reports is described
in the General Grading information.
Make sure that you have kept your meeting minutes and management plan up-to-date on Github.
When you are ready to submit the Post-Mortem report (and management notes) for grading:
- prepare your report (ideally ASCII text in a file named postmortem_3.txt)
- put a standard submission prologue on the front of it
- make sure that it also contains Github URLs for your status updates and management plans
- up-load it for submission (only one person on the team needs to do this)
This report be graded on the basis of:
- 50% whether or not you meaningfully discuss each of the required activities.
- 20% whether or not you identify all of the important incidents.
- 30% the extent to which you are able to derive and articulate useful lessons
(and good future advice) from those experiences.
Project Phase 4
Implementation and Testing Sprint
The first three projects took us through all of the activities that precede
implementation. In this final project you will
(using skills you mastered long before you got here)
actually implement the components you designed in phase 3.
But, by now it should come as little surprise to you that only part of your time will be spent coding
(and if you have done it right, very little of your time will be spent debugging).
An implementation is not completed when it finally compiles;
We must convince ourselves (and others) of its correctness.
If we are implementing this as part of a team effort
(or for use by others)
we will probably be expected to package it and hand it off:
- provide a (perhaps brief) precise description of what we are delivering.
- provide a demonstration of its building (e.g. a check-out, build, and run).
- provide a demonstration that it meets its requirements (e.g. by passing a test of those requirements).
This final project also includes multiple activities, but no intermediate deliverables.
You will complete your implementation and testing, and (when you are done) you
will conduct a Sprint Review wherein you present your completed
implementation (to your product owner)
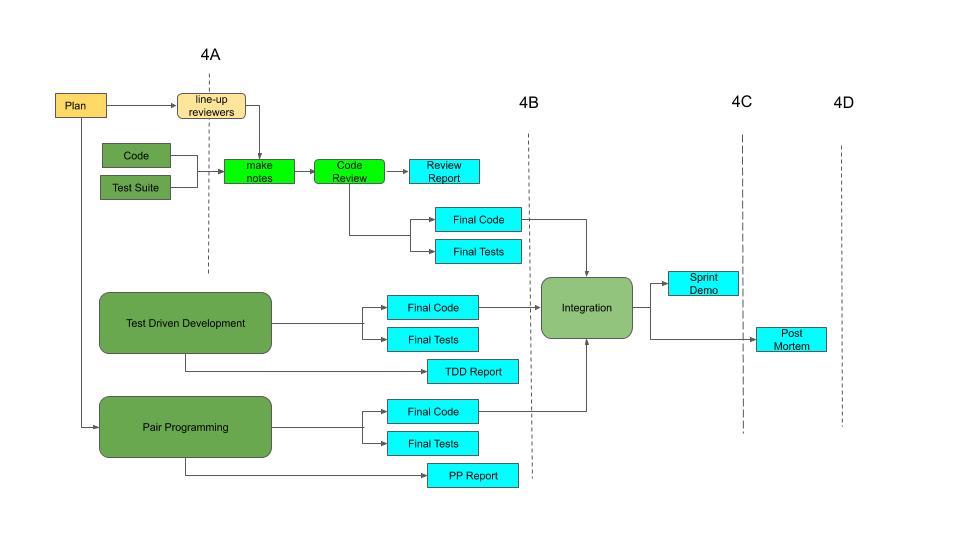
3 less 10% for each unexcused late day.
Each team member will use their code in one of the exercises
(Pair Programming, Test Driven Development, or Code Review),
and all team members will participate (as a submitter or reviewer)
in at least one code review. While most of these activities will involve selected
individuals, you are encouraged to discuss each of these activities as a team,
and the reports from most of those activities will be graded as team deliverables.
You may note that there is no management plan or grade associated with this
project. You should, by now be able to plan and coordinate activities for
yourselves, and you are already being graded on your ability to deliver the
required work on schedule ... which is the point.
P4A.1 Final Code
The primary activity in this project is for each person to implement
and test the component(s) they designed in project 3. There will be
many processes and exercises surrounding this implementation, but
the primary deliverable is working code that implements the requirements
and specifications set out in project 3.
The primary deliverable is source files and scripts (e.g. ant/Makefile) required to build them.
Make sure that you document the build procedure and the environment that is required to build your
components (e.g. in a README.md), because part of your grade will depend on
the grader being able to independently build your product from the checked-in sources
and instructions.
If this is not practical (e.g. because your component cannot be built on a basic
Linux developer desktop) make arrangements with the professor (or Grutor) to have him/her
either do a check-out and build-from-scratch on an appropriate system, or watch you do so.
You should also re-submit URLs for the specifications and design for this component
(from project 3) with any changes you have made since then. These are the standard
against which the completeness and correctness of your implementation will be judged.
After you have completed all of your implementation (including reviews, testing
and correction) and you believe your code is in final form
- prepare your source code (ideally ASCII text in file(s) with a language appropriate name)
- include a description of the build instructions and required environment in
a README.md file.
- put a standard submission prologue into a new file
(code_4a.txt) which includes:
- URL for the final component specifications
- URL for the final component design
- URL for the README and source file(s) in your repo ...
so we can examine their history
- up-load it for submission (each person needs to do this for themselves)
Each code submission will be graded on the basis of:
- 20% completeness and correctness with respect final specifications
- 16% being implemented as described in the final design
- 16% significant amount of non-trivial code
- 16% code quality (reasonable use of language/toolkit features, simplicity, efficiencty)
- 16% readability (module and method comments, algorithmic comments, use of white-space)
- 8% organization, build environment and instructions described in README.md
- 8% grader is able to do (or observe) a successful clone and build from scratch
P4A.2 Final Test Suite Results
Each team member will, for his/her component, implement the
test plan proposed in project 3, and run (and pass) those tests against
their component implementation.
The execution of your test cases should be automated (e.g. so that
all tests can be run with a single command), and all of the test
cases and scripts should be checked in to your repo.
Make sure that you document the environment and procedure for running
these tests, because part of your grade will depend on the grader being able to
independently test your product from the checked-in sources and instructions
(in a README.md file).
If this is not practical (e.g. because your component cannot be tested on a
basic Linux developer desktop)
make special arrangements with the professor (or Grutor) to have
him/her do a check-out and build-and-test-from-scratch
(or watch you do so) on an appropriate system.
It is possible that you will, as a result of lessons learned during
the implementation, decide you want to change your test plan. If this
happens
- update your project 3 test plan accordingly
- include, with your submission, a summary and explanation of the changes
After you have completed all of your implementation and testing, and
you believe your test suite to be entirely complete
- prepare your source code (ideally ASCII text in file(s) with a language appropriate name)
- include a description of the required build and execution environment and the
build and run instructions in a README.md file.
- include a file (output_4a.txt) containing the captured output from
a successful run of your test suite
- put a standard submission prologue into a new file
(test_4a.txt) which includes:
- URL for the final component specifications and requirements
- URL for the final test plan
- URL for the source file(s) in your repo ... so we can examine their history
- up-load them for submission (each person needs to do this for themselves)
This activity and report be graded on the basis of:
- 20% completeness and full execution with respect to the final test plan
- 16% test cases that thoroughly verify assertions,
including non-trivial white-box test cases
- 16% full automation, with clear indications of what assertions are
being tested and pass/fail results for each (and the entire suite)
- 16% code quality (reasonable use of language/toolkit features,
reasonable setup/cleanup, simplicity, efficiency)
- 8% readability (module and method comments, algorithmic comments, use of white-space)
- 8% clear comments, in every test-case, about the assertion being tested
and the means of exercising it and ascertaining passage
- 8% organization, build environment and instructions described in README.md
- 8% grader is able do (or observe) a clone-from scratch, build, test and pass,
involving very few commands.
P4B.1 Pair Programming Exercise
At least one member of the team will ask another member to join
them for at least one pair-programming session.
A meaningful pair-programming exercise should produce ~200 lines of code (including tests).
How you divide up your effort (think/code, code/review, code/test) is entirely
up to you, and you are welcome to try multiple/various approaches.
For all work done in a pair-programming mode, the commit comments
made during those sessions should reflect the division of
responsibilities under which that work was done.
NOTES:
- The module used for this exercise must be of moderate to significant complexity
(to benefit from two minds), or no points will be earned.
- What ever component this is done for should not also be used for code review or TDD.
After the end of each pair-programming session, each of the
people involved should jot down notes on what happened. After
the component has been completed, the two people should get
together (ideally discussing it with the entre team) and
write up a report on the experience. This report should cover:
- what role divisions you tried and how you decided how to organize those activities.
- how effectively each persons time was used (with each division of roles).
- the speed of code development, vs working alone.
- the quality of the code, vs working alone.
- pleasant or unpleasant aspects of the experience.
- how you would do this differently next time.
When you are ready to submit this report for grading
- prepare your report (ideally in an ASCII text file named pair_report.txt)
- put a standard submission prologue onto the front of it
which includes:
- URLs for the file(s) created during the pair programming exercise.
- references to the commits done during the pair programming sessions
- up-load them for submission (only one person on the team needs to do this)
This activity and report be graded on the basis of:
- 20% documentation of collaboration in commit comments
- 20% reasonable role divisions, reasonably carried out
- 20% amount of work accomplished in this mode
- 20% quality of work accomplished in this mode
- 20% reasonable insights into the process
P4B.2 Code Review
At least one member of the team will write all of his/her code,
and before running test suites against it, submit that code for
review by the other members of their team.
The other team members
will study the code, prepare notes and conduct a code review,
producing a report with must-fix/should-fix/advice items.
The author will make the appropriate revisions, and then move on
to testing. After the code is working, the author will discuss
the process with the rest of the team and then write
up a report on the process.
The author will prepare a review package including references
to the component requirements, specifications, and design (perhaps modified)
from project 3, as well as the implementing code.
Other team members will review that package and prepare
written notes, which will be up-loaded to Sakai
(e.g. in ASCII text files named notes_4b.txt)
well prior to the review.
After the review, the author will prepare a formal report
(listing all important conclusions) and checked in to github.
The author will address all of the raised issues, and then complete the
testing. The commit comments for all such changes should mention the
review issue to which they respond.
After completing the testing (and any other required changes) the author
will add notes (to the review report) about how the testing went and what
(if any) additional problems were discovered.
NOTES:
- The module used for this exercise must be of moderate to significant complexity
(to benefit from review), or no points will be earned.
- What ever component this is done for should not also be used for pair programming or TDD.
The author's review report should include (in addition to the usual information):
- how valuable the input received from the code review process was,
and what kinds of problems it turned up.
- what kinds of problems remainined in the code after the code
review process, and why they weren't found.
- the relative merits of doing code review before or after testing.
- would knowing that you were going to have a code review have
caused you to make any changes to your test plan?
- how would you do this differently next time?
When you are ready to submit this report for grading
- prepare your report (ideally in an ASCII text file named review_4b.txt)
- put a standard submission prologue onto the front of it
which includes:
- URLs for the reviewed file(s).
- up-load it for submission (only one person on the team needs to do this)
The grading of the code review exercise will be based on:
- 10% notes: appropriate comments, reasonably organized, submitted before review
- 40% notes: thoroughness of study to which they attest
- 10% report: completness with respect to issues raised
- 10% report: clear disposition of every issue
- 20% report: code improvement value gained from the review process
- 10% report: insights gained regarding code reviews
P4B.3 Test Driven Development
At least one member of the team will use Test Driven Development to
implement his/her component, building and running the test cases for
each increment of code as the new code is added. The rewards for
this approach should be:
- the there should be little debugging to do, and what little
there is should be quite simple.
- by the time the coding is done, most of the testing will also be done.
But it will require the test framework to be working first, and more up-front
planning about the order in which things should be implemented.
Write-up and commit plan before you start coding.
There are a few tricks to this planning:
- there is a natural order to implementation and testing, because
some features fundamentally depend on others. These dependencies
must be recognized.
- some test cases may be only applicable to incomplete code
(e.g. because they proxy for code that has not yet been written)
and become obsolete after the code has been completed. These
represent a waste of work and should be avoided as much as
possible.
As evidence that you did infact follow a TDD process, and for keeping a
record of the problems found, please:
- make sure that you commit the test cases together before
committing the code they test.
(Note that we are not asking you to prove that you failed
the test before you wrote the code).
- after you have passed the tests, commit the updated code
(and perhaps test cases), with comments describing
the problems found and fixed during the testing. If they
worked first time (this will happen) follow this up with
a trivial commit and a comment to that effect.
- do not move on to implementing new functionality until
you have passed all the tests for the existing functionality.
NOTE:
What ever component this is done for should not also be used for code review or pair programming.
After completing development, the/each person who uses this methodology
will discuss the experience with the team and write a brief report, covering
what they did, and specifically addressing the following questions:
- how the implementation/testing order was decided, and how the chosen order worked.
- the efficiency of the process was (e.g. how much time went into building
test cases that were only useful during the construction process).
- to what extent do you believe that knowing how you were going to
test the code caused you to write code that was more correct?
- were there bugs that showed up later that were not found by the
TDD process? If so, why do you think they were not turned up
earlier?
- how would you do this differently next time?
When you are ready to submit this report for grading
- prepare your report (ideally in an ASCII text file named tdd_4b.txt)
- put a standard submission prologue onto the front of it
which includes:
- URLs for the files containing the code and test-cases.
- up-load it for submission (only one person on the team needs to do this)
This activity and report be graded on the basis of:
- 10% a reasonable plan for implementation order (checked in before starting)
- 10% automation framework enabled testing from the start
- 20% tests were written and passed incrementally (from the commit history)
- 20% each test meaningfully validated the associated code (from the commit history)
- 20% tests were committed before the code they tested
- 20% reasonable insights gained from the process
P4C Integration and Sprint Review/Demo
You have built your components and test suites, and you have
passed your tests.
You were advised to give some thought to independent development
and the integration process when you chose these components for
specification, design and implementation.
You should now be able to combine your components and demonstrate
functionality for the integrated whole.
- If the combination of your components is a complete
product, integration means combining the pieces
together and running test cases to confirm whole-product
functionality.
- If the combination of your components is less
than a complete product, but some components provide
services to others, integration might be a matter of
building them together and running test cases to confirm
that the client components still/now work with the
services being supplied by others.
Now it is time for you to review what you have produced with your
"product owner".
At the end of each sprint, the team presents the work that was
completed during that sprint to the product owner. This is, in part,
ceremonial (the team can claim success and receive feedback on the
work they have completed) but it is also the SCRUM
acceptance/sign-off process:
- the team briefly reviews the requirements to have been
met and demonstrates that the product now meets them.
- the team overviews the reviews and testing that have been done
to ensure the quality of the delivered code.
- the product owner decides whether or not this work
has actually been completed (i.e. is ready to be
delivered to users).
- velocity points are earned for accepted work.
When higher level modules depend on lower level modules,
the correct execution of those higher level modules may be adequate
evidence of successful integration. But if the implemented
modules are parallel, it may be necessary to create an
additional piece to exercise them all together.
Part of the score is based on a demonstration that these
modules are all working together.
Your review presentation should include:
- a brief summary of the functionality of each of the components
built during this sprint, and the (component level) requirements
each was to meet.
- a brief overview (a slide will do) of the scope of the automated testing plan for
each component.
- a brief overview (a slide will do) of the expected functionality of the integrated
pieces.
- a demonstration of a check-out from git-hub, error-free
build, and automated test of each component (according to the test plan).
- a demonstration of the functionality of the combined pieces
- showing them working together
- showing that all (applicable to this sprint) key requirements
have been met
- a summary of what progress this represents towards the construction
of your larger project (what this means and what comes next).
This is not a long presentation (4-5 minutes will be fine).
It might be simplest to have slides to cover the components,
their requirements, and their test plans, but this is not
necessary.
When you have an idea when you will be ready for your review,
contact either the professor (or Grutor) to schedule it.
This presentation be graded on the basis of:
- 10% overview of components and their requirements
- 10% overview of component test plans
- 10% overview of integration and resulting functionality
to be demonstrated from the combined sub-components.
- 20% error free check-out and build from scratch
- 20% error free check-out and execution of all test cases,
each clearly indicating the verified requirement (or assertion).
- 20% demo shows component meets all of its key functional requirements
- 10% demo shows clear evidence of successful integration
(that all sub-components are clearly interoperating).
P4D Post-Mortem Report
This project is a learning exercise, and one of the major ways
we learn is by analyzing past mistakes. You will, as a team,
review all aspects of this project. One of you will then
summarize that process into a post-mortem analysis report.
A report, summarizing the key issues raised in your post-mortem,
and the conclusions you came to. Your post-mortem discussion
should include:
- the implementation of your component designs and the resulting code quality
- the implementation of your test plan, the problems found, and the confidence gained
- the relative efficacy of the three exercised coding/testing practices processes
- the integration of your components together
- the preparation and delivery of the release review/demo
- the overall project as an educational exercise
When you are ready to submit the Post-Mortem report for grading:
- prepare your report (ideally ASCII text in a file named postmortem_4.txt)
- put a standard submission prologue on the front of it
- up-load it for submission (only one person on the team needs to do this)
This report be graded on the basis of:
- 50% whether or not you meaningfully discuss each of the required activities.
- 50% the extent to which you are able to derive and articulate useful lessons
(and good future advice) from those experiences.
General Comments on Rules and Grading
Submissions
Project deliverables should be submitted by up-loading files to the appropriate Sakai Assignment.
Note that several project phases have multiple deliverables (e.g. presentation, meeting notes, and analysis),
each of which must be submitted (as a distinct assignment).
Team deliverables need only be submitted by one (any) team member.
Personal deliverables (e.g. notes you prepared before a design review, or code you have implemented)
must be submitted (individually) by each team member.
Each up-loaded deliverable should begin with a standard submission prologue describing:
- a list of the people who should receive credit for this deliverable
- the primary author (perhaps broken down by section) who's work this represents
- a (Github or Google) URL where we can find the history of this (and related) deliverables
- if this submission is late, how many late days from whom should be used
A typical example might be:
    Team: Kallisti

    Members: Andromeda, Algernon, Medea, Zebulon

    Project: 1D - Final Proposal
       Product proposal: https:/github.com/kallisti/proposal.txt
       primary author: Algernon

    Slip Days: 1 (Zebulon)
Where practical, the preferred submission format is ASCII text
(the most common format for source code, universally readable on almost any computer), but ...
- if you need to include diagrams or have other highly structured information
to present, other relatively universal formats (e.g. pdf or html)
can be used.
- Richer deliverables can also be maintained as a
Google Doc,
Google Sheet,
or Google SLides presentation
(any of which can be viewed by any browser).
- do not submit files in any format (e.g. Word, RTF,
Excel, or PowerPoint) that requires additional processing
(with potentially proprietary software) in order to make it readable.
A short and simple ASCII text submission (e.g. review notes or a post-mortem)
can be submitted in the same file, immediately after the submission prologue.
For a richer (e.g. pdf submission, the submission prologue can simply
be included at the start of the document.
For larger documents, maintained on Github or in Google Docs
(and can therefore be accessed via the web), simply include the
Github or Google URLs in the submission prologue.
If you do this, please ensure that the repo is public or the Google docs
are readable by anyone with the URL.
Due Dates and Slip Days
Any assignment that is not turned in by midnight at the end of its due date,
will have its grade reduced by 10% (of its nominal value) for each
late day. I understand that problems happen, and so each student is
granted a few (4) slip days. A team of four students would have
(between them) four times that number of slip days.
One slip-day will excuse a single day's deliverables
being late by up to twenty-four hours.
- for team deliverables, a single slip day is all that is required.
If you are using a slip day for a team deliverable, please state
(in the submission) who's slip day is being used.
- for individual deliverables, each person who is making a late
delivery must use a slip day.
- when ever a slip day is to be used, this must be stated in
the submission header, so that we know to deduct a slip day
rather than deducting points from your score.
But, be careful about using slip-days:
- a slip-day will buy you one extra day to work on a particular
deliverable (e.g. a module design), but spending an extra day
on that means you have one fewer day to work on the next
week's deliverable(s).
- slip days are probably more valuable later in the semester,
as the project work demands more time, as term projects come
due in other classes, and when most of the deliverables are
individual. Don't make the mistake of using half of your
slip days on projects one and two.
If you plan on using slip days on a deliverable, please tell me
(or your grutor) that you will be doing so (so that we don't nag you
about whether or not we lost your submission).
Team and Individual Grades
When we tackle big projects, we succeed or fail as a team.
Consequently, the majority of the grade you earn on a team
project will be based on the overall quality of the team's
product. But a team can only be successful if everybody
is working towards producing quality results.
Thus, a non-negligible portion of your grade
will be based on your individual contributions:
Primary Authorship
While many activities (e.g. Post Mortem review) are fundamentally team
activities, each major work product will typically have a primary author:
one person who works up the basic organization, pulls together the contributions
from the other team members, and writes most of the prose.
The ability to organize large collections of complex information into a coherent
narrative is a fundamental skill for any engineer or researcher.
Each team member should take primary
authorship for multiple work products. The quality portion of the individual
contribution grade will be based on the work products for which that person was
the primary author (presided over a process, or wrote at least 2/3 of
the text in a document).
Each work product submission must include (in its prologue)
an indication of the primary author. If (e.g. in a larger document)
different sections had different primary authors, include this
information in the submission prologue. Primary authorships are
important for two reasons:
- For a team to handle a complex project, it is usually
necessary for a single member to take primary responsibility
for each deliverable. I want to see that you can do this.
- Even though the whole team will review (and perhaps revise)
each major deliverable, most of its quality (depth, clarity,
cogency) comes from the original draft. I want to see how
well each of you can tell an important technical story.
Team Review of All Deliverables
Since the whole team will be graded
on the quality of most work products, it is only prudent
for the entire team to review any high-value work product
before it is submitted. The description of every deliverable
for every project includes:
- a list of the things it must include
- a list of how many points will be awarded for which contents
If you, as a team, review each deliverable (whether team or individual)
against those criteria, you should expect to find that both the reviewers
and reviewees reap significant benefits:
- In reviewing someone else's submission, we have the opportunity
to observe and learn from things they have done well.
- In analyzing the completeness and cogency of someone else's submission, we
will gain a deeper understanding of what makes a good presentation.
- We all suffer from confirmation bias, which makes it
difficult for us to see things that we have missed. Getting
critical review and feedback from others before submitting our final
version will greatly improve both our submissions and scores.
This is not merely a trick that students can use to improve their learning
and grades in this class. We all depend on our friends and co-workers to help
us do our best (or the right thing) on anything that matters.
Share of Project Work
The quantification of individual contributions is an inexact process.
The most obvious unit of contribution might be hours worked, tho
reported hours often seem poorly correlated to results obtained.
None the less, team members generally have a pretty good sense of who
is working how hard and contributing how much value.
At the end of each project, each member of each team should (privately)
submit their own assessment of how the overall effort/contributions
were divided between the various project activities and team members.
Ideally this might be csv export from a spreadsheet like:
| activity | % tot | Balder | Osirus | Algernon |
| management | 15% | 50% | 30% | 20% |
| research | 25% | | 75% | 25% |
| report #1 | 10% | 10% | 75% | 15% |
| prototyping | 35% | 25% | 15% | 65% |
| final report | 15% | 50% | 25% | 25% |
| |
|
|
|
| | 22% | 37% | 35% |
(where the bottom row is a sumproduct of the second column and the per-person columns)
These submissions will be kept confidential, and averaged together to get a sense
of the individual contributions to each team's efforts.
Management Grading
The team will be graded on how effectively they managed themselves
and the work.
- Perform the work according to the plan.
We will determine when a deliverable was completed by
looking at the names and dates for the commits.
- Monitor progress and detect problems.
Monitoring plans should be included in your
project plan. Status should be reviewed regularly
(e.g. daily) with minutes promptly checked in to github.
- Reasonably adjust the plan in response to problems.
Detected problems and responses should be discussed
in your post-mortem, and reflected in revisions to
the plan.
In assigning the management grades we will review the commit history
(or Google Docs history) for your meeting minutes and work plan.
Please include the URLs (e.g. GitHub or Google Docs) for these files in
the final submission prologue for each post-mortem you submit.
| criterion | value |
| regular status checks (as verified by checked-in minutes) | 40% |
| plan (approach, assignments, schedule) kept up-to-date | 20% |
| problems promptly and reasonably addressed,
work performed according to (updated) plan | 40% |
Post-Mortem Analyses
Each project is a learning exercise, and one of the major ways
we learn is by analyzing past mistakes. You will, as a team,
review all aspects of each project. One of you will then
summarize that discussion into a post-mortem analysis report.
Like all good post-morti, this should be a safe activity ... where there
are no penalties discussing mistakes.
Your grade for all post mortem reports is not based on how
well you did in following the project processes, but what
you learned.
More specifically, the grade will be based on:
- 50% the extent to which you meaningfully discuss each of the required
activities (e.g. there should be some mention of the processes that
led to ther creation of each deliverable).
- 20% your identification and examination of the important incidents.
- 30% the extent to which you are able to derive and articulate useful lessons
(and good future advice) from those experiences.
Note that if you make no mistakes or learned no lessons, you will not be able
earn the points for identifying and discussing them.
Fortunately, no teams have ever yet found it necessary
to deliberately make mistakes in order to have something to analyze. :-)
When your Post-Mortem Anslysis is ready for submission, prefix
it with a standard submission prologue that includes
the primary author and GitHub URLs for:
- the Post-Mortem Analysis
- your (up-to-date) plan
- your status meeting minutes
Collaboration and Citation
This is a team project, but different individuals will have primary
responsibility for different processes or work products (or different
parts of a single work product or process). Each team will be working
on a different type of product. You are free to talk your team members
(and for that matter other teams) about the processes you are following.
You may review your work products with your own team members, and revise
them based on their feedback ... but ...
- If you are the primary author of a work-product, you must
cite the source of text you did not write (if it is more
than a sentence), or any information that did not originate
within your team or from your interviews.
- You will be doing research to develop your product definition and
requirements. I expect that many of the ideas for your product
will come from this research. Cite all of your sources for each
work product, and explain how each source contributed to your work
products.
- You may not share any of your work products (other than as required
for reviews) with members of other teams.
(Last Updated: "Apr 2 2021")