Lab Setup
This document will walk you through all the steps you need to set up a working environment for all labs in CS 159. You may also wish to reuse this environment for your final project as well.
Note that this documentation is written with the assumption that you are working on the course server, which is the recommended approach. If you prefer to work on your own computer, we provide brief notes at the bottom of this document regarding what additional steps you might need to follow, but we do not "officially" support this option. In particular, CS 159 makes use of a collection of software packages whose behavior can sometimed differ across different versions, hardware, and operating systems in unpredictable ways. Consequently, while we will try our best, the course staff cannot guarantee support for technical issues you may encounter on any environment other than the course server.
Part 1: Connecting to the CS 159 server
Note: this part of the documentation is largely modeled after the documentation for accessing the CS 70 server. If you still remember and/or have notes on how you did that, that knowledge should largely be transferrable here, with the only difference being the server URL.
First-time login
You should have received an email that contains your username for the server and a temporary password. If you have not received that email, let us know immediately!
If you are trying to connect from off-campus you'll need to use a VPN to connect to the server.
Open a terminal to get a command-line prompt (on your computer, or inside Visual Studio Code) and connect to chrysanthemum.cs.hmc.edu with the command
ssh <username>@chrysanthemum.cs.hmc.edu
where <username> is replaced by your actual username as listed in the email. It will ask for your old password (i.e. the temporary password you were given) and then ask you to pick a new password. Then it will disconnect you immediately.
Note: For security reasons, as you are typing your password, it will appear "invisible"; not even the familiar dots or stars will appear. So it might look like your keyboard is not working, but rest assured it is working as intended!
Important: Pick a secure password. Bad actors constantly scan all computers connected to the internet and try to log in with hundreds or thousands of plausible usernames and passwords. If you pick a weak password then there's a high probability that the server will be hacked and become unusable for everyone, even though this isn't a particularly "important" computer.
Log in and configure Git
Run the same command ssh <username>@chrysanthemum.cs.hmc.edu and log in with your new password. You should now find yourself in a terminal environment with the prompt <username>@chrysanthemum indicating that you are on the server. You can further verify by trying out the following commands:
hostname: should say that the machine where this command is run ischrysanthemum.pwd: should say that you are currently in your personal directory/home/<username>.ls: should show the contents of your home directory, which will probably be empty.
While you are logged in, run the following two commands to configure git:
git config --global user.name "Your name here"git config --global user.email "Your email address here"(important: make sure to use the email address associated with whatever GitHub account you wish to use for this class!)
where you put your own name and email address in the quotes.
If you don't get an error message, everything worked! If anything went wrong, please contact course staff immediately for assistance.
Finally, you can end your remote session by running the command exit.
Log in to the server using VS Code
You are perfectly free to access the server purely by terminal (using the above ssh commands) if you wish, but I imagine most of you will be more comfortable using VS Code since that's what you've done in most of your core and kernel CS courses. Here, we'll walk you through the process of connecting to the server directly in VS Code (again, this should be identical to the process you used for CS 70 or any other course that had its own server).
- Open VS Code on your computer (or a CS Lab computer). This gives you an editor for files on the hard drive of the computer you are using.
- In the bottom left corner of VSCode, there should be a blue button with a >< icon:
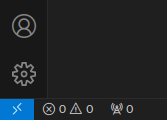
Click on this button! - This will bring up the following menu:
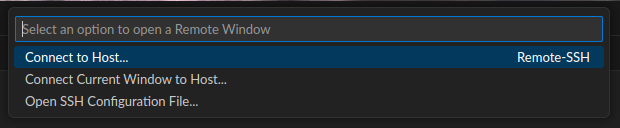
You may select either "Connect to Host" or "Connect Current Window to Host"; it’s entirely a matter of personal preference (if you’re new to this, I recommend the latter option). - In the resulting prompt, enter
<username>@chrysanthemum.cs.hmc.edu(where<username>is, once again, your actual username as listed in the email). - It will then ask you for your password. Enter the new password you set during the previous step.
- Now you should be connected! You can tell because the bottom left icon should have changed to say "SSH: chrysanthemum.cs.hmc.edu".
Part 2: Virtual environment setup
Now that you are connected to the server, the next step is to make sure you have all the necessary software and packages installed to run the lab code.
In CS 159, we primarily use conda as our system for dependency management. We use conda to maintain “virtual environments”: isolated Python installations with specific versions of packages installed. This has two main benefits: it ensures you won’t have conflicts with any other Python-related stuff you already have on your computer, and it promotes reproducibility by ensuring your code is always run with a fixed set of packages.
Conda is already installed on the server but must be configured for each individual user. To configure it for yourself, please open a terminal on the server (either inside VS Code or by directly SSH-ing in) and run the following command:
/opt/miniconda3/bin/conda init
When finished, it will instruct you to "close and re-open your current shell". This can be done by closing and re-opening VS Code (or, if you were using SSH on the terminal, exit-ing your SSH session and then SSH-ing back in). To verify that the configuration worked, you can run:
which conda
Which should print /opt/miniconda3/condabin/conda. If it prints anything else, then something went wrong with the configuration, and you should immediately ask the course staff for help!
So far, we have only ensured that you can use the conda command; we haven’t actually set up our virtual environment yet! To create your virtual environment, run the following command:
conda create -n cs159env python pip
Make sure you understand what this command is doing! Here’s a point-by-point breakdown:
conda create: this tellscondato create a new virtual environment-n cs159env: this lets us give a name to the virtual environment. The name is whatever text comes after the -n, so in this case, our environment is called "cs159env". (In fact, we could have named it anything we wanted, and you are free to pick a different name if you wish. That said, it's best practice to give your virtual environment a meaningful name explaining what it is used for, so don’t name it "mycoolenv" or anything like that!)python pip: this tellscondathat this environment will specifically be a python environment (you can also use conda to create environments for other programming languages!). Additionally, we are specifying that we want to usepipto install additional packages.
Now that we have our virtual environment prepared, we need to activate it. This is basically telling the computer we want to use the Python, and the Python packages, in that environment specifically (and not, say, any other Python version or packages we already had installed elsewhere). In the terminal, run the following command:
conda activate cs159env
To indicate that this was successful, the appearance of your command line should change to show "cs159env" before your username, like in the screenshot below (though, note this screenshot is from my summer research docs and therefore shows a different environment name):

Note: activating a virtual environment only affects the terminal in the current SSH session. Every time you start a new SSH session, you will need to run the above activation command again if you want to use this virtual environment!
Install necessary packages
Now that your virtual environment has been created and activated, there is just one last step: installing all the Python packages we will be using throughout labs in CS 159. In your terminal, make sure your virtual environment is active, and then run the following command:
pip install -r /courses/cs159/python/requirements.txt
This tells pip to read a list of packages from the file named /courses/cs159/python/requirements.txt (which the course staff has already prepared for you) and install them all. This will take a while and print out a bunch of progress bars.
You may want to do some quick testing to make sure that everything got installed correctly. In your terminal, open an interactive Python shell by running either python or ipython (depending on your personal preference), and try running the following code snippet. You don't need to fully understand what this code does yet, but it basically "looks like" the kind of code you'll be writing throughout the labs!
from spacy.lang.en import English
nlp_model = English() # this makes an English spaCy model
test_str = "1 picture is worth a thousand words"
spacy_output = nlp_model(test_str) # this uses the spaCy model to analyze test_str
for piece in spacy_output:
    if piece.like_num:
        print(piece)
This should print:
1
thousand
If it prints anything else, or if any part of the above snippet gives an error, something may have gone wrong and you should immediately contact course staff for assistance.
(As an aside: don't you think it's pretty neat how spaCy is able to identify different "ways" humans express numbers? I think that's pretty neat! If you want, maybe you can try playing around with different input strings to test the limits of this ability...)
You are now finished! Your virtual environment has been set up with all the necessary software and packages, and you can use it for all subsequent labs (and your final project). Remember to always activate the virtual environment before starting work on any lab!
(OPTIONAL) Brief notes about using your own computer
As stated above, we strongly recommend working on the server, and that is the only environment for which the course staff can commit to providing technical support. However, if you still prefer to work on your own computer, here's a quick rundown of what you'll need to do:
- Even if you don't plan to use the server, you should still go through the account setup steps listed in Part 1. This is so that you can connect to the server to download necessary files to your computer.
- You will need to install conda on your computer (if you don't already have it). This can get a bit confusing since conda is part of the larger Anaconda Project, which offers many different "editions" of their software that you can install. Most editions are overkill for what you'll need in CS 159, so I recommend installing the "miniconda" edition, which is the same one we have on the server. Installation instructions can be found here.
- You will also need to make sure you have the
requirements.txtfile that we use to tell pip what packages to install. As noted above, this file is located on the server at/courses/cs159/python/requirements.txt. You can use thescptool to download the file. Open a terminal on your computer (NOT a remote SSH to the server) and run:scp <username>@chrysanthemum.cs.hmc.edu:/courses/cs159/python/requirements.txt <path to file>/requirements.txt, where<username>is your server username and<path to file>is the full path to some directory on your computer (e.g.,~/Downloads). Note that if you are using Windows, you may need to separately installscp. - Once you have
condainstalled and therequirements.txtfile downloaded, you can proceed with the steps listed in Part 2 to set up your virtual environment.
IMPORTANT: Throughout the labs, we will often be working with text datasets. These datasets are already provided for you on the server, but if you are working on your own computer, you will need to download the datasets to your computer (you can again use scp for this). Note that the datasets can be quite large, which is another reason we strongly recommend working on the server (that way you can avoid large downloads). If working on your own computer, it is very likely that you will have to change some file paths in the provided code or instructions (since those paths all point to locations on the server). But when you submit your code, we may need to run your code on the server. Therefore, when submitting, you must make sure to change all paths back to their original/default values!
(When logged in, completion status appears here.)