Lab 5: Two Ways to Draw: Plotter Python and piq
In this course we build a compiler for piq, a small drawing language for a pen plotter. The compiler translates a piq program into a Python program made of just five low-level plotter commands. In this lab you'll use both languages and compare them: first the target language, raw plotter Python, then the source language, piq — looking at the Python the compiler makes from piq programs, and extending a drawing using piq's loops and procedures. Both parts draw the same stick person, so you can see how much work each language takes.
You don't need a plotter. Every drawing is saved as a preview picture (PNG). About 50 minutes in all.
Objectives
- Run and modify low-level plotter-Python programs built from five primitive commands.
- Run, read, and extend programs in
piq, a small drawing language that compiles to that Python. - Compare compiler-generated Python to hand-written Python for the same drawing.
- See firsthand what a small language and its compiler buy you over programming directly against the low-level target.
How you'll get the starter code
The starter code is a small public repository, hmc-cs-131-fa-2026/piq-lab, containing everything for both parts of this lab. On the course server, clone it directly — no need to make your own copy first:
cd cs131
git clone https://github.com/hmc-cs-131-fa-2026/piq-lab.git
cd piq-lab
Run every command below from this piq-lab folder.
See Connecting to the Server with VS Code if you haven't gotten to a terminal on the server yet.
Gradescope
As you work, keep notes in answers.md — its headings match the corresponding Gradescope questions below. When you're done, paste your answers into the Lab 05 assignment on Gradescope and upload the pictures and code files it asks for. The What to Submit table at the end of this page lists everything.
Boxes labeled Gradescope question need a submitted answer. Boxes labeled Things to notice don't — they're just there to point your attention at something.
Setup
In this lab you'll use three tools, already installed on the server:
| Usage | What it does |
|---|---|
py2png <file.py> [-o <output.png>] |
Runs a plotter Python program on a pretend plotter and saves the drawing as a PNG picture (by default next to the .py, with the same name) |
piq2png <file.piq> [-o <output.png>] |
Compiles a piq program to Python (a .py next to it), then draws it as a PNG |
piq2py <file.piq> [-o <output.py>] |
Only compiles: writes the Python program, so you can read it |
Don't run these yet. We'll introduce them one at a time below, as you get to know the Python target language and piq.
To look at a PNG, open it in your editor (VS Code shows images), or copy it to your own computer.
Reading a Preview
Here is the preview of the simple-shapes program you'll run in Part 1:
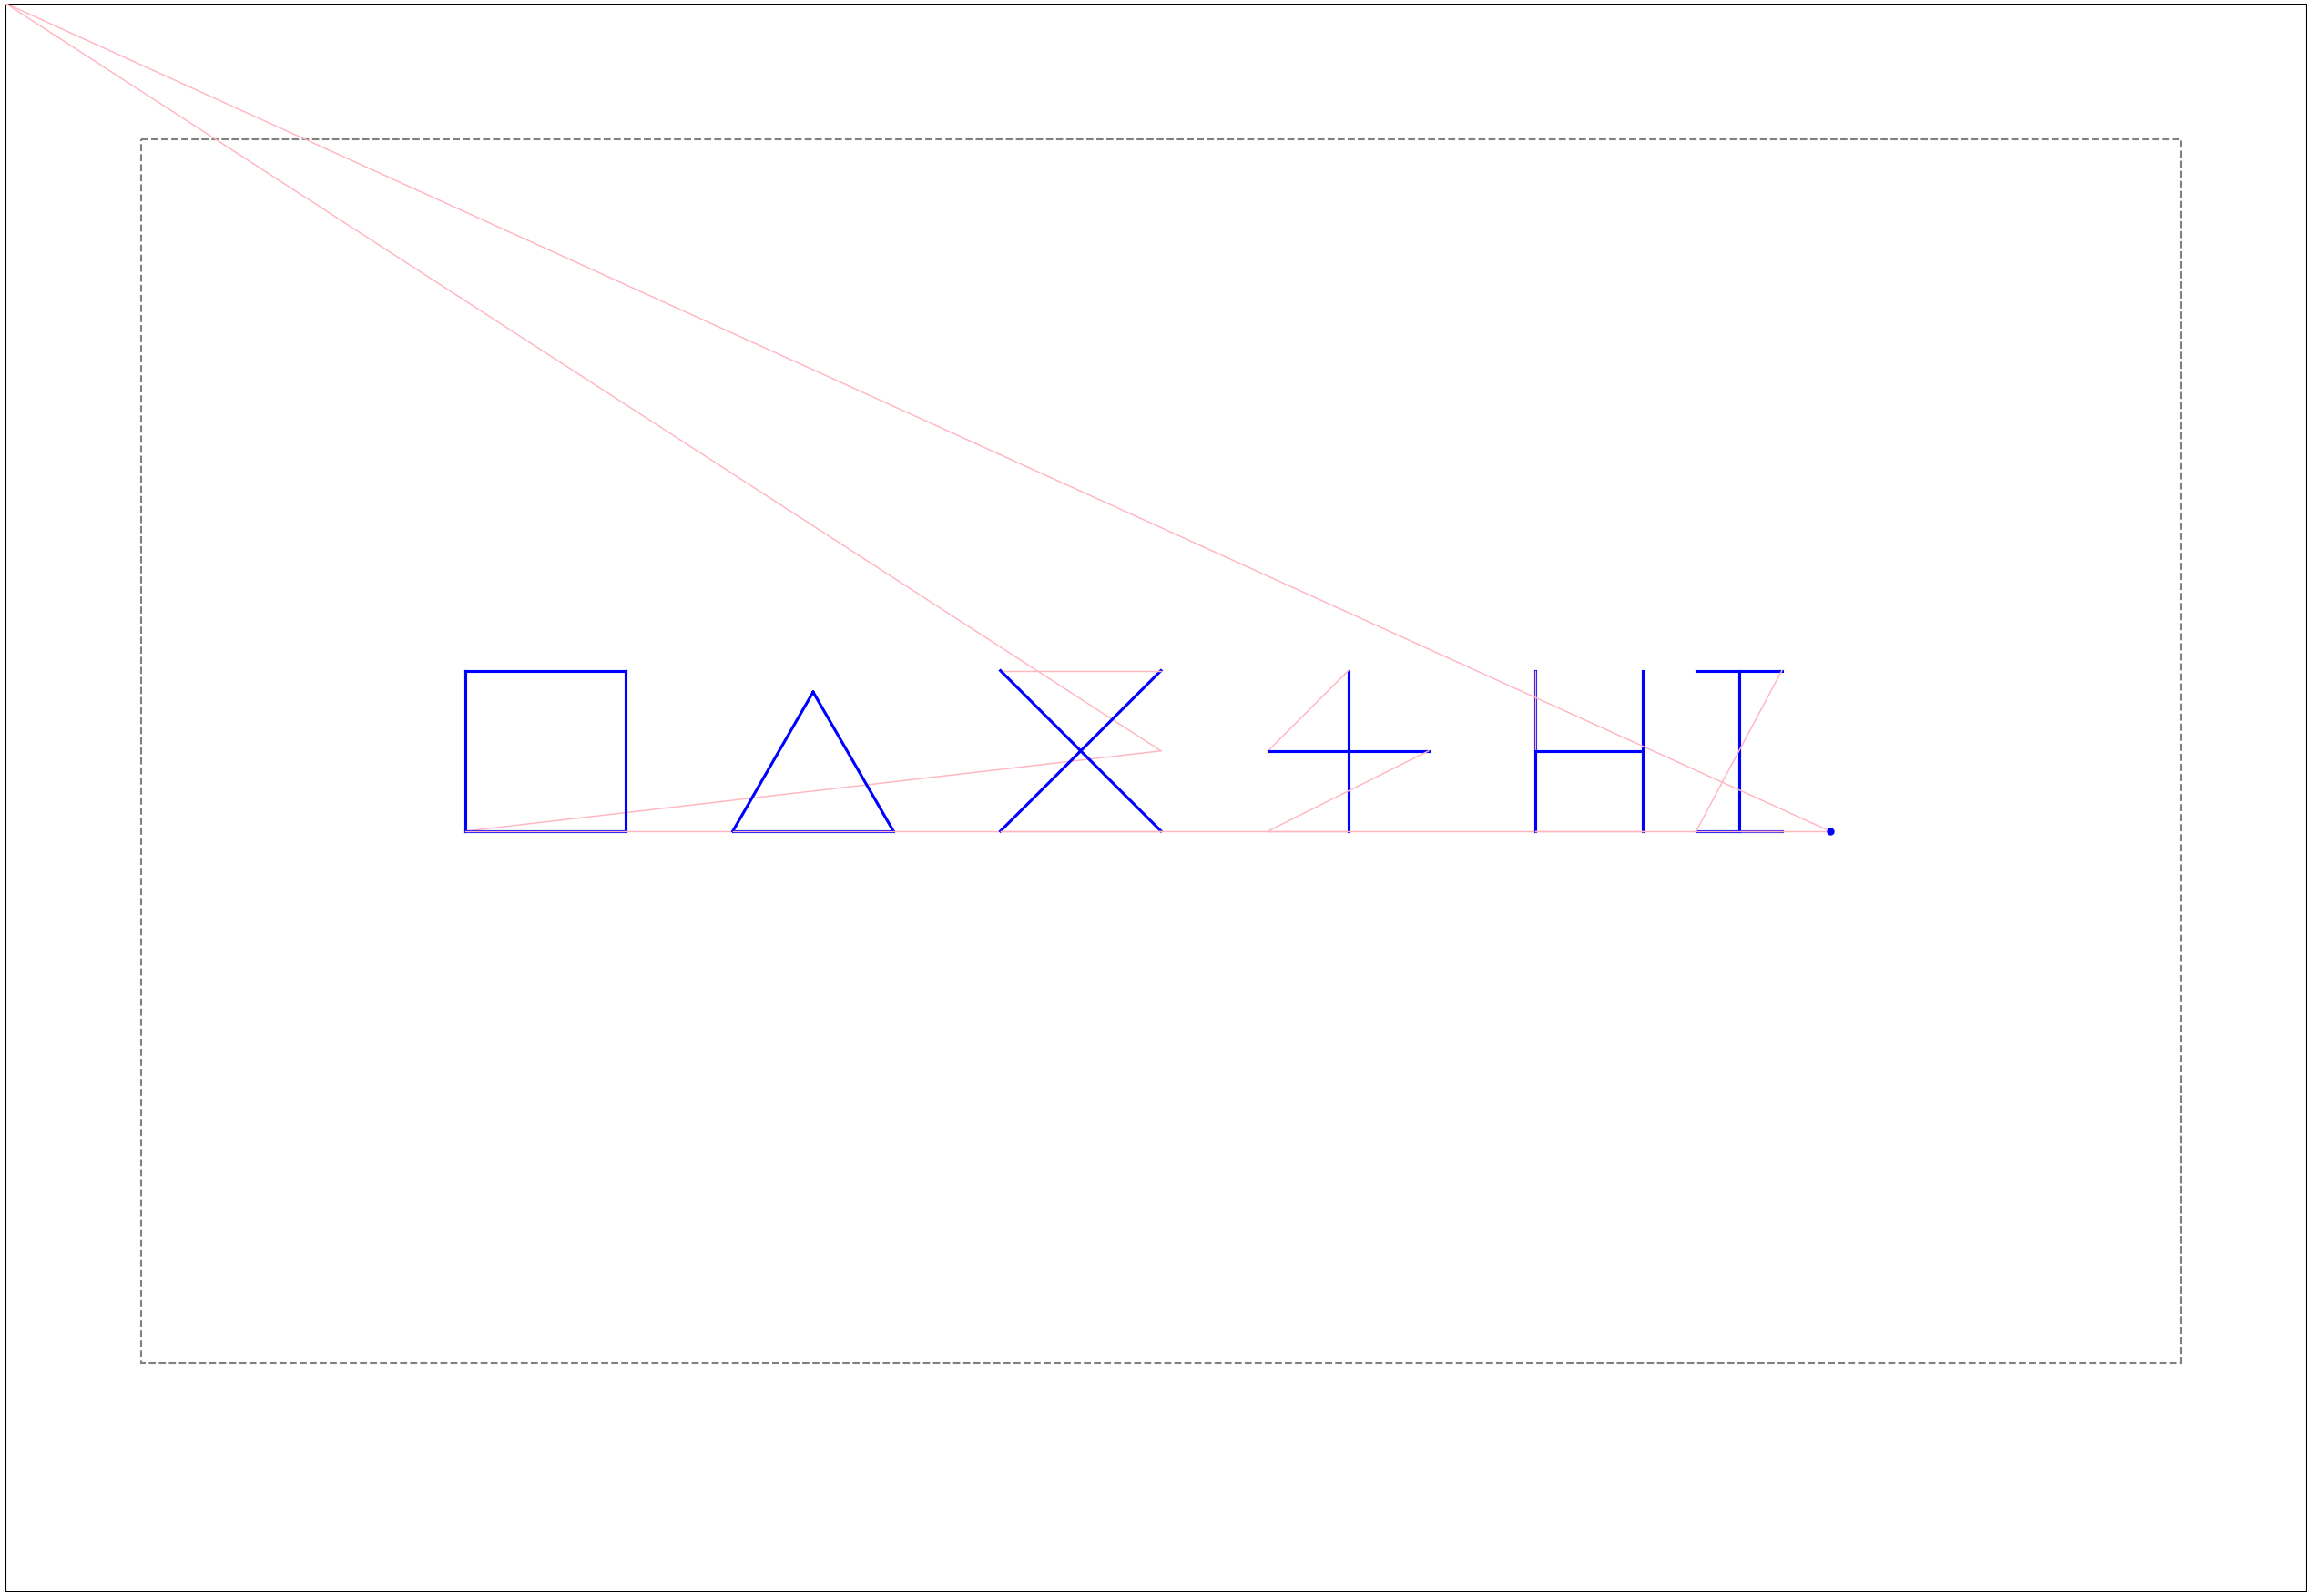
In the preview, blue paths are motions with the pen down — the marks that would appear on paper. Pink paths show motion with the pen up: the plotter still has to physically travel along these paths, but it doesn't draw them.
- The two long pink lines to the top-left corner are the trip from the plotter's home corner to the centre of the paper at the start, and back home at the end.
- The grey dashed box is the safe area: the pen must stay at least 1 inch from the edges of the 17 × 11 inch paper. Anything that goes outside it is drawn in red, with a warning. The real plotter refuses to draw such a drawing at all.
- Units are millimetres. x points right, y points up. Drawing starts at the centre of the paper. The safe area is 190.5 mm left/right and 114.3 mm up/down of the centre.
Part 1: The Target Language (about 20 minutes)
The Five Commands
| Command | Meaning |
|---|---|
start() |
Start a drawing. The pen is up, at the centre of the paper. |
pen_up() |
Lift the pen. Moves after this do not draw. |
pen_down() |
Lower the pen. Moves after this do draw. |
move_rel(dx, dy) |
Move dx mm right and dy mm up from where the pen is now. Negative numbers go left or down. |
finish() |
Check that the whole drawing stays in the safe area, draw it, then lift the pen and go home. |
A dot is pen_down() followed straight away by pen_up().
Every program has the same outline. The commands between start() and finish() are only recorded; finish() checks the whole drawing and then draws it. The try/finally makes sure finish() runs even if the drawing code crashes (then the real plotter draws nothing, and a preview shows what was recorded):
import sys
sys.path.insert(0, "/opt/piq/python")     # where the plotter commands live on the server
from plotter_runtime import start, finish, pen_up, pen_down, move_rel

start()
try:
    ...drawing commands...
finally:
    finish()
Moves are relative. move_rel(10, 0) means "10 mm to the right of wherever the pen is now," not "go to x = 10." So every line's effect depends on all the lines before it. The programs below use one rule to stay sane: each shape starts and ends at its anchor point, with the pen up.
Before each change below, write your prediction in answers.md. Then run it and check. A wrong prediction that you then explain is worth as much as a right one.
1.1 Run It
Open part1/shapes.py and read it. Then run:
py2png part1/shapes.py
and open part1/shapes.png. You should see, left to right: a square, a triangle, an X, a plus sign, the letters "HI," and a dot.
Things to notice
- Skim
part1/shapes.pyand compare how manypen_down()calls you see with how many shapes appear in the preview. You don't need to count carefully — just notice how the shapes you see relate to the low-level pen operations that draw them. - Think about why drawing the X requires lifting the pen between its two diagonal strokes, while drawing the square doesn't require lifting the pen between its four sides.
1.2 One Number, Everywhere
In part1/shapes.py, change only the square's last stroke, move_rel(0.0, -30.0), to move_rel(0.0, -40.0).
- Predict first: what happens to the square? What happens to every shape after it?
- Run
py2png part1/shapes.pyagain and check. - Save this picture for Gradescope:
cp part1/shapes.png part1/shapes_1_2.png. Then change the line back to-30.0.
Gradescope: 1.2 — one number, everywhere
Submit your prediction, what actually happened, and in one or two sentences, why one number changed the whole rest of the drawing.
1.3 Bug Hunt: The Missing pen_up()
In the X block, delete the pen_up() on the line right after the first diagonal.
- Predict first: what extra line will appear, and exactly where?
- Run it and check. Then put the
pen_up()back.
Gradescope: 1.3 — bug hunt
Submit your prediction and what happened.
A missing pen_up() is the most common plotter bug. On paper, that line can't be erased!
1.4 Dress Up the Stick Person
Run py2png part1/stick_person.py and look at the picture. Read the code: each body part starts and ends at the neck (the middle of the bottom of the head).
Work in a copy, so the original stays unchanged for Part 2:
cp part1/stick_person.py part1/dressed.py
In part1/dressed.py, fill in the two sections marked # === TODO (1.4) at the end of the drawing (just above finally:), using only the five commands. The same instructions are in the comments there:
- A hat: a brim, a 40 mm horizontal line lying on top of the head, centred, plus a crown, a 20 mm wide, 15 mm tall box standing on the middle of the brim.
- A face: two eyes (dots) 20 mm above the neck and 7 mm to either side, and a mouth, a 12 mm horizontal line 8 mm above the neck, centred.
Here the top of the head is 30 mm above the neck, and the head is 30 mm wide.
Tips: sketch it first, and label each move with its (dx, dy). Do the hat, run py2png part1/dressed.py, then do the face, and run it again. End each part back at the neck with the pen up. Comments (# …) help.
Gradescope: 1.4 — dress up the stick person
Submit how many lines of code you added (don't count blank lines or comments), plus part1/dressed.py and part1/dressed.png.
Part 2: piq (about 25 minutes)
piq in One Table
| piq | Meaning |
|---|---|
square 30 |
A 30 × 30 square centred on the pen. The pen ends where it started. |
rectangle 40 20 |
A 40 wide, 20 tall rectangle, centred on the pen |
circle 15 |
A circle of radius 15, centred on the pen |
dot |
A dot where the pen is |
line right 20 |
Draw a line 20 mm to the right. The pen ends at the far end. Directions: left, right, up, down. |
move up 10 |
Travel 10 mm up without drawing |
x = 20 |
Set a variable. Expressions use + - * / and parentheses, e.g. square x * 2 + 5. |
for i from 1 to 4 { … } |
Repeat the block with i = 1, 2, 3, 4 |
define box(s) { … } |
Define a procedure with a parameter s (definitions go first in the file) |
box(20) |
Call it |
Also worth knowing:
- The pen is up between statements, and all shapes return to where they started.
- Lines and moves can only go left, right, up, or down. piq has no diagonal lines.
- Spacing and newlines don't matter, and piq has no comments.
- If a program has a mistake,
piq2pngprints an error with a line and column number, likeerror: part2/shapes.piq:3:3 -- …. The problem is at that spot or just before it. No picture is made.
2.1 Run It, and Look at What the Compiler Made
Read part2/shapes.piq, then run:
piq2png part2/shapes.piq
and open part2/shapes.png. Then open the Python file the compiler wrote, part2/shapes.py. It uses the same five commands you used in Part 1.
Gradescope: 2.1a — the right-most shape
Which lines of shapes.piq drew the right-most shape?
Gradescope: 2.1b — the for loop
Find the for loop in shapes.piq, then look through shapes.py. Is there a Python for loop that corresponds to it? What did the compiler do instead?
Gradescope: 2.1c — counting lines
Count the lines of the piq program and of the Python the compiler made from it:
wc -l part2/shapes.piq part2/shapes.py
How many lines does each file have?
Gradescope: 2.1d — finding the circle
Find the Python for circle 15. Hint: it comes right after the rectangle's code. Look for move_rel(15.0, 0.0) (the pen travels out to the circle's edge), then pen_down(), then a long run of move_rel calls with long decimal numbers. Approximately how many move_rel(...) calls draw this one circle?
2.2 Predict, Then Change
Make each change, predict what will happen, and run piq2png part2/shapes.piq after each.
Things to notice
- (a) Change the loop to
for i from 1 to 8 {and its body tosquare i * 5. Run it and notice what the right-most shape looks like now. Is it bigger, smaller, or the same size overall? Make sure you can see why. - (b) In the
flowerprocedure, change the last line,move up 3 * r, tomove up 2 * r. Run it and notice which shapes move, and in which direction. Confirm for yourself which question from Part 1 this is like. Afterwards, change it back.
2.3 The Same Stick Person, in piq
Run piq2png part2/stick_person.piq. It draws exactly the same stick person as part1/stick_person.py (the original, without your hat and face).
First count the lines of each file:
wc -l part1/stick_person.py part2/stick_person.piq part2/stick_person.py
(The hand-written Python has lots of comments, so the plotter commands are a fairer comparison.) The compiled part2/stick_person.py and the hand-written part1/stick_person.py draw the same picture. Count the plotter commands in each:
grep -cE 'pen_up|pen_down|move_rel' part1/stick_person.py part2/stick_person.py
Gradescope: 2.3a — comparing the versions
Which one uses more plotter commands? Look inside the compiled file: where do the extra commands come from?
2.4 Extend the Drawing
Now you'll grow the piq stick person into a scene. Work in a copy, part2/scene.piq:
cp part2/stick_person.piq part2/scene.piq
and run piq2png part2/scene.piq often to preview your work.
2.4a Finish the person. Give the person a face and a hat. They're up to you, though reusing the sizes from 1.4 makes the comparison in Reflection question 1 fairer. Preview it.
Gradescope: 2.4a — finishing the person
Submit how many lines of piq you added for the hat and face.
2.4b Make it a procedure. Define a procedure with no parameters:
define person() {
    ...
}
Move the code that draws one person, including your hat and face, into the body of person(). Then, below the definition, call it:
person()
and preview it: you should see the same single person as before.
Procedure definitions must appear first
Procedure definitions must appear at the top of a piq program, before the ordinary statements that run the drawing. A define after a statement is an error.
2.4c A crowd. Use a for loop to draw several people side by side. Inside the loop: call person(), then move some distance to the right, then the loop repeats. Hints:
- A procedure is only easy to repeat if it ends where it started.
stick_person.piqstarts by moving up to the neck and ends at the neck. What must you add or remove so thatperson()ends where it began? - About 90 mm between people keeps their arms and hats from overlapping.
- Move left before the loop, so the group ends up centred. If anything turns red in the preview, it's outside the safe area.
Preview the group of people.
2.4d Add one thing of your own. Add at least one other thing to the drawing besides the people. That's the only requirement. It can be anything reasonable, for example:
- a sun or clouds;
- the ground, a tree, or a house;
- circles or other decoration, or a pattern;
- another style of person, or another repeated object;
- something completely different.
You may use another procedure, a loop, variables, arithmetic, shapes, or lines, but none of these is required. Experiment! Just keep everything inside the safe area (no red in the preview).
Gradescope: 2.4 — the scene
Submit part2/scene.piq and part2/scene.png.
Reflection (5 minutes)
Gradescope: reflection
Answer each of the following in 2–4 sentences:
- For the hat and face, how many lines did Python (1.4) and piq (2.4a) each take? Why was the difference small there, but huge for the crowd and for circles? Use numbers from
wc -l, or fromgrep -c move_rel, to support your answer. - Name two things the piq compiler does for you that you had to do by hand in Part 1.
- What's one feature you would add to piq, and why? (For example: diagonal lines, comments, a "go back to the start" command, colours, …)
What to Submit
Upload to Gradescope:
| Question | Submit |
|---|---|
| 1.2–1.3 | Your answers, and part1/shapes_1_2.png |
| 1.4 | Your line count, part1/dressed.py, and part1/dressed.png |
| 2.1a–2.1d | Your answers |
| 2.3a | Your answer |
| 2.4 | Your line count (2.4a), part2/scene.piq, and part2/scene.png |
| Reflection | Your answers |
Optional: on the real plotter
Your instructor may plot some of the best scenes on the real NextDraw plotter. The Python the compiler writes is exactly what drives it, so a drawing that looks right in the preview is what ends up on paper, pink travel and all.